WEEK 1: Choose fabric, prep templates
Welcome to the first week of the first ever Omega Quiltalong! This week we are going to discuss versions/sizes, fabric selection, and cutting out your paper templates. Below is the full six-week schedule to give you an idea of where we’re headed.
WEEK 1 (Jan 30): Fabric selection, prep templates
WEEK 2 (Feb 6): Cut strips, strip piece all units
WEEK 3 (Feb 13): Cut & piece all Block A (Cut all and piece half of Block C, Improv only)
WEEK 4 (Feb 20): Cut & piece all Block B (Piece half of Block C, Improv only)
WEEK 5 (Feb 27): Pressing, trimming & catch-up week
WEEK 6 (Mar 6): Assembly
Before we dive in, let’s talk about prizes! This week, our prize sponsors are Domesticity, a fabric shop & sewing studio in Baltimore, MD; and Ponderosa Creative, maker of rad thread gloss with amazing scents. One lucky person will win a $50 gift card to Domesticity and a set of 2 thread glosses (winner’s scent choice) from Ponderosa. All participants can also use discount codes generously provided by Domesticity, Ponderosa Creative, Autumn Moon Quilting, Stitch Lab Quilting, Thai Charm LLC, and Wild Phil Quilting to save some money on fabric/supplies/longarm quilting. Be sure to scroll to the end for all the prize/discount info!
Here we go!
WHICH LAYOUT?
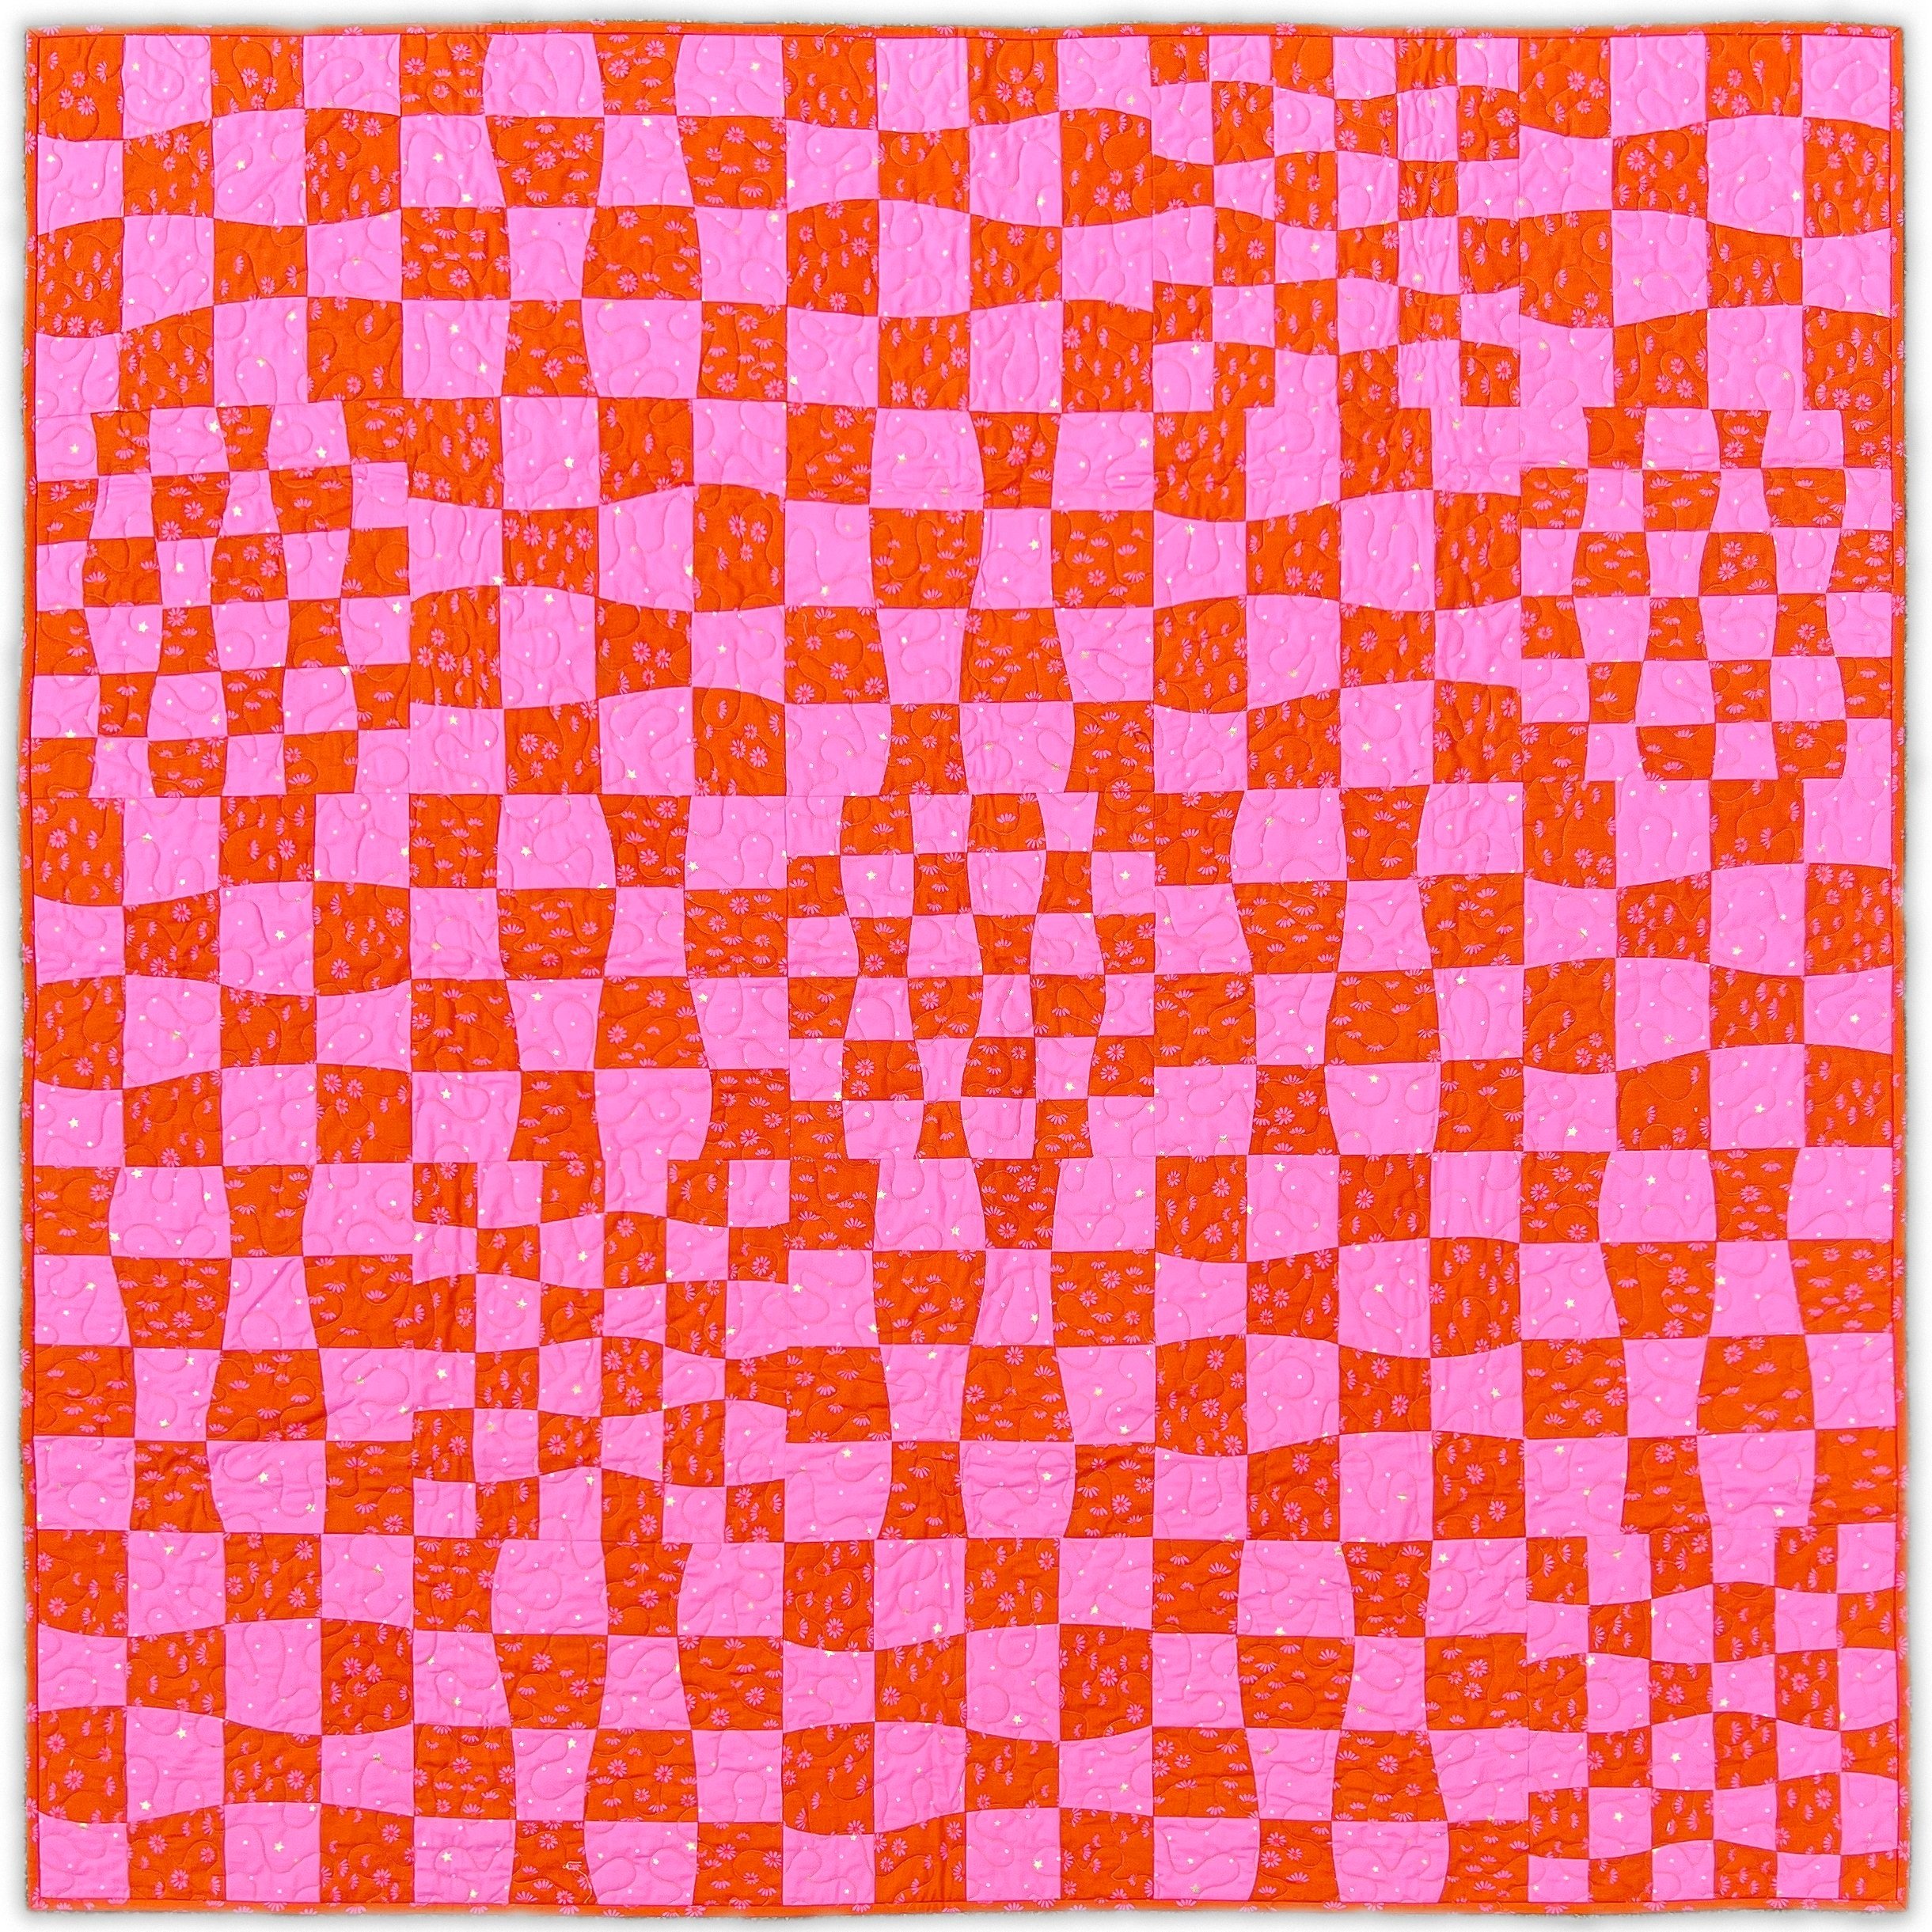
Before you really get going on your Omega, you have a few decisions to make. The first is if you would prefer to make the Basic or the Improv layout. In the Basic layout, all the squares (or, more accurately, wavy-wiggly-squareish-shapes) in the checkerboard are the same size. In the Improv layout, some of the blocks are swapped for “disruptor blocks” with squares of a slightly smaller size. This disruption creates an improv-inspired look. Note that there is no actual improv* in this layout, the name just reflects how the finished quilt feels visually.
BASIC LAYOUT
IMPROV LAYOUT
Both the Improv and Basic layouts have the same yardage requirements, so if you want to kick the can down the road, you really don’t have to decide until next week when we start cutting. (But then you will need to decide.)
*“Improv” refers to a type of quilting done without intention, where no pattern is followed and fabric is cut and sewn together in an improvised way. It is characterized by wonky angles, organic shapes and seams that may or may not line up.
WHICH SIZE?
For a fun and stress-free quiltalong, I would recommend making a Large Throw size (60” x 72”) or smaller. This would include the Baby (48” x 48”) and Small Throw (60” x 60”). These sizes demand a not-unreasonable amount of attention that will hopefully fit easily around all the other responsibilities in your schedule, especially when stretched over 6 weeks.
However, I am never one to discourage anyone from a good thrill sew, so if you’re feeling adventurous or really just craving some self-imposed high stakes, go for a larger size. I’ve been working a Two Color version, Improv layout KING SIZE(!) version myself, and although I started it several weeks ago and will probably not finish it by the end of the quiltalong, you might see a photo pop up here from time to time! I’m using Moda Fabrics Bella Solids in Maize and Bronze for a monochrome mustardy grellow look and I’m VERY EXCITED.
If this is your first time making a quilt and you intend to finish it yourself (basting, quilting, binding), I always recommend making a smaller size. In this case, the Baby size is a little bit of a misnomer, as 48” x 48” is plenty large enough for a cozy lap quilt to drape over a chair or couch. The Small Throw is a little bigger but still pretty manageable. Yes, you may have your sights set on Queen, but when you are pushing all those layers of fabric and batting through the tiny throat of your domestic machine, you will be glad that you did a practice (read: bonus, read: someone’s future gift) Baby sized version first.
FABRIC SELECTION
And now for the hardest and most fun part - picking fabric! First, decide if you want to make the Two Color Version or the Scrappy Version. The Two Color version is pretty self explanatory - there are two fabrics, Fabric 1 (darker) and Fabric 2 (lighter). In the Scrappy version, you can choose to go full Scrappy, with a mixture of darker fabrics for Fabric 1, and a mixture of lighter fabrics for Fabric 2. You can also do a Scrappy version with a mixture of fabrics for either Fabric 1 (dark) or Fabric 2 (light), then follow the Two Color yardage for the other fabric, so that you have one consistent background fabric in your quilt. This is what I’m going to do for most of the tutorial photos - I’m doing dark blue yardage for Fabric 1, and a mix of lighter blue FQs for Fabric 2 (see first photo of post). Example photos are below for all three options.
TWO COLOR VERSION, IMPROV LAYOUT, SMALL THROW SIZE
FULL SCRAPPY VERSION, BASIC LAYOUT, SMALL THROW SIZE
SCRAPPY + BACKGROUND VERSION, BASIC LAYOUT, BABY SIZE
A note about contrast - in all versions/layouts, Fabric 1 should be darker than Fabric 2. Technically, you could swap them and get a quilt that looks the same, just inverted, but then all the illustrations and instructions you are trying to follow would also be inverted, and no one needs to do that to themselves.
The degree of contrast, however, is up to you. The higher the contrast - meaning, the greater difference in value between Fabric 1 fabric(s) and Fabric 2 fabric(s) - the more pronounced your checkerboard will be. That being said, Omega looks really great in lower contrast fabrics too. This is more of a personal preference than anything else.
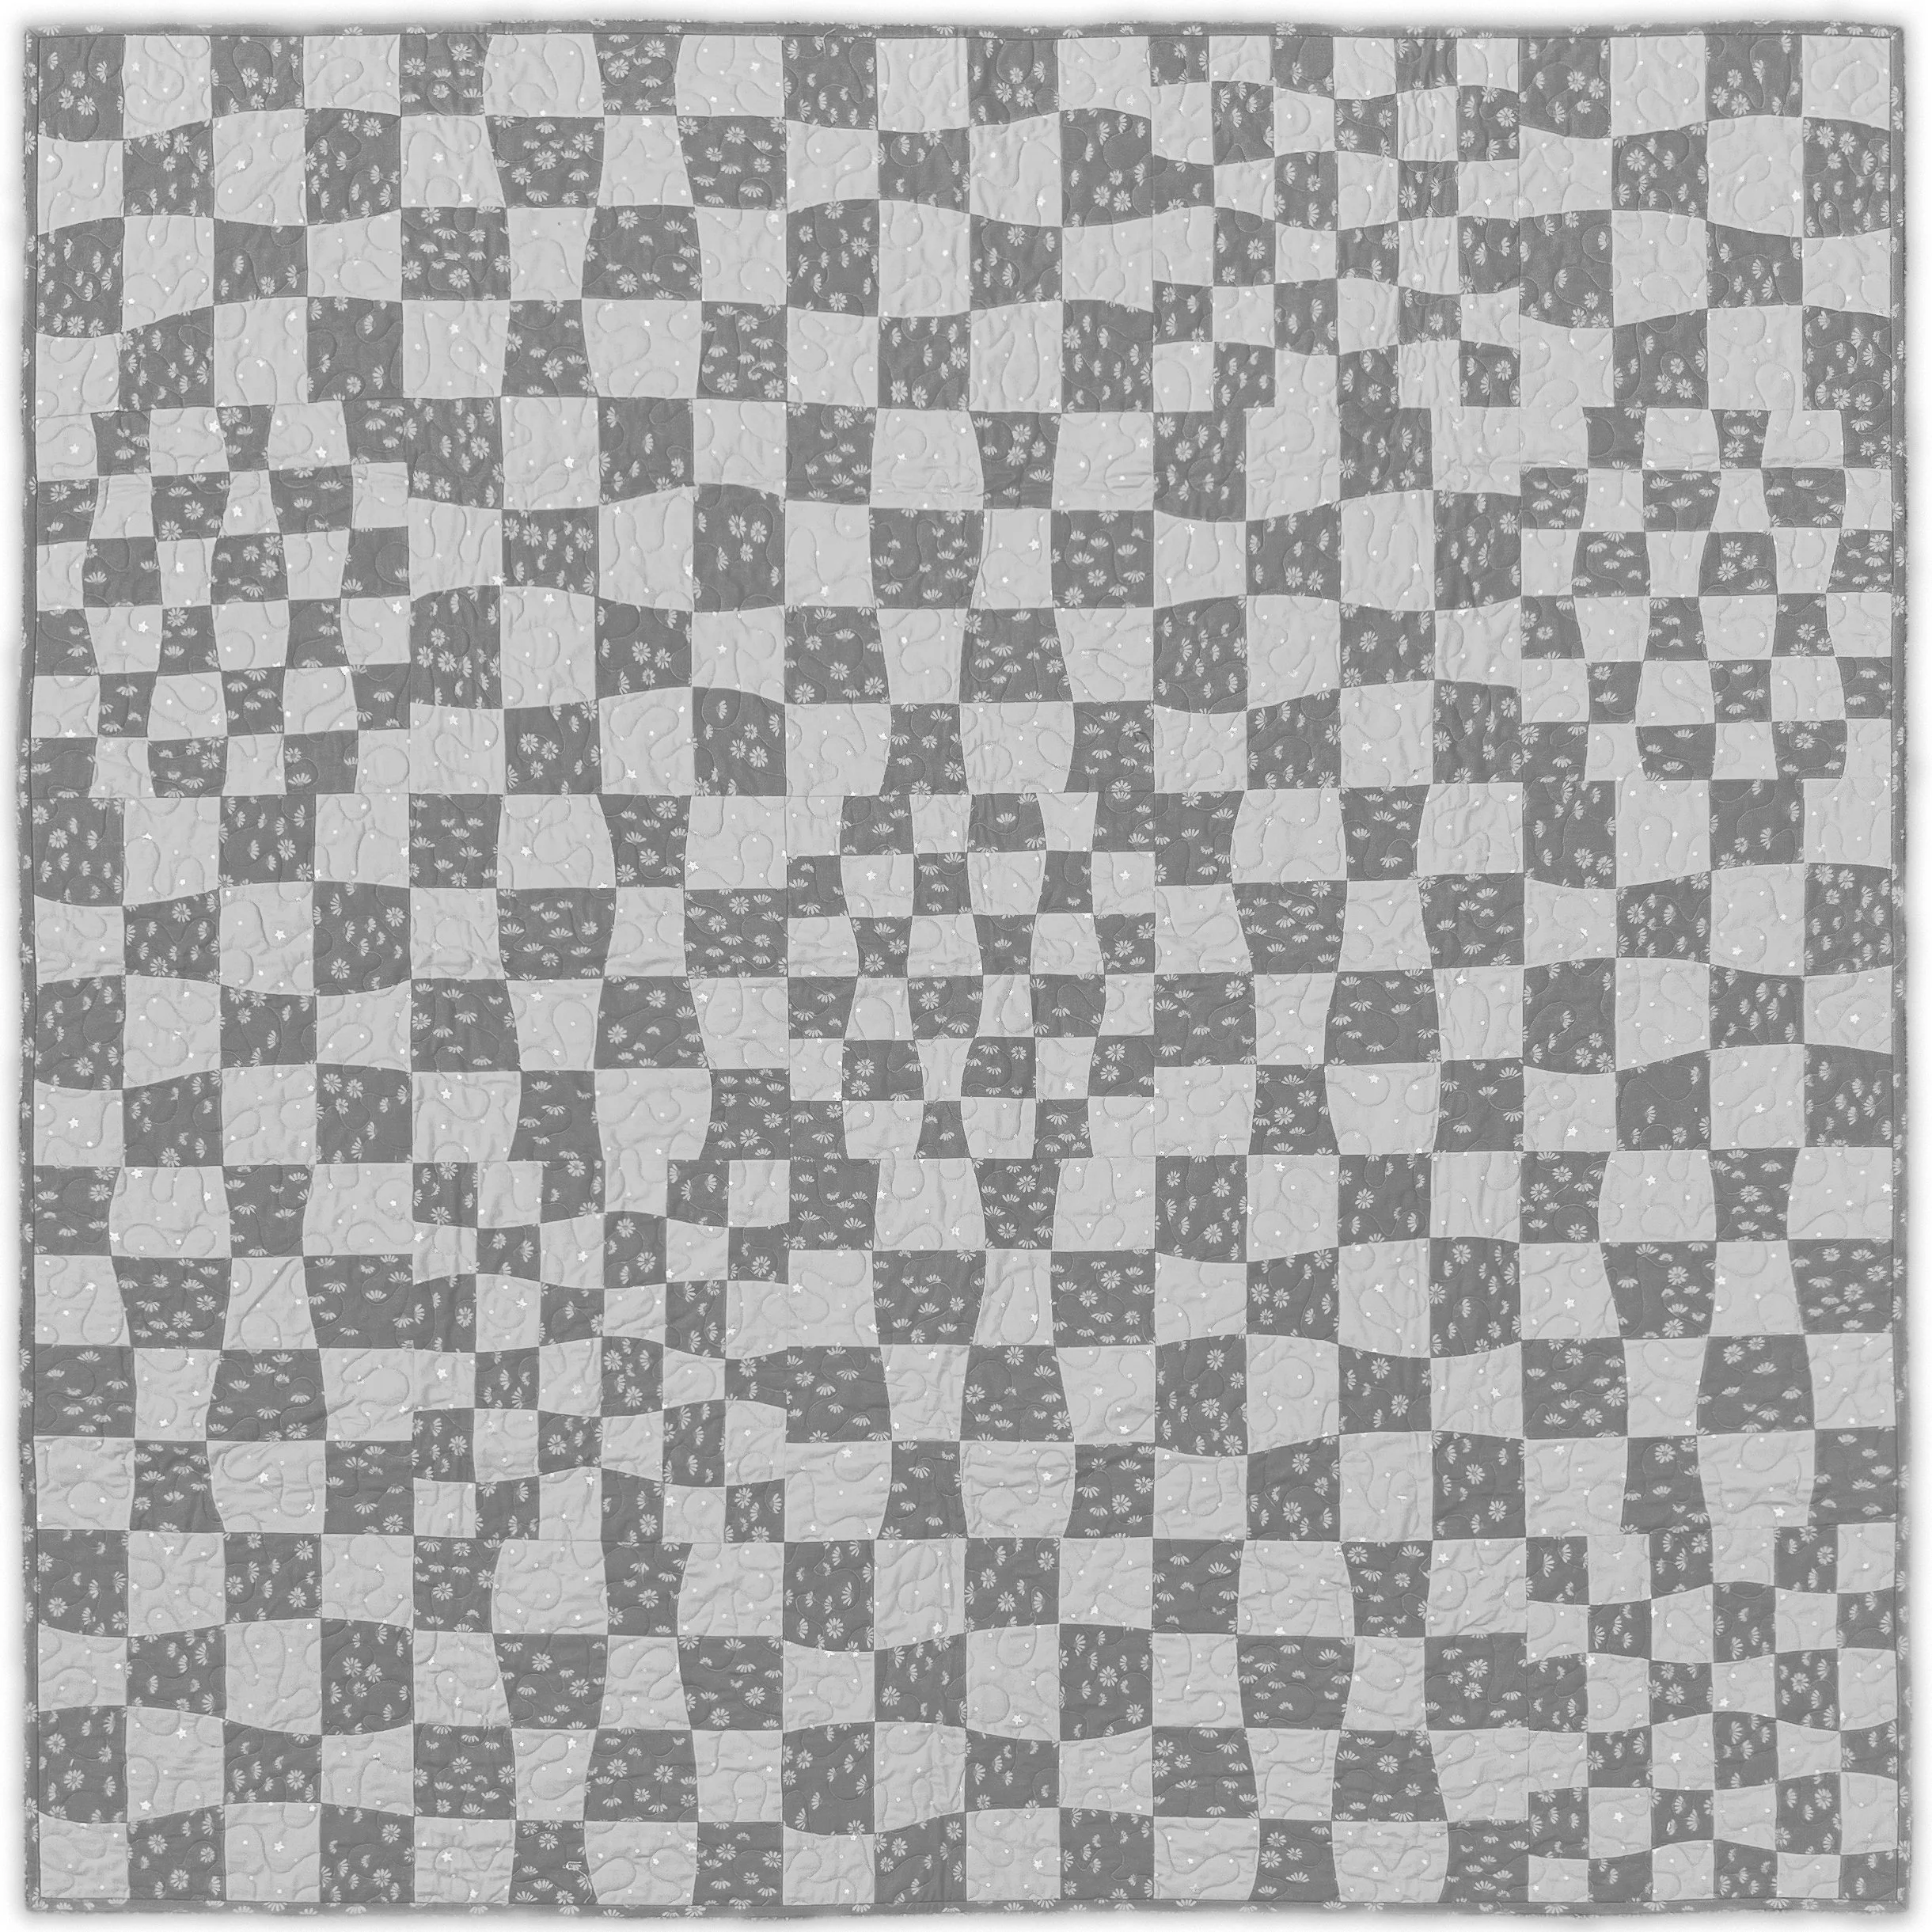
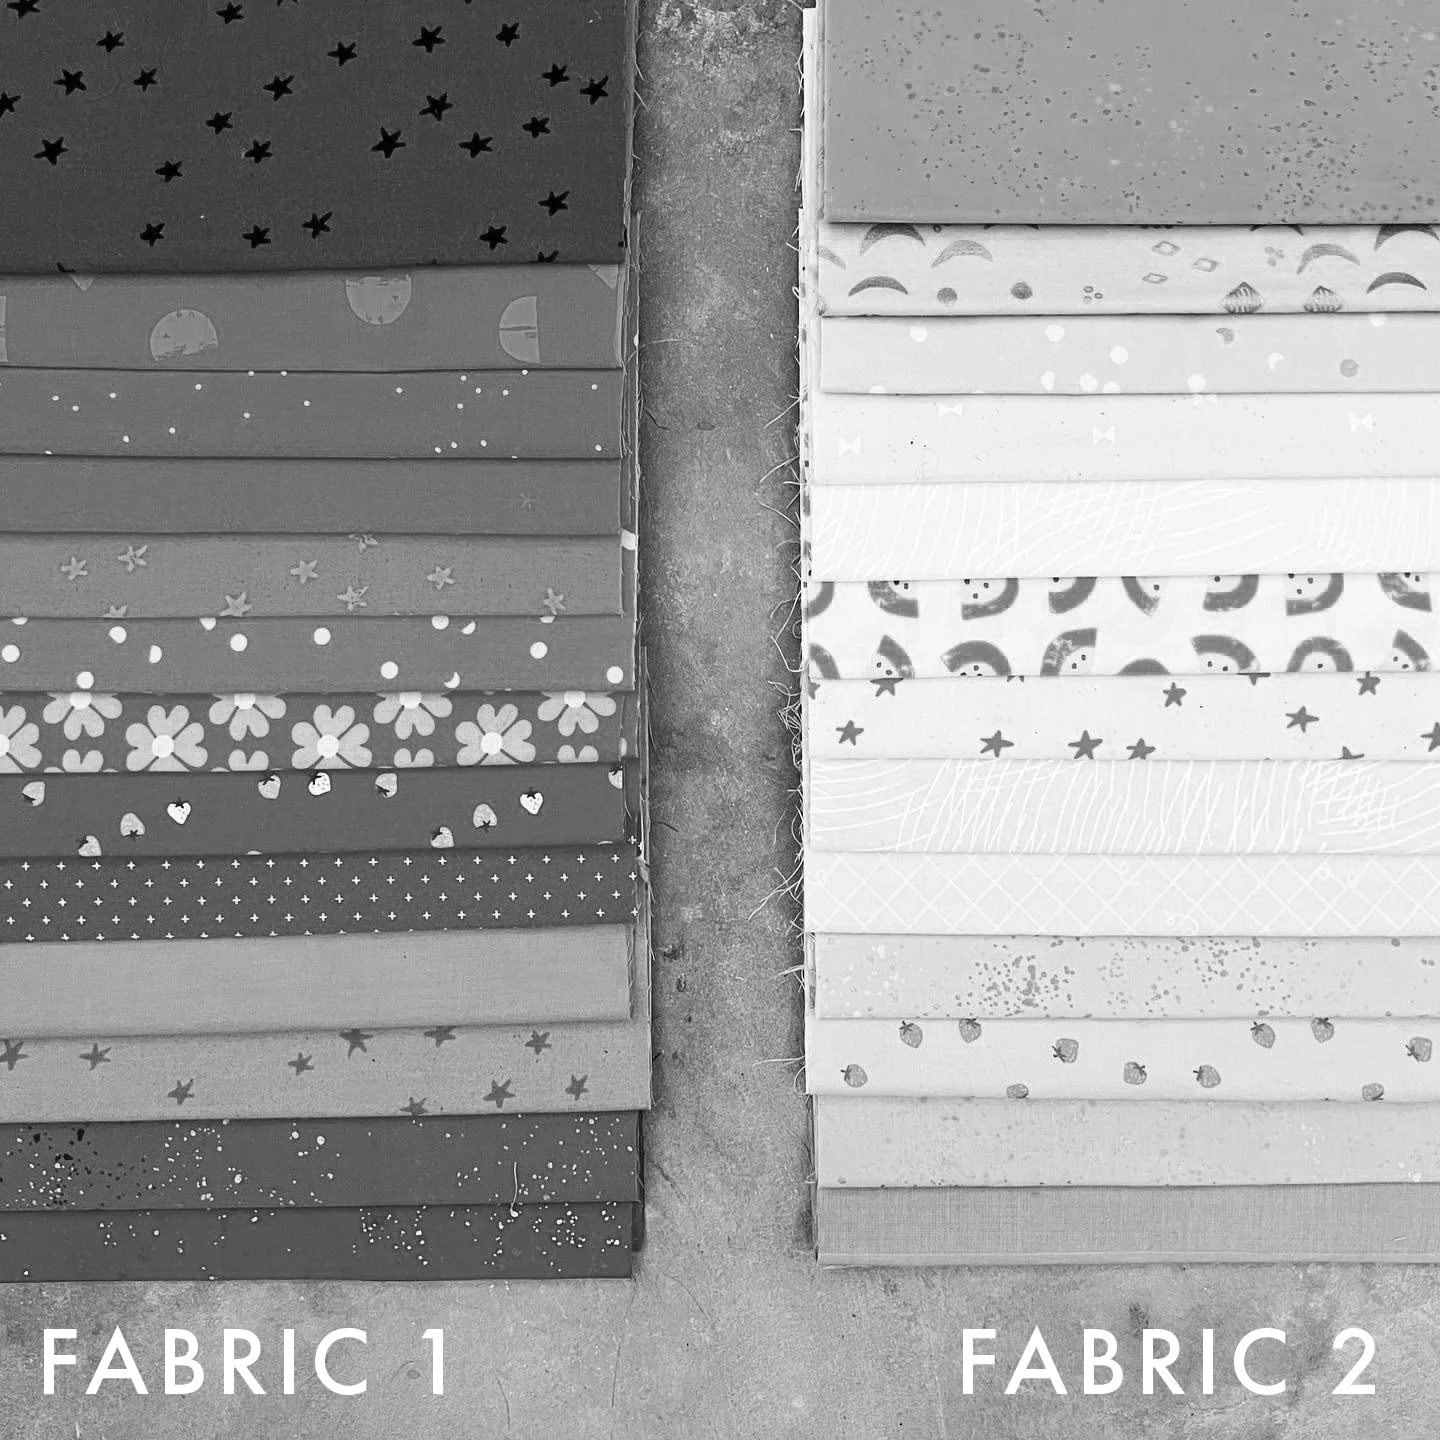
For the scrappy version, keeping your Fabrics 1 & 2 relatively darker and lighter is a little more important, because there’s going to be more happening visually. Sometimes it can be a little tricky to decide if a fabric belongs in the dark or light pile. When in doubt, grab your phone and take a picture with a black and white filter. Of course everyone’s phones are a little different, but there should be a setting right in your camera. (On my iPhone, I swipe up on “PHOTO”, tap the three-circle icon all the way on the right, and pick the “mono” filter.) You can also edit a photo you’ve already taken and desaturate it all the way. By taking out the color you can easily see the relative values of all your fabrics to make sure they’re more or less in the right categories. (Make sure you are just removing the color and not applying an artistic/stylistic B&W filter, which might also edit the contrast.) You might be surprised by what you see - that mustard yellow really is darker than that medium blue. Check out the quilt photos below with all the color removed to see the contrast level.
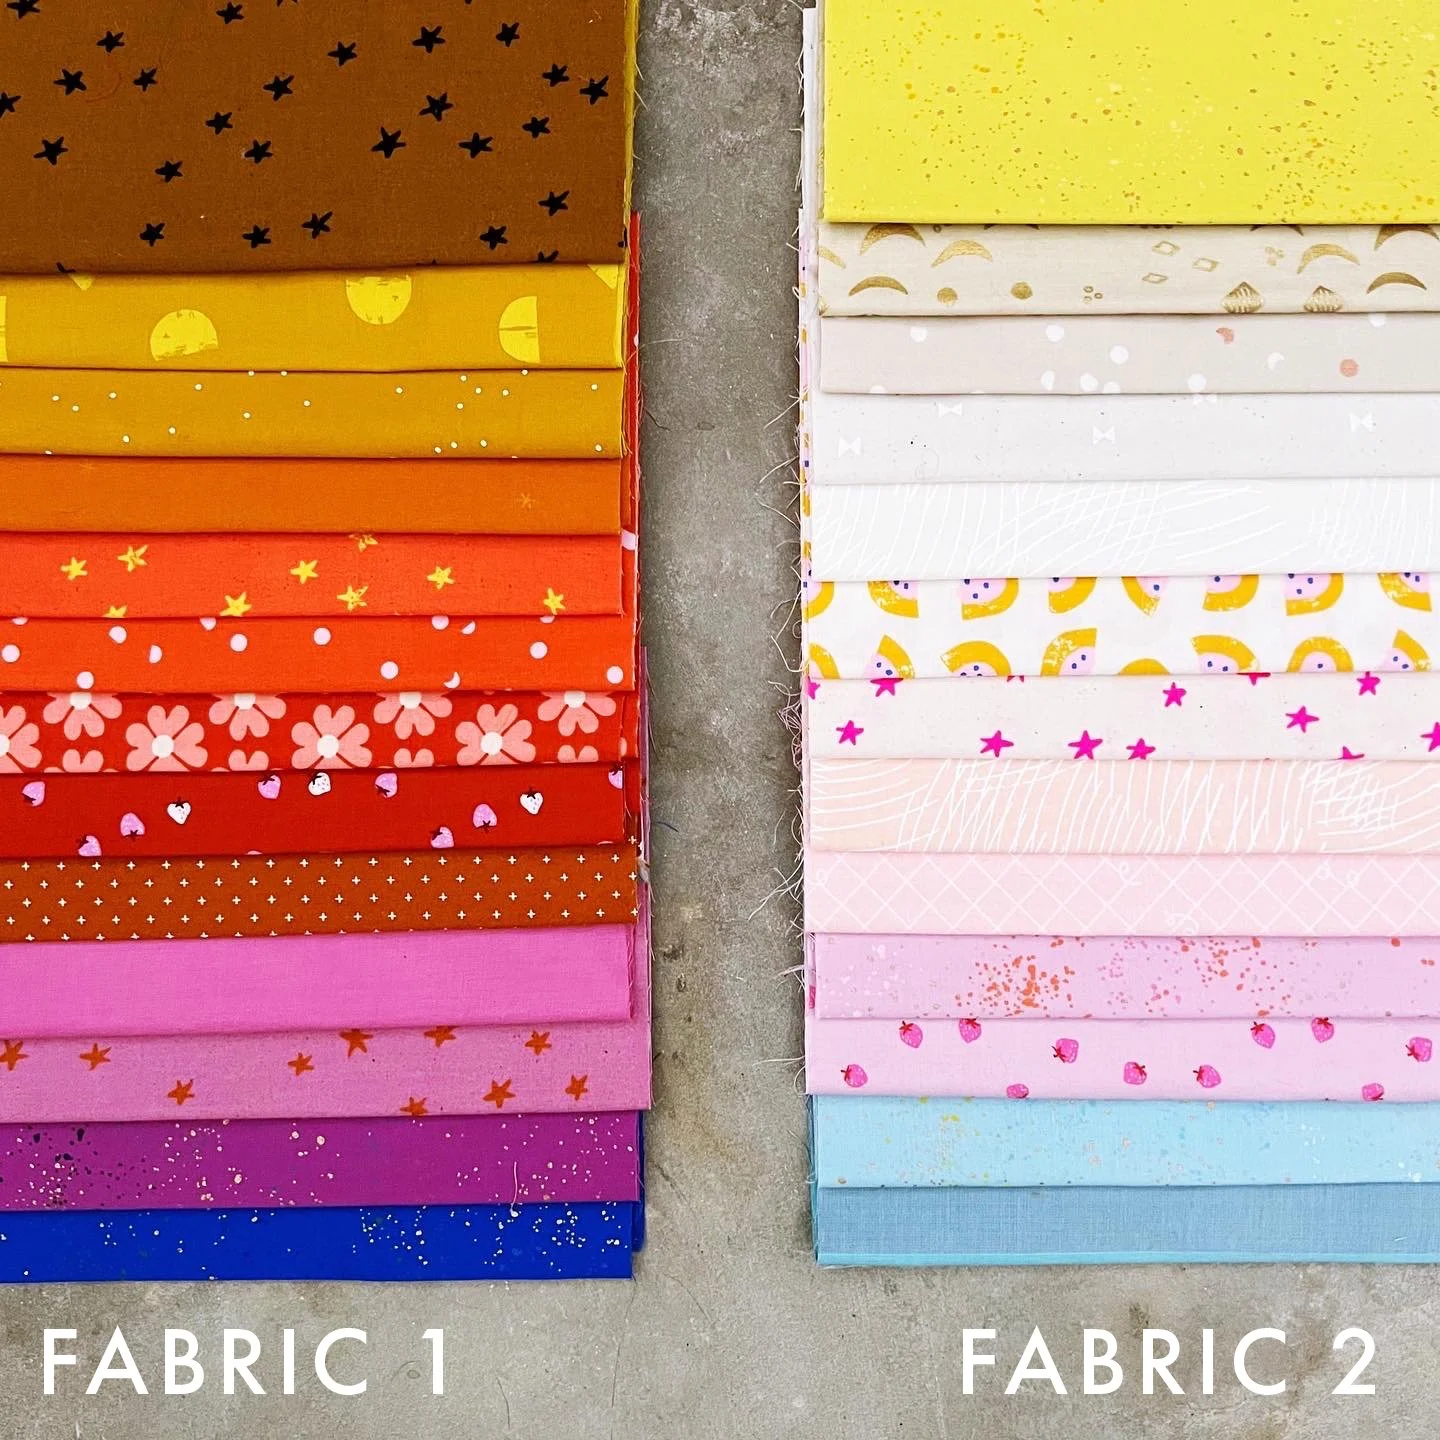
One caveat to all this contrast business is considering color. Below are the fabrics I used to make the full Scrappy version shown just above. In grayscale, you can see that the top fabric in the Fabric 2 stack is actually the same value as a few of the lighter fabrics in the Fabric 1 stack. However, that fabric is a bright, almost highlighter yellow color, and the only like it in the entire quilt. It’s definitely going to pop when mixed with all those other fabrics. I figured that would work in the Fabric 2 stack (and honestly I did not have a lot of low volume prints to fill that column haha) and I think it does!
This color caveat comes even more into play in the Two Color version. Since there are only two colors, you will see a checkerboard pretty much no matter what. Below is a theoretical Two Color version out of the highlighter yellow and the solid orchid fabric (4th up from bottom on left) in the photo above. Even though they are nearly the same value, the difference in color still reads as a checkerboard in the finished quilt. I actually would never guess these colors are almost the same value - isn’t the grayscale image surprising?
In the scrappy version, what happens if you don’t separate the scrappy lights and darks very well? Nothing terrible! The closer in relativity the contrast gets, the more the finished quilt leans away from checkerboard and towards all over patchwork. There is nothing wrong with this, it’s just something to be aware of. In my favorite Omega I’ve made so far (below, more info here), which I made just for me, I chose fabric for sentimental and color family reasons. While there are definitely light lights and dark darks, there are some in the middle that could have probably gone in either category. You likely don’t think “checkerboard” when you look at this quilt, you are probably more apt to think “scrappy patchwork,” but that doesn’t make it wrong, just different. And there is still enough contrast and color variation overall to keep those wavy seams visible and prevent the squares from merging into big visual chunks.
Can you use prints? Yes you can, definitely! I do not, however, recommend using large scale, high contrast prints (like 2” black and white polka dots or something), as these might obscure the wavy edges of the checkerboard you are about to spend the next six weeks painstakingly creating. Check out #omegaquilt on Instagram to see how people have used prints in Omega so far. Whatever prints you do use, they will most likely end up going in different directions in the finished quilt, as there is a long sequence of cascading steps ahead of you that you would need to reverse engineer to get a directional print to end up the same direction everywhere in the finished quilt. Maybe that will happen by chance, but this isn’t the quilt to try to plan that all out.
There is a really awesome (and free!) quilt mockup tool here that includes Omega, and all of my other patterns. Plug in fabrics and see what they’ll look like! This is a great way to audition fabrics from your own stash.
Once you’ve made all your fabric decisions, use the yardage chart on page 2 (booklet and PDF) to make sure you have the correct quantities of fabric for your size.
If you are having trouble making fabric decisions, or there are simply too many, remember that some fabric shops are selling kits! Sit back, relax, and bask in the benefit of someone else having made all the choices. You can find a list of kit stockists in this post.
TRULY SCRAPPY VERSION
Omega includes instructions for making a truly scrappy Omega, meaning every single square comes from an individual piece (instead of the speedier strip piecing method). You can find these instructions on pages 18-19 of the printed booklet and page 11 of the PDF. While this is a great way to use up scraps, it is also a much more time consuming way to make an Omega. You can certainly go in this direction if your heart is telling you to, but keep in mind that you will need to spend a lot more time in Week 2 cutting and sewing your units. After that, however, all the steps are pretty much the same.
You will still want to follow all the Fabric 1 and Fabric 2 fabric selection guidance above, and also still decide if you are making a Basic or Improv layout. How much fabric you need is a little more nebulous, since you are working from scraps. You can check the instructions (page 18-19 print, 11 PDF) to see how many 3.5” x 4.5” and 2.5” x 3.5” pieces of Fabric 1 & 2 you’ll be cutting next week to get an idea. If you have time this week, get started cutting your Fabric 1 and 2 pieces (everyone else will start next week).
Because of the more time consuming cutting, you might get a little behind over the course of the quiltalong, which is totally fine, you can work at your own pace and still access all the posts after the quiltalong is over, just something to keep in mind!
SHOULD I PREWASH?
This is a common question and there are a lot of opinions on it. I personally almost never prewash fabric for quilting. In my many quilt years, I have only had fabric bleed twice - once a bargain navy solid from Joann, and once a printed nearly-solid red fabric in a quilt that I accidentally left sitting wet in the washer. My strategy is this: wash the finished quilt on cold, use multiple color catchers (like 4-5), remove it from the washer immediately, and immediately tumble dry low. The immediacy is important - if you leave a wet quilt sitting in a pile with saturated colors directly touch light colors, there’s a higher chance the ink or dye is going to transfer.
Some people prewash to get any fabric shrinkage out before sewing. Shrinkage is what gives a washed quilt that crinkle texture. I personally love this texture, so I don’t mind the shrinkage. Your batting is also going to shrink a little (unless it’s polyester), so unless you prewash that too (people do it!) you will still get some crinkle.
The only time I might consider prewashing - if you are making the Two Color version, and Fabric 1 is a bright red solid (or maybe navy or black), and Fabric 2 is a bright white solid, especially if it’s a fabric brand you haven’t used before, or is of dubious origin. As you quilt more, you can start to build a little knowledge of how different fabric brands behave in the wash. At the end of the day, do what makes you most comfortable! If that’s prewashing, then by all means prewash.
If you do prewash, wash and dry the fabric how you intend to wash the finished quilt, colors separated. After drying, give it all a good press and, if it’s yardage, refold it selvage-to-selvage on grain. To fold on grain, grab about a yards-worth of the fabric, holding the two selvages together. Hold the fabric up in the air, letting the folded edge hang down, and scoot the selvages back and forth parallel to each other until the fold edge is nice and flat. If the bottom fold edge is bunchy or, for lack of a better term, “weird looking,” the fabric is not folded on grain. Keep scooting until it is. Once on grain, continue folding the entire piece.
PREP YOUR TEMPLATES
Aside from picking fabric, your only other task for this week is to cut out your paper templates. Remember to use a separate pair of scissors to cut out the templates, not your fabric scissors.
PRINTED VERSION
Unfold your template sheet. Give it a light press with a warm, dry iron to get rid of the creases. Cut off the coloring templates along the right side and set aside (or use them to help visualize your Omega). If you’re making the Basic layout, cut out only the A/B templates 1, 2, 3, and 4. If you’re making the Improv layout, cut out all templates. When you cut, try to cut right on the line so that you’re preserving the line on the cut-out piece. This way you know later that you cut in the right spot. Tuck the templates in a safe spot (like back into the envelope) to be ready to use later.
PDF VERSION
Following the instructions on “MM.OMEGA.TiledTemplateInstructions.pdf” included in your pattern, open “MM.OMEGA.Templates.tiled.pdf”, then print out and tape together the templates you need. (Note that for Basic layout you only need pages 1-4 of the tiled template file, for Improv layout you’ll need all 8 pages). There is also a file ending in “largeformat.pdf” you can take to a copy shop and have printed in one piece on a large format printer if you prefer. The file is 22” x 34” meant to be printed on 24” x 36” paper. Either way you print, be sure the templates are printed at 100% scale - there is a 1” box on both files to measure to check print scale, and the templates themselves should all be 12.5” wide.
Once printed and assembled, cut out the templates. When you cut, try to cut right on the line so that you’re preserving the line on the cut-out piece. This way you know later that you cut in the right spot. Tuck the templates in a safe spot to be ready to use later. Remember that your PDF came with a printable envelope file you can print out and assemble. This is a great place to store your template pieces.
PRACTICE BLOCK
If you just can’t wait to get started on something, anything this week, you could make a practice block. Use the “Use Even Smaller Scraps” section of the instructions (pg 18-19 booklet/11 PDF) and raid your scrap bin to cut individual rectangles for one A/B block - that’s 8 dark and 8 light 3.5” x 4.5” pieces. There will be additional posts about how to cut out and sew the templates in coming weeks, so you’re working a teensy bit ahead, but I understand you might be excited and raring to go! This is totally optional and only if you want to.
CHECKLIST
As a review, here is your checklist for the week. See you back next week for cutting and strip piecing!
Choose layout (Basic or Improv)
Choose size (recommended: Baby, Small Throw, or Large Throw)
Choose version (Two Color, Full Scrappy, or Scrappy + background)
Make sure you have the fabric you need
Prep & cut out templates
PRIZE & DISCOUNT INFO
Now the good stuff! To enter to win the weekly prize, post a photo in your grid on Instagram this week using the hashtag #omegaqal. It can be a photo of your fabric pull, a photo of you introducing yourself, anything Omega related! One winner will be randomly selected from the hashtag to win a $50 gift card to Domesticity and two Ponderosa Thread Glosses. Post in your grid, not stories. Your profile must be public for the hashtag picker to see your photo. Open worldwide. You can post to enter multiple times but if you do they must be different photos (no spamming!). Post between 8am Jan 30 and 11:55pm Feb 5 (EST) to enter.
FABRIC/SUPPLIES DISCOUNTS
Everyone can get in on these discounts!
Domesticity: Use code OMEGAQAL for 15% off your purchase! Code valid through Sunday Feb 5 (so this week only).
Ponderosa Creative: Use code OMEGA for 20% off, and free shipping over $35! Discount applies to patterns and supplies. Code valid through Sunday Feb 19.
LONGARM QUILTING DISCOUNTS
These discounts are available throughout the whole quiltalong (and beyond). Dig out those languishing quilt tops and send them away to be finished, and make plans for your future Omega!
Autumn Moon Quilting: Use code OMEGA for 10% off longarm services. Code valid Jan 30 - Mar 5.
Stitch Lab Quilting: 20% off longarm quilting services (batting and binding separate). Use code OmegaQAL23 on booking form. Offer expires June 6, 2023.
Thai Charm LLC: All Omega quilts sent Jan 30 - April 12 will automatically get 25% discount. Participants just need to mention the quiltalong when they fill out the quilting form.
Wild Phil Quilting: 20% off edge to edge longarm quilting services on any Omega top. Use code Omega20 when submitting form. Offer valid through May 5, 2023.

