WEEK 3: Block A (and C for Improv)
Welcome back to Week 3 of the Omega Quiltalong! This week we are going to cut and sew the template pieces for all our Block A’s. Improv layout people are also going to cut all and sew half of their Block C’s. Don’t worry Improv layout people, you have fewer Block A’s to sew, so it kind of evens out.
Below is the full six-week schedule for a review. First two weeks checked off!
WEEK 1 (Jan 30): Fabric selection, prep templates
WEEK 2 (Feb 6): Cut strips, strip piece all units
WEEK 3 (Feb 13): Cut & piece all Block A (Cut all and piece half of Block C, Improv only)
WEEK 4 (Feb 20): Cut & piece all Block B (Piece half of Block C, Improv only)
WEEK 5 (Feb 27): Pressing, trimming & catch-up week
WEEK 6 (Mar 6): Assembly
Before we dive in, let’s talk about prizes. First, last week’s random winner was @the_seams_i_sew! Woo!
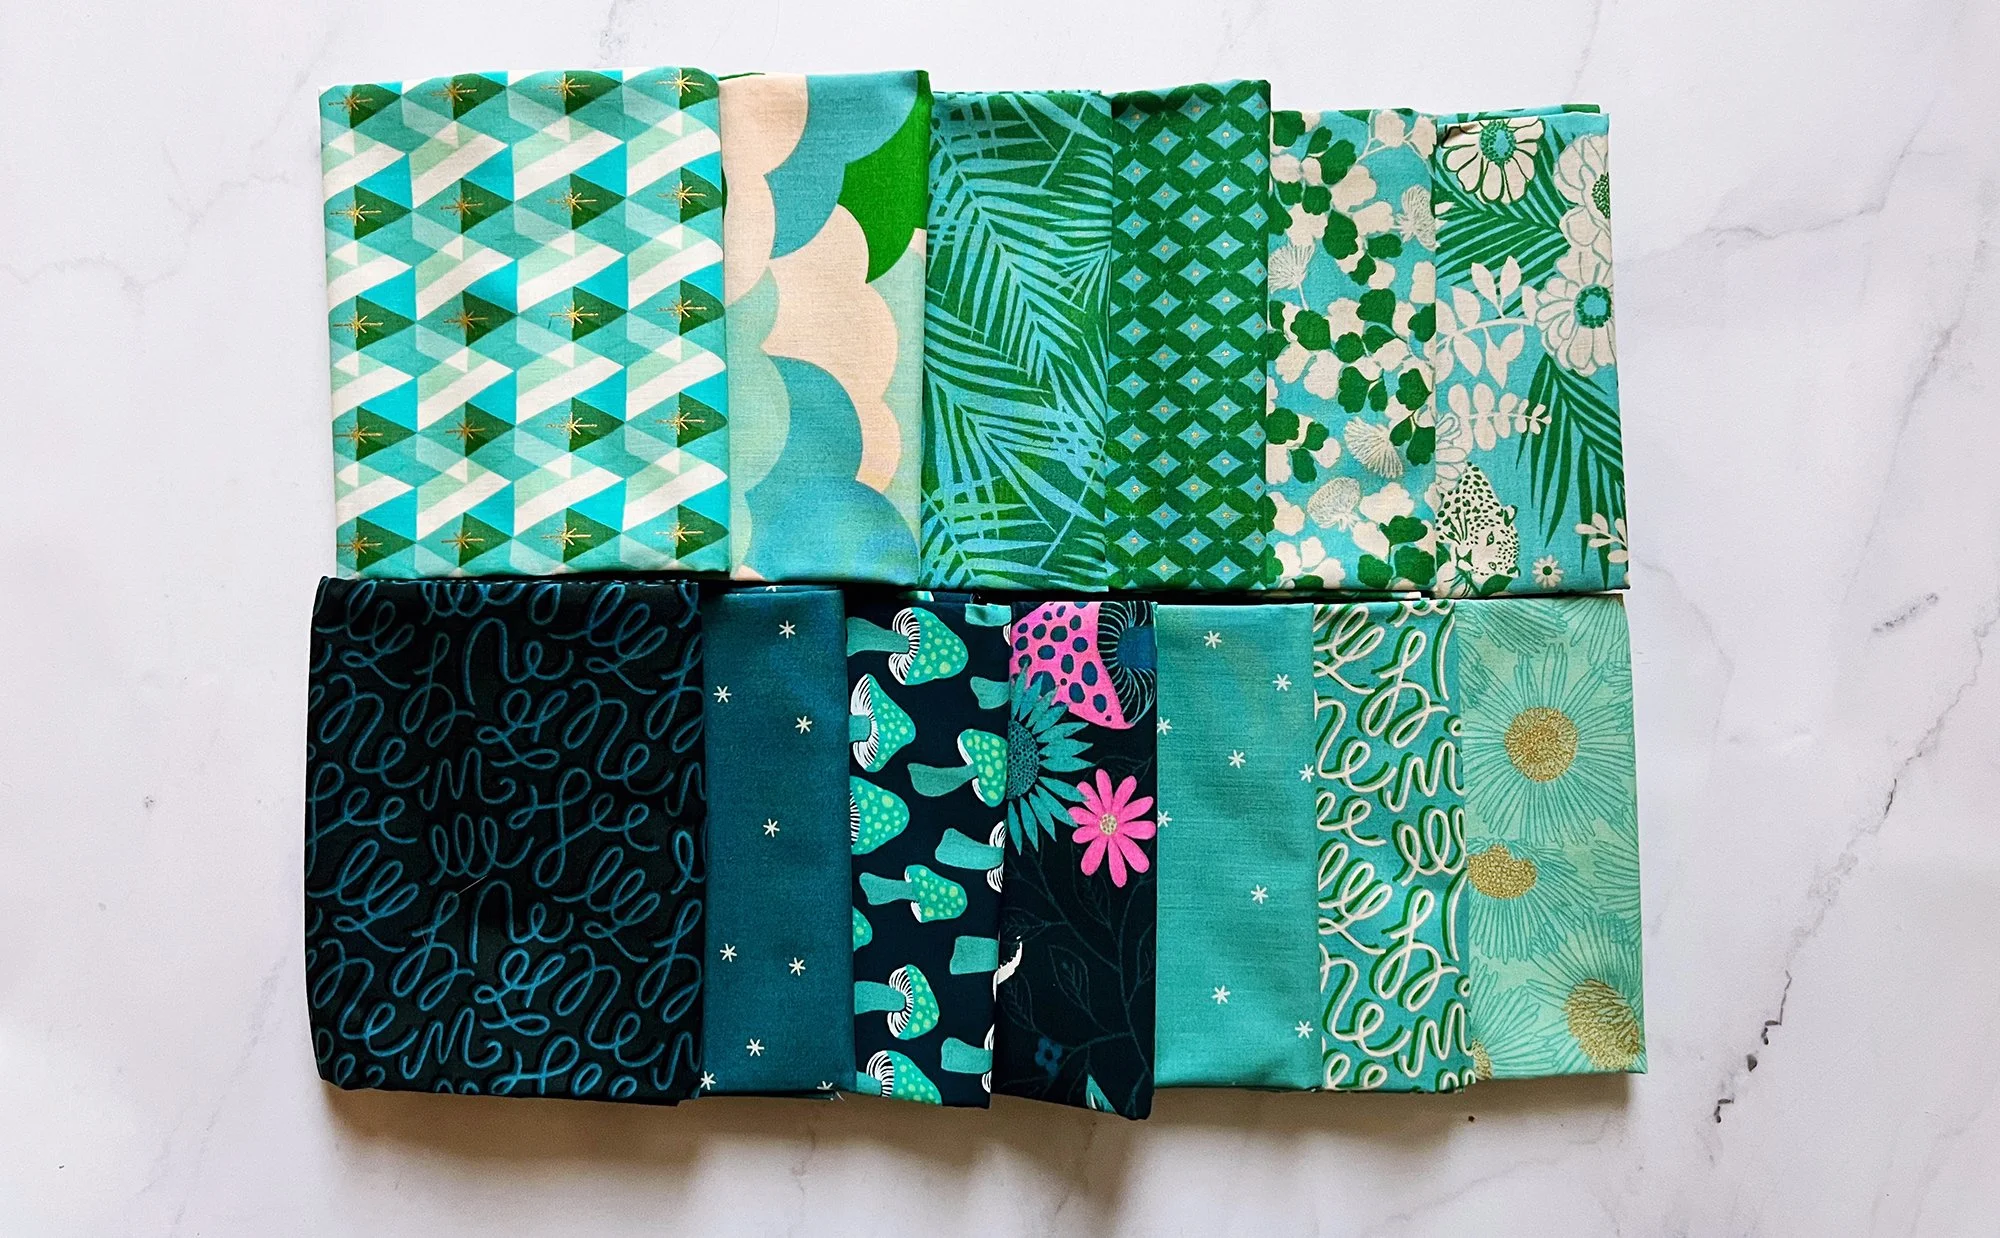
This week, our prize sponsors are Wyldwood Creative, a fabric shop in Renton, WA; and Ponderosa Creative, maker of rad thread gloss with amazing scents. One lucky person will win a 13 fat quarter bundle and stickers from Wyldwood Creative (pictured below) and a set of 2 thread glosses from Ponderosa (winner’s scent choice). All participants can also use discount codes generously provided by Wyldwood Creative, Ponderosa Creative, Autumn Moon Quilting, Stitch Lab Quilting, Thai Charm LLC, and Wild Phil Quilting to save some money on fabric/supplies/longarm quilting. Be sure to scroll to the end for all the prize/discount info!
GET TO KNOW YOUR BLOCKS
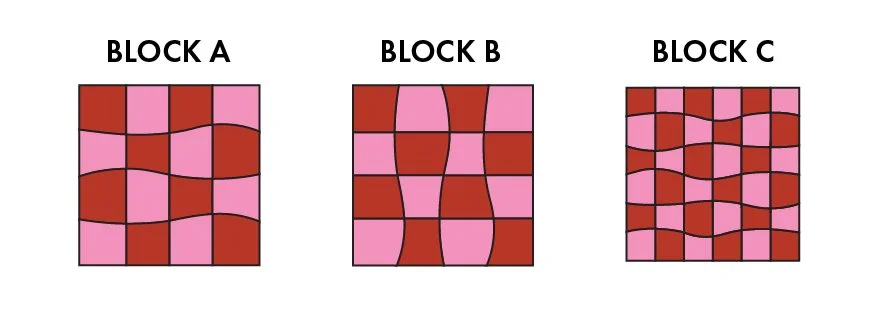
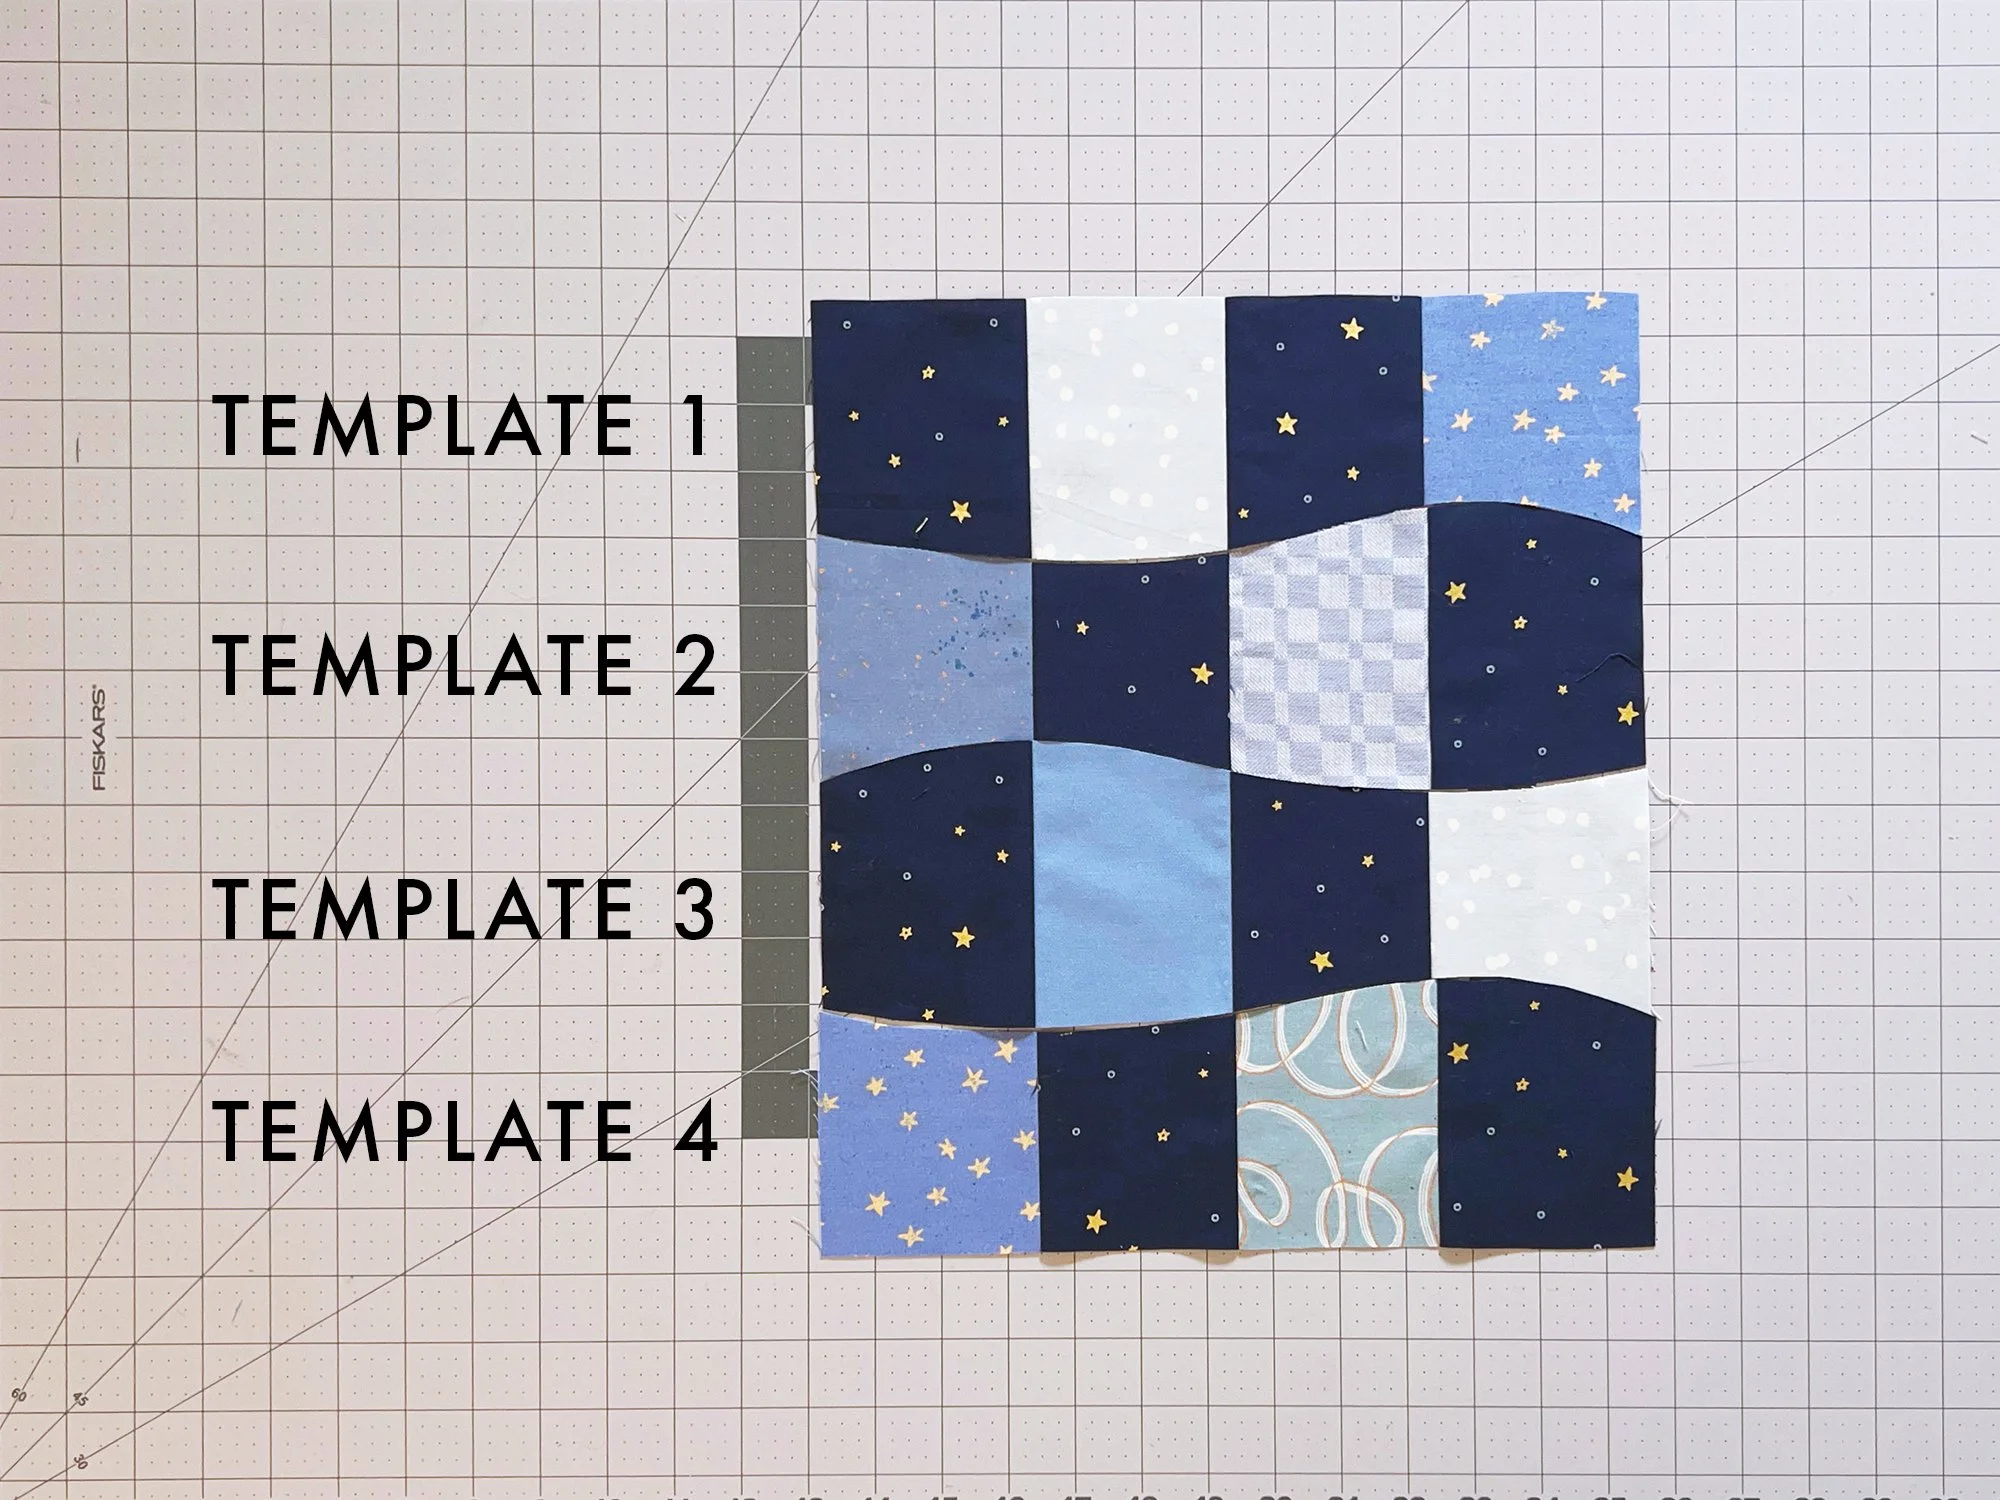
Omega is comprised of 3 blocks: A, B, and C. Blocks A and B are a 4x4 checkerboard. In Block A, the curvy seams are horizontal in the finished quilt. In Block B, the curvy seams are vertical in the finished quilt. Block C is a 6x6 checkerboard. Its seams go multiple ways in the finished quilt. All blocks are 12.5” x 12.5” to finish at 12” x 12” in the final quilt.
This week, we will only be working on Block A (and C for Improv people). We’re ignoring Block B for now to help prevent any whoopsies. Because they are very similar, and made from the same units, it’s really, really easy to get Block A and Block B pieces confused. Even when you’re not doing a quiltalong, it’s a good idea to cut and sew all your Block A’s first, and then go back and cut and sew all your Block B’s, instead of trying to do them together at the same time. It’s easier to keep things straight that way.
CUT BLOCK A TEMPLATES
Go look at the Block Checklist on page 21 (booklet) / 12 (PDF) of the instructions, and see how many Block A you need for your size and layout. Count out that number of the A/B units you strip pieced last week. You’ll use these this week for Block A. Put the rest away, away from sight, away from danger. You’ll be using those next week for Block B. (If you’re doing Scrappy, try to have a roughly even print distribution throughout the Block A and B strip pieced units.)
Find and retrieve the paper templates you lovingly cut the first week. We’ll be using A/B templates 1, 2, 3, and 4. These are the wider templates.
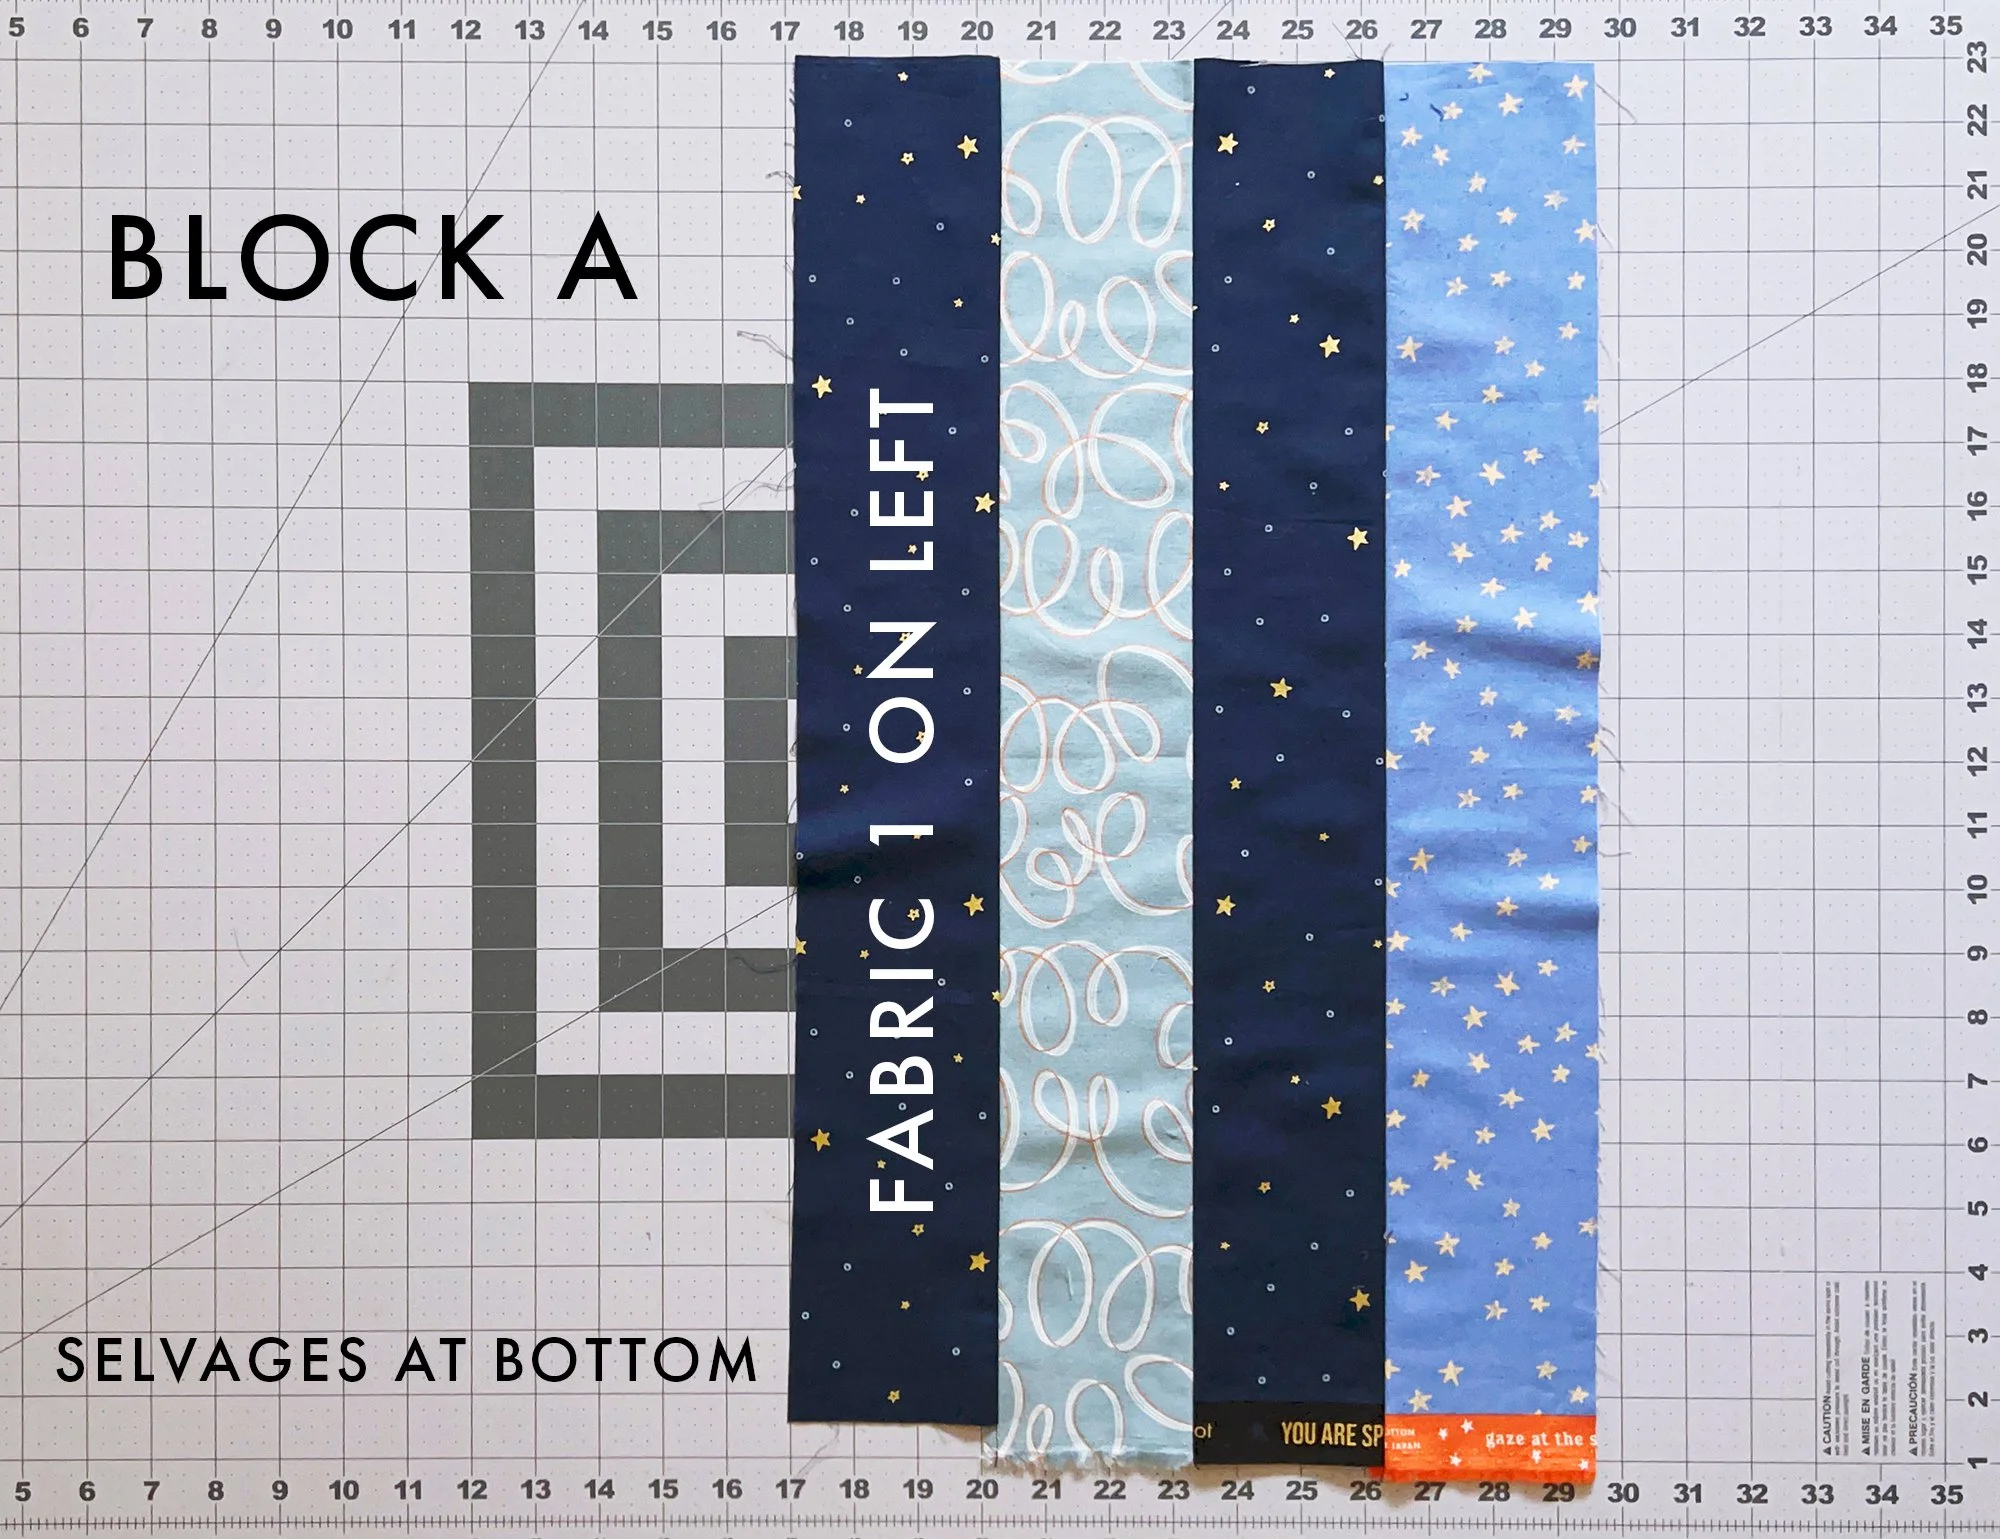
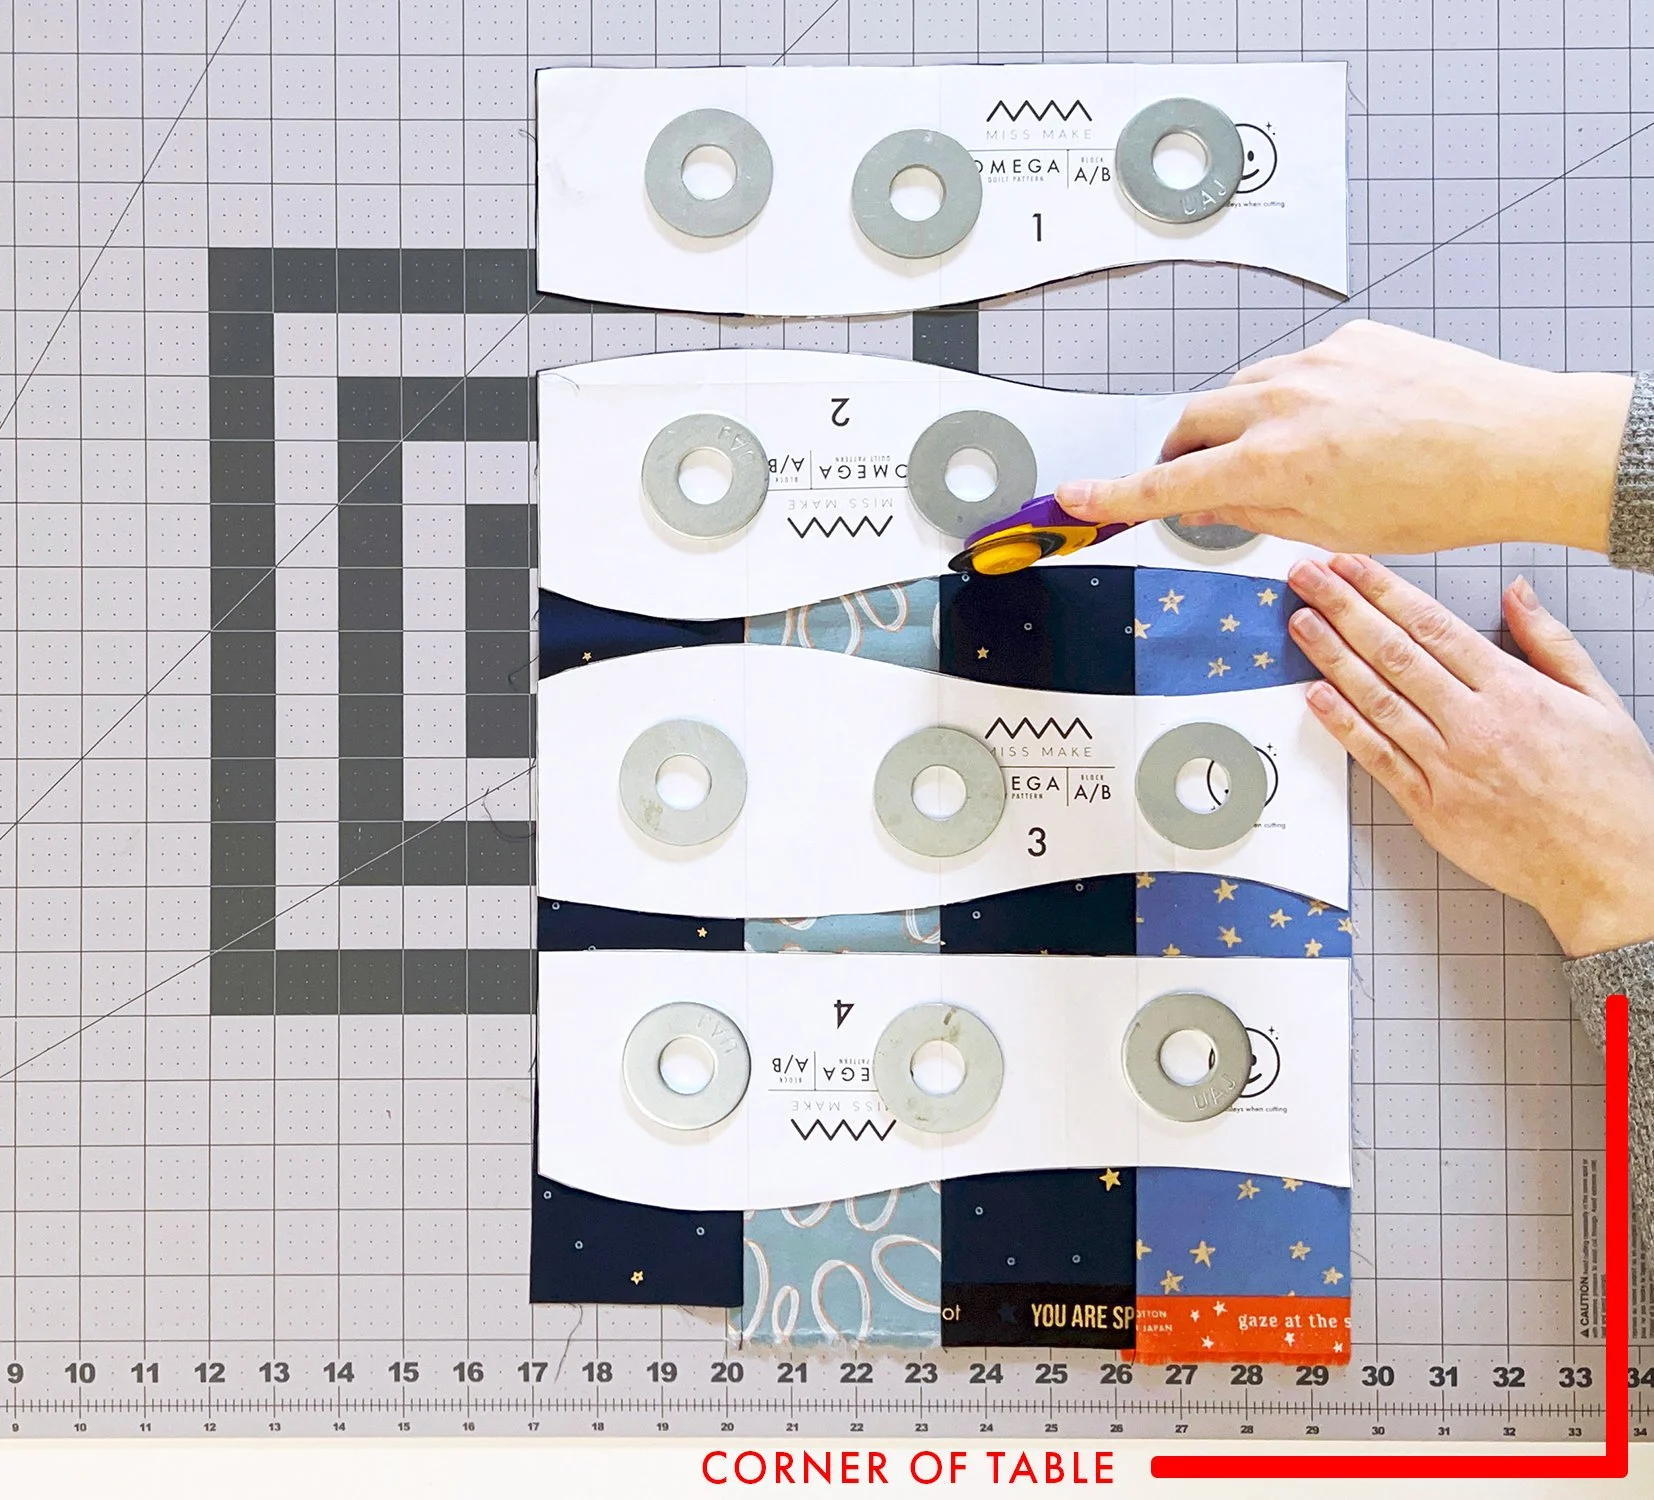
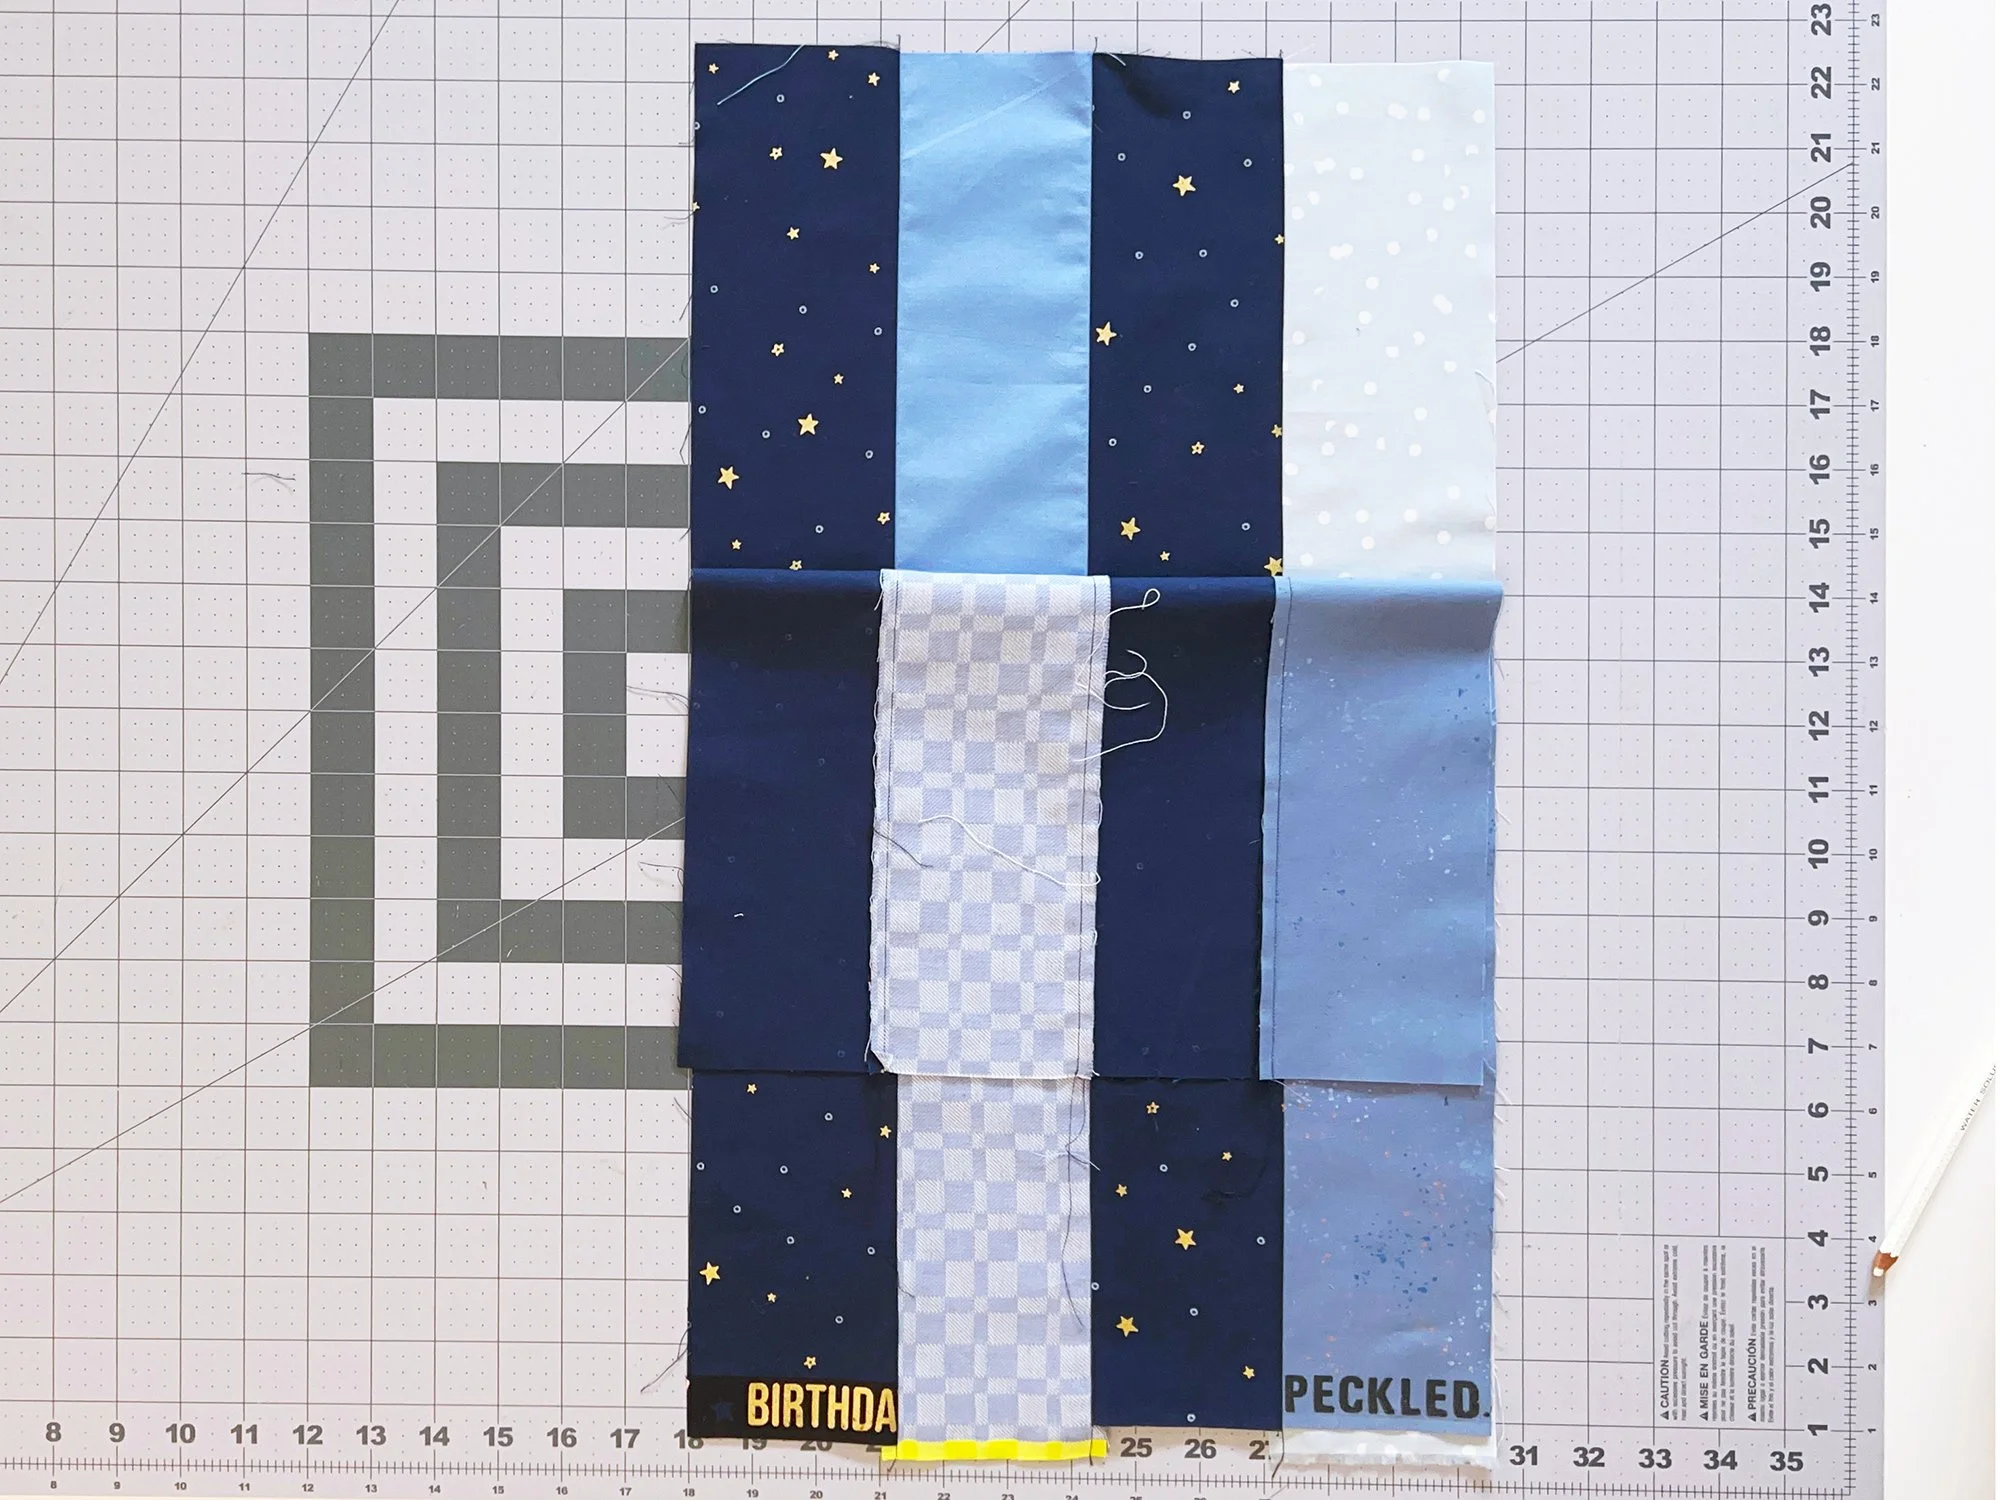
Place your first pieced unit on the cutting mat in front of you with the selvages at the bottom. This will make the left most strip in the unit a Fabric 1 strip (as long as you sewed your units correctly). This seemingly inconsequential step is very important. The position of the strip pieced unit while cutting the templates is the only procedural difference between making Block A and Block B. If you accidentally put the selvages at the top, you are now making a Block B. So just remember, for all the cutting this week, put the selvages at the bottom (left-most strip Fabric 1) for Block A before making any cuts.
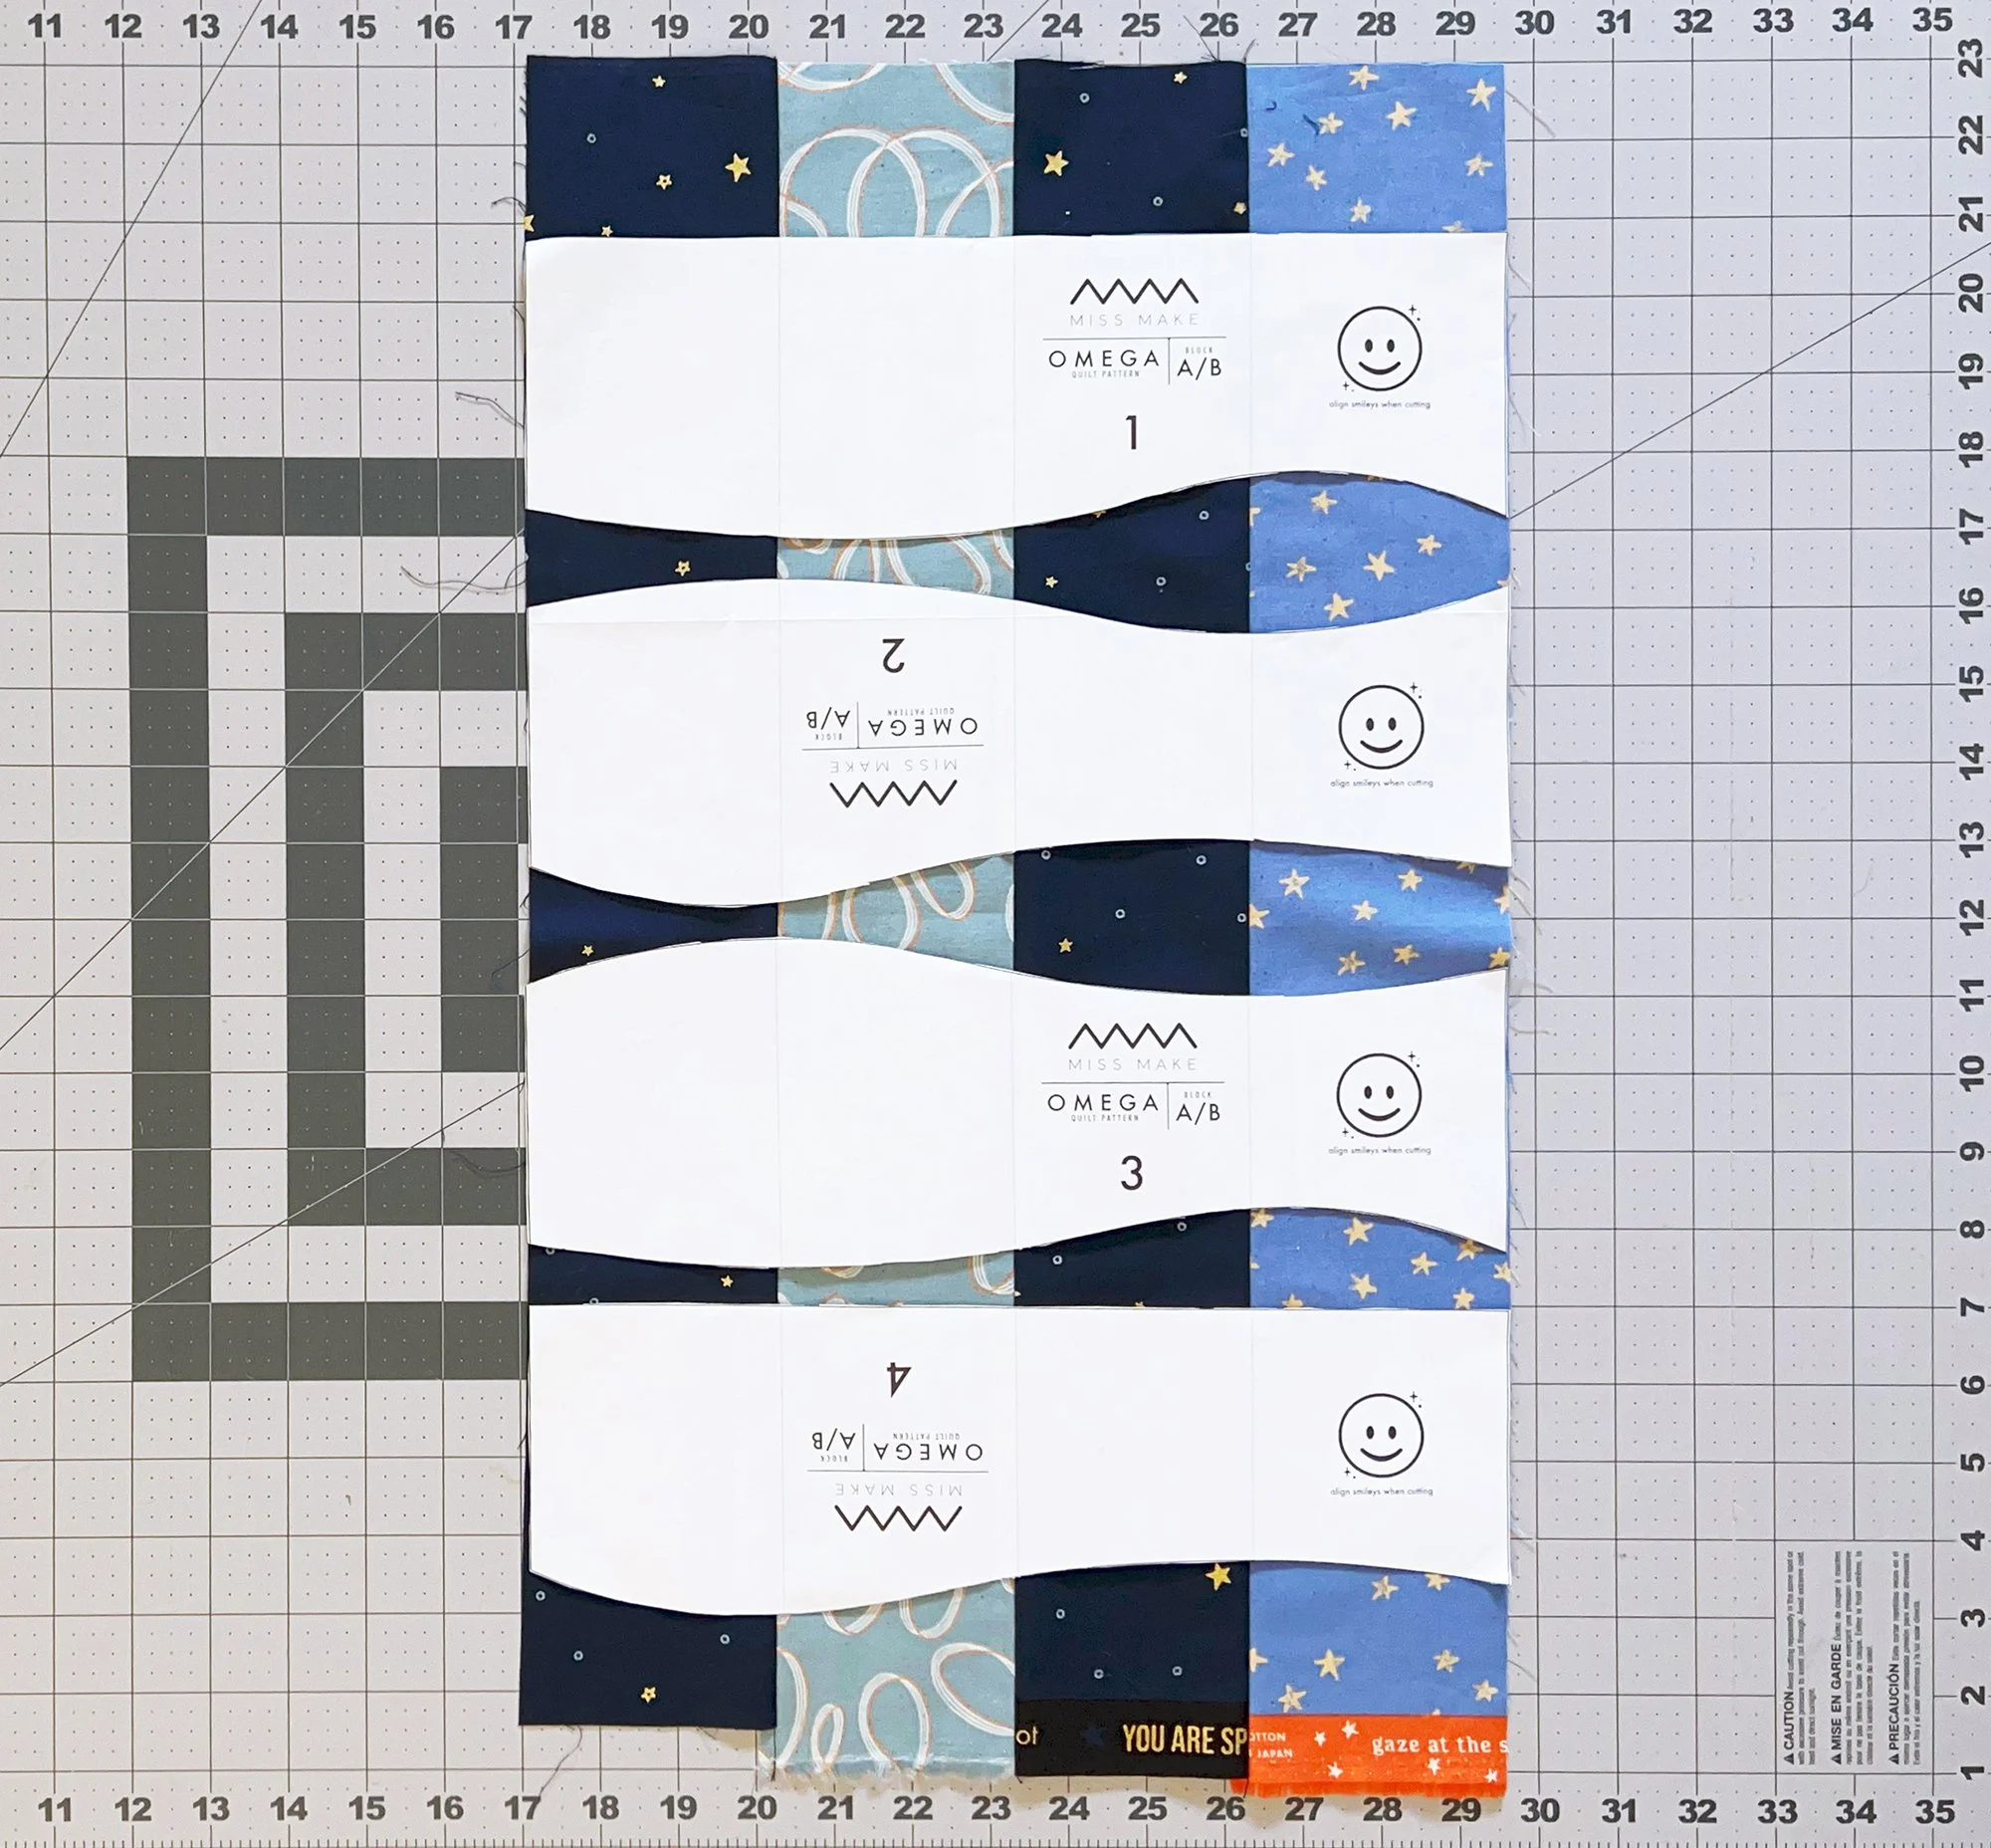
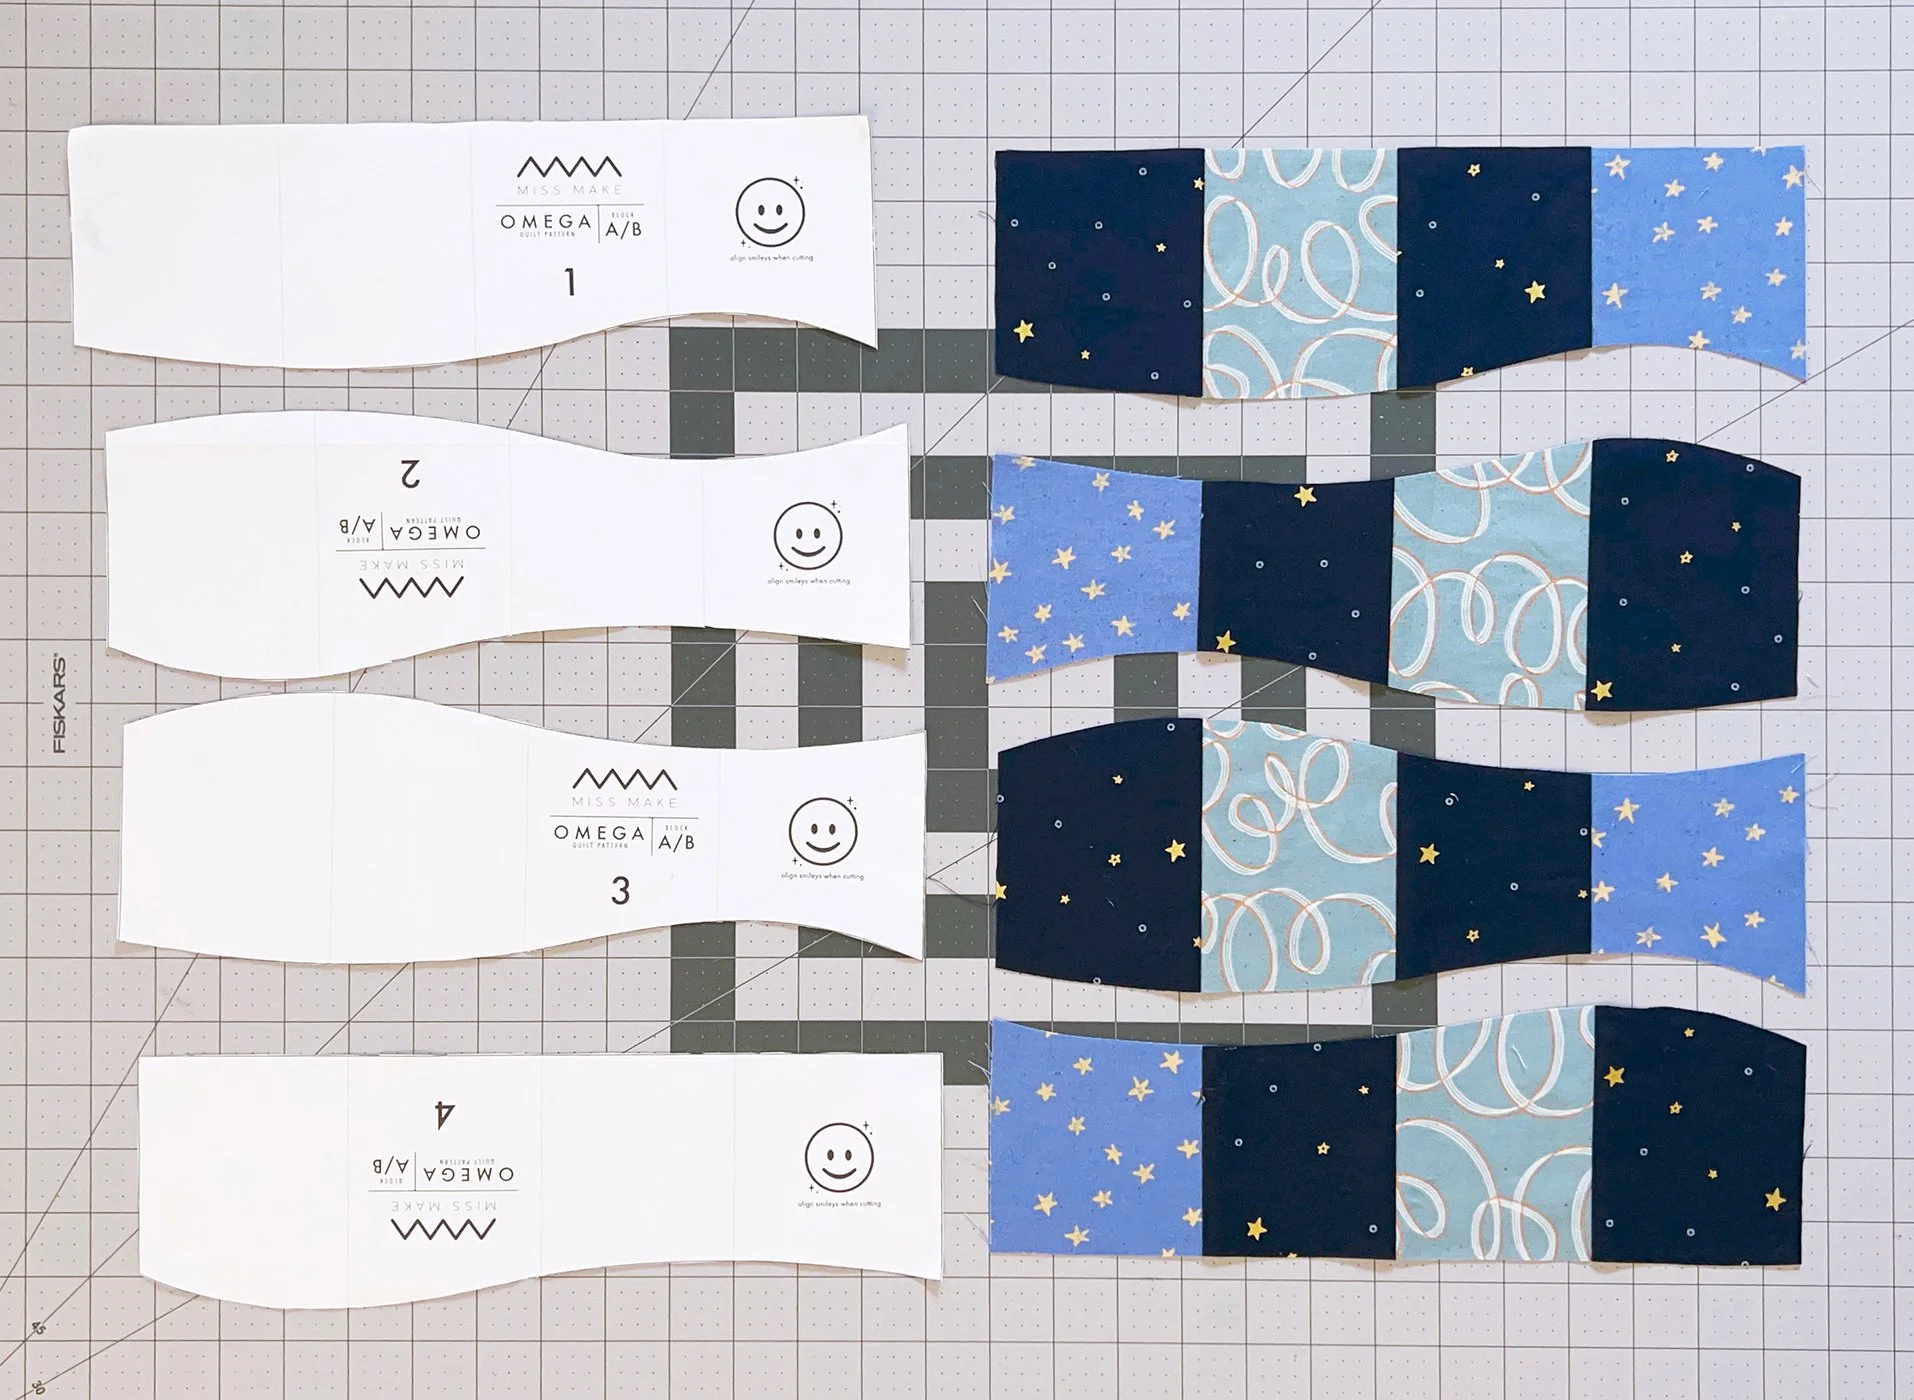
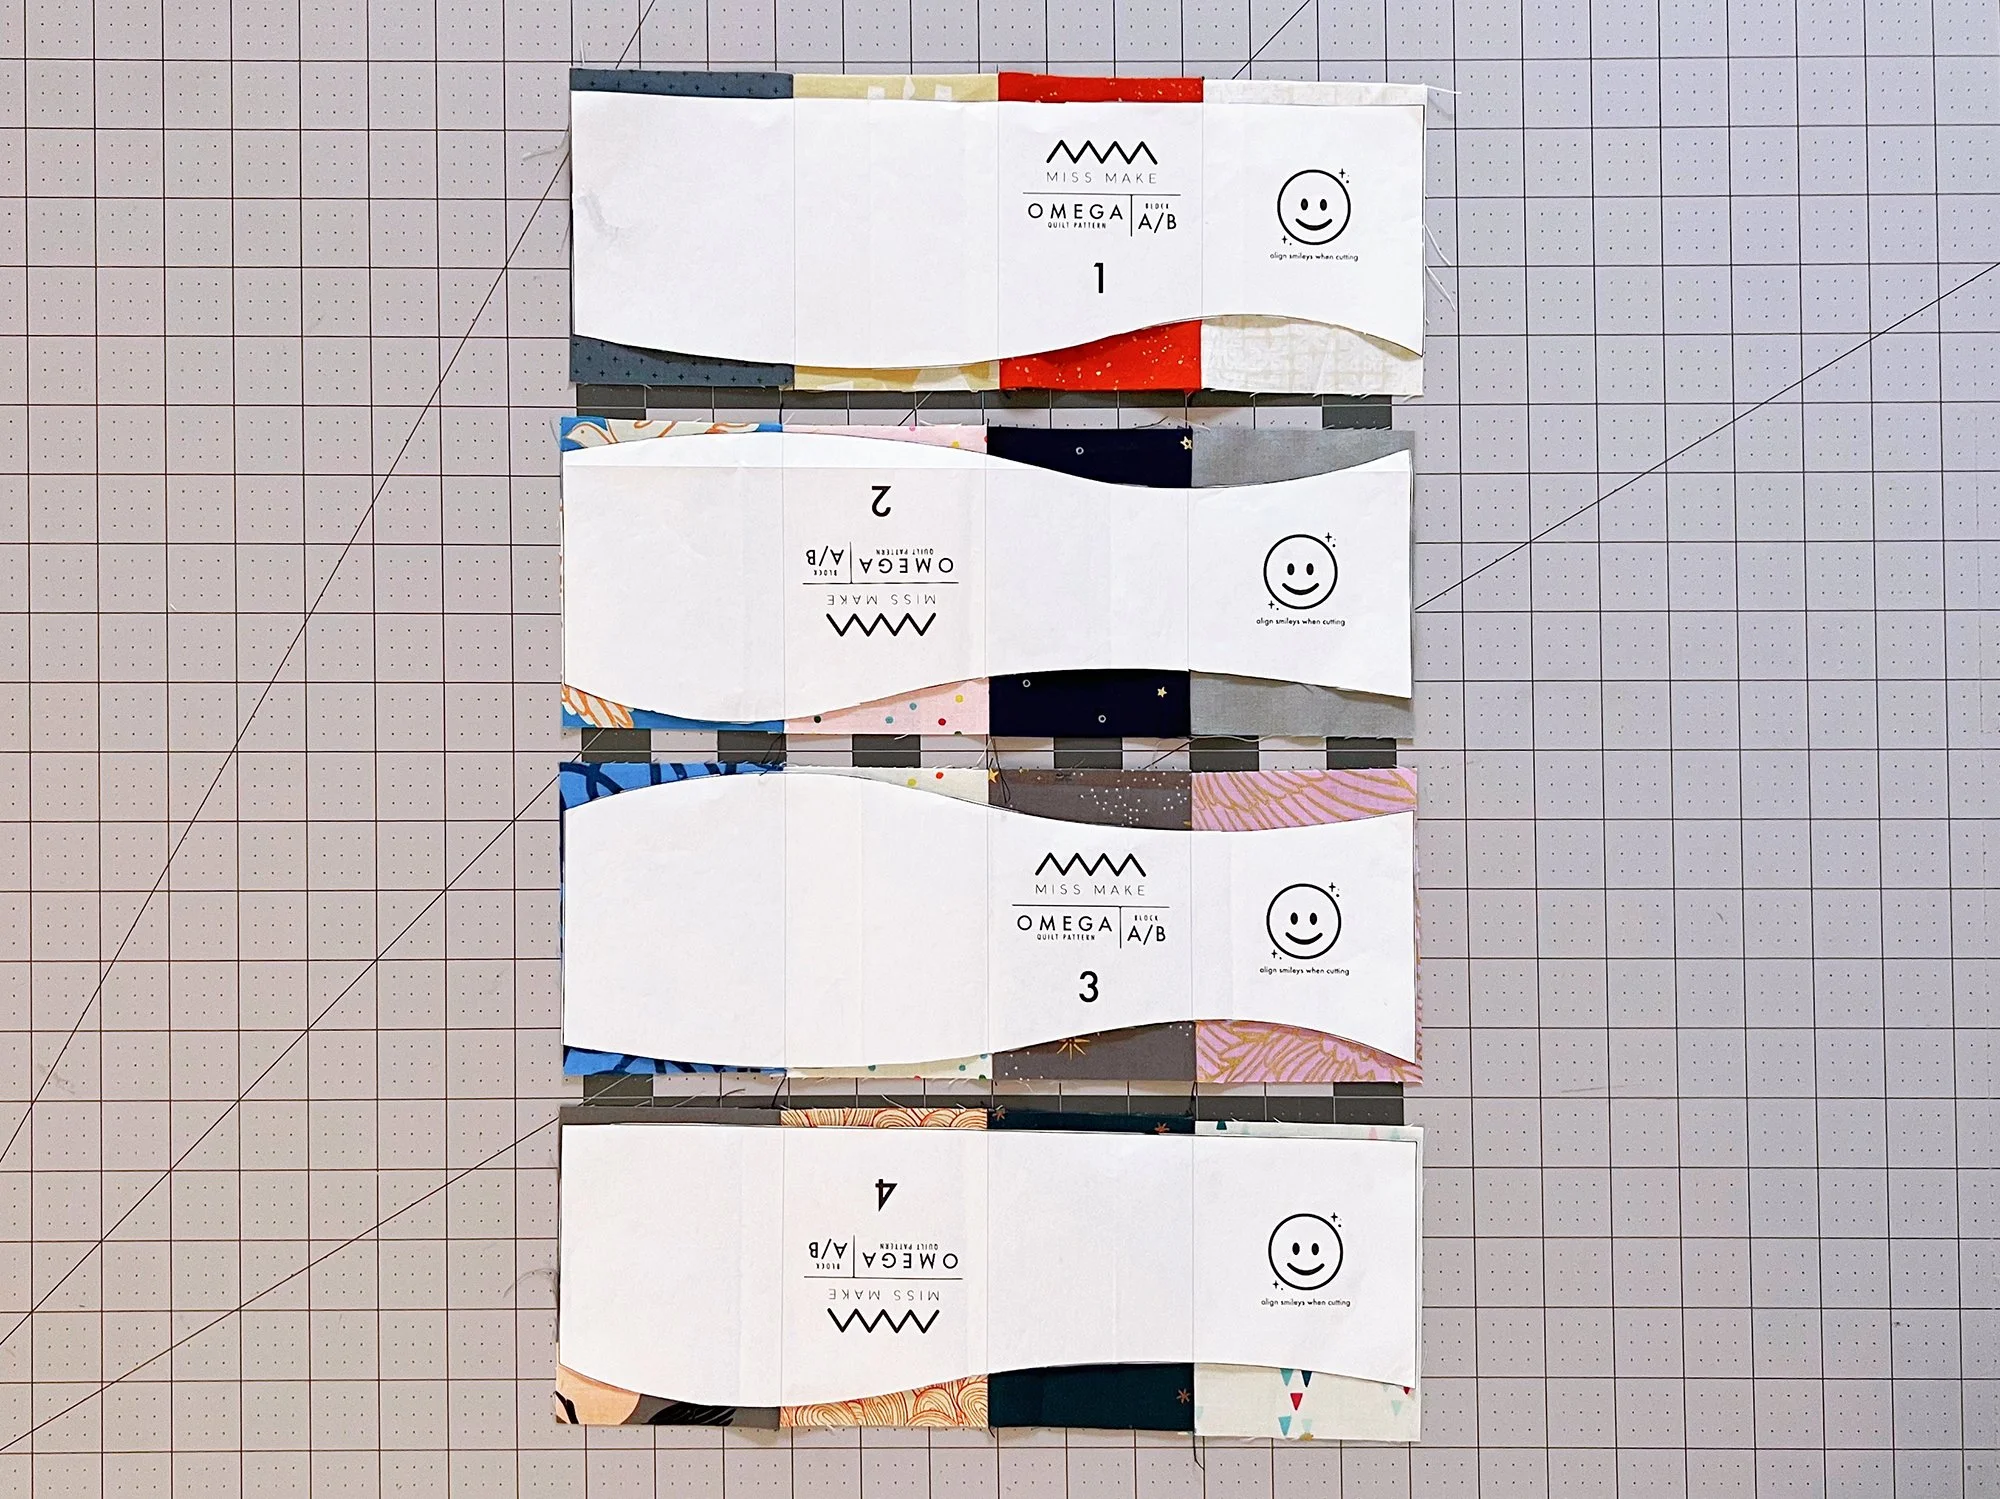
Place your paper A/B templates on top of the unit with the printed side facing up as shown below. Align all the smiley faces on the templates - this means that templates 2 and 4 will be upside down. There are gray lines on the templates you can align with the seams on your unit to make sure you are putting the template straight across the fabric.
Now might be the moment when you discover that you are, in fact, not a robot, and your strip pieced unit is not exactly 12.5” wide like your templates. That’s ok! You hopefully did double check your seam allowance after you sewed the first unit, as mentioned last week, so it isn’t too crazy off, but a little variation is totally normal. Just center the template on the fabric by aligning the middle seam and middle gray line. As long as it’s not more than 1/8” off on each side you are fine. If your unit is coming up too narrow, make sure your fabric is all the way flat - sometimes that narrowness is just a little excess that isn’t smoothed out all the way. Give it another press if needed. If it’s too wide, you can just leave it, as we’ll be trimming the blocks later.
Also, I for one tend to use a teeny bit too big of a seam allowance at the beginning and end of a seam. What am I compensating for? It’s a mystery! But maybe you do something similar. If so just avoid the using the very top and bottom edges of the unit, if they are narrower or wider than the center. There is enough cushion for this.
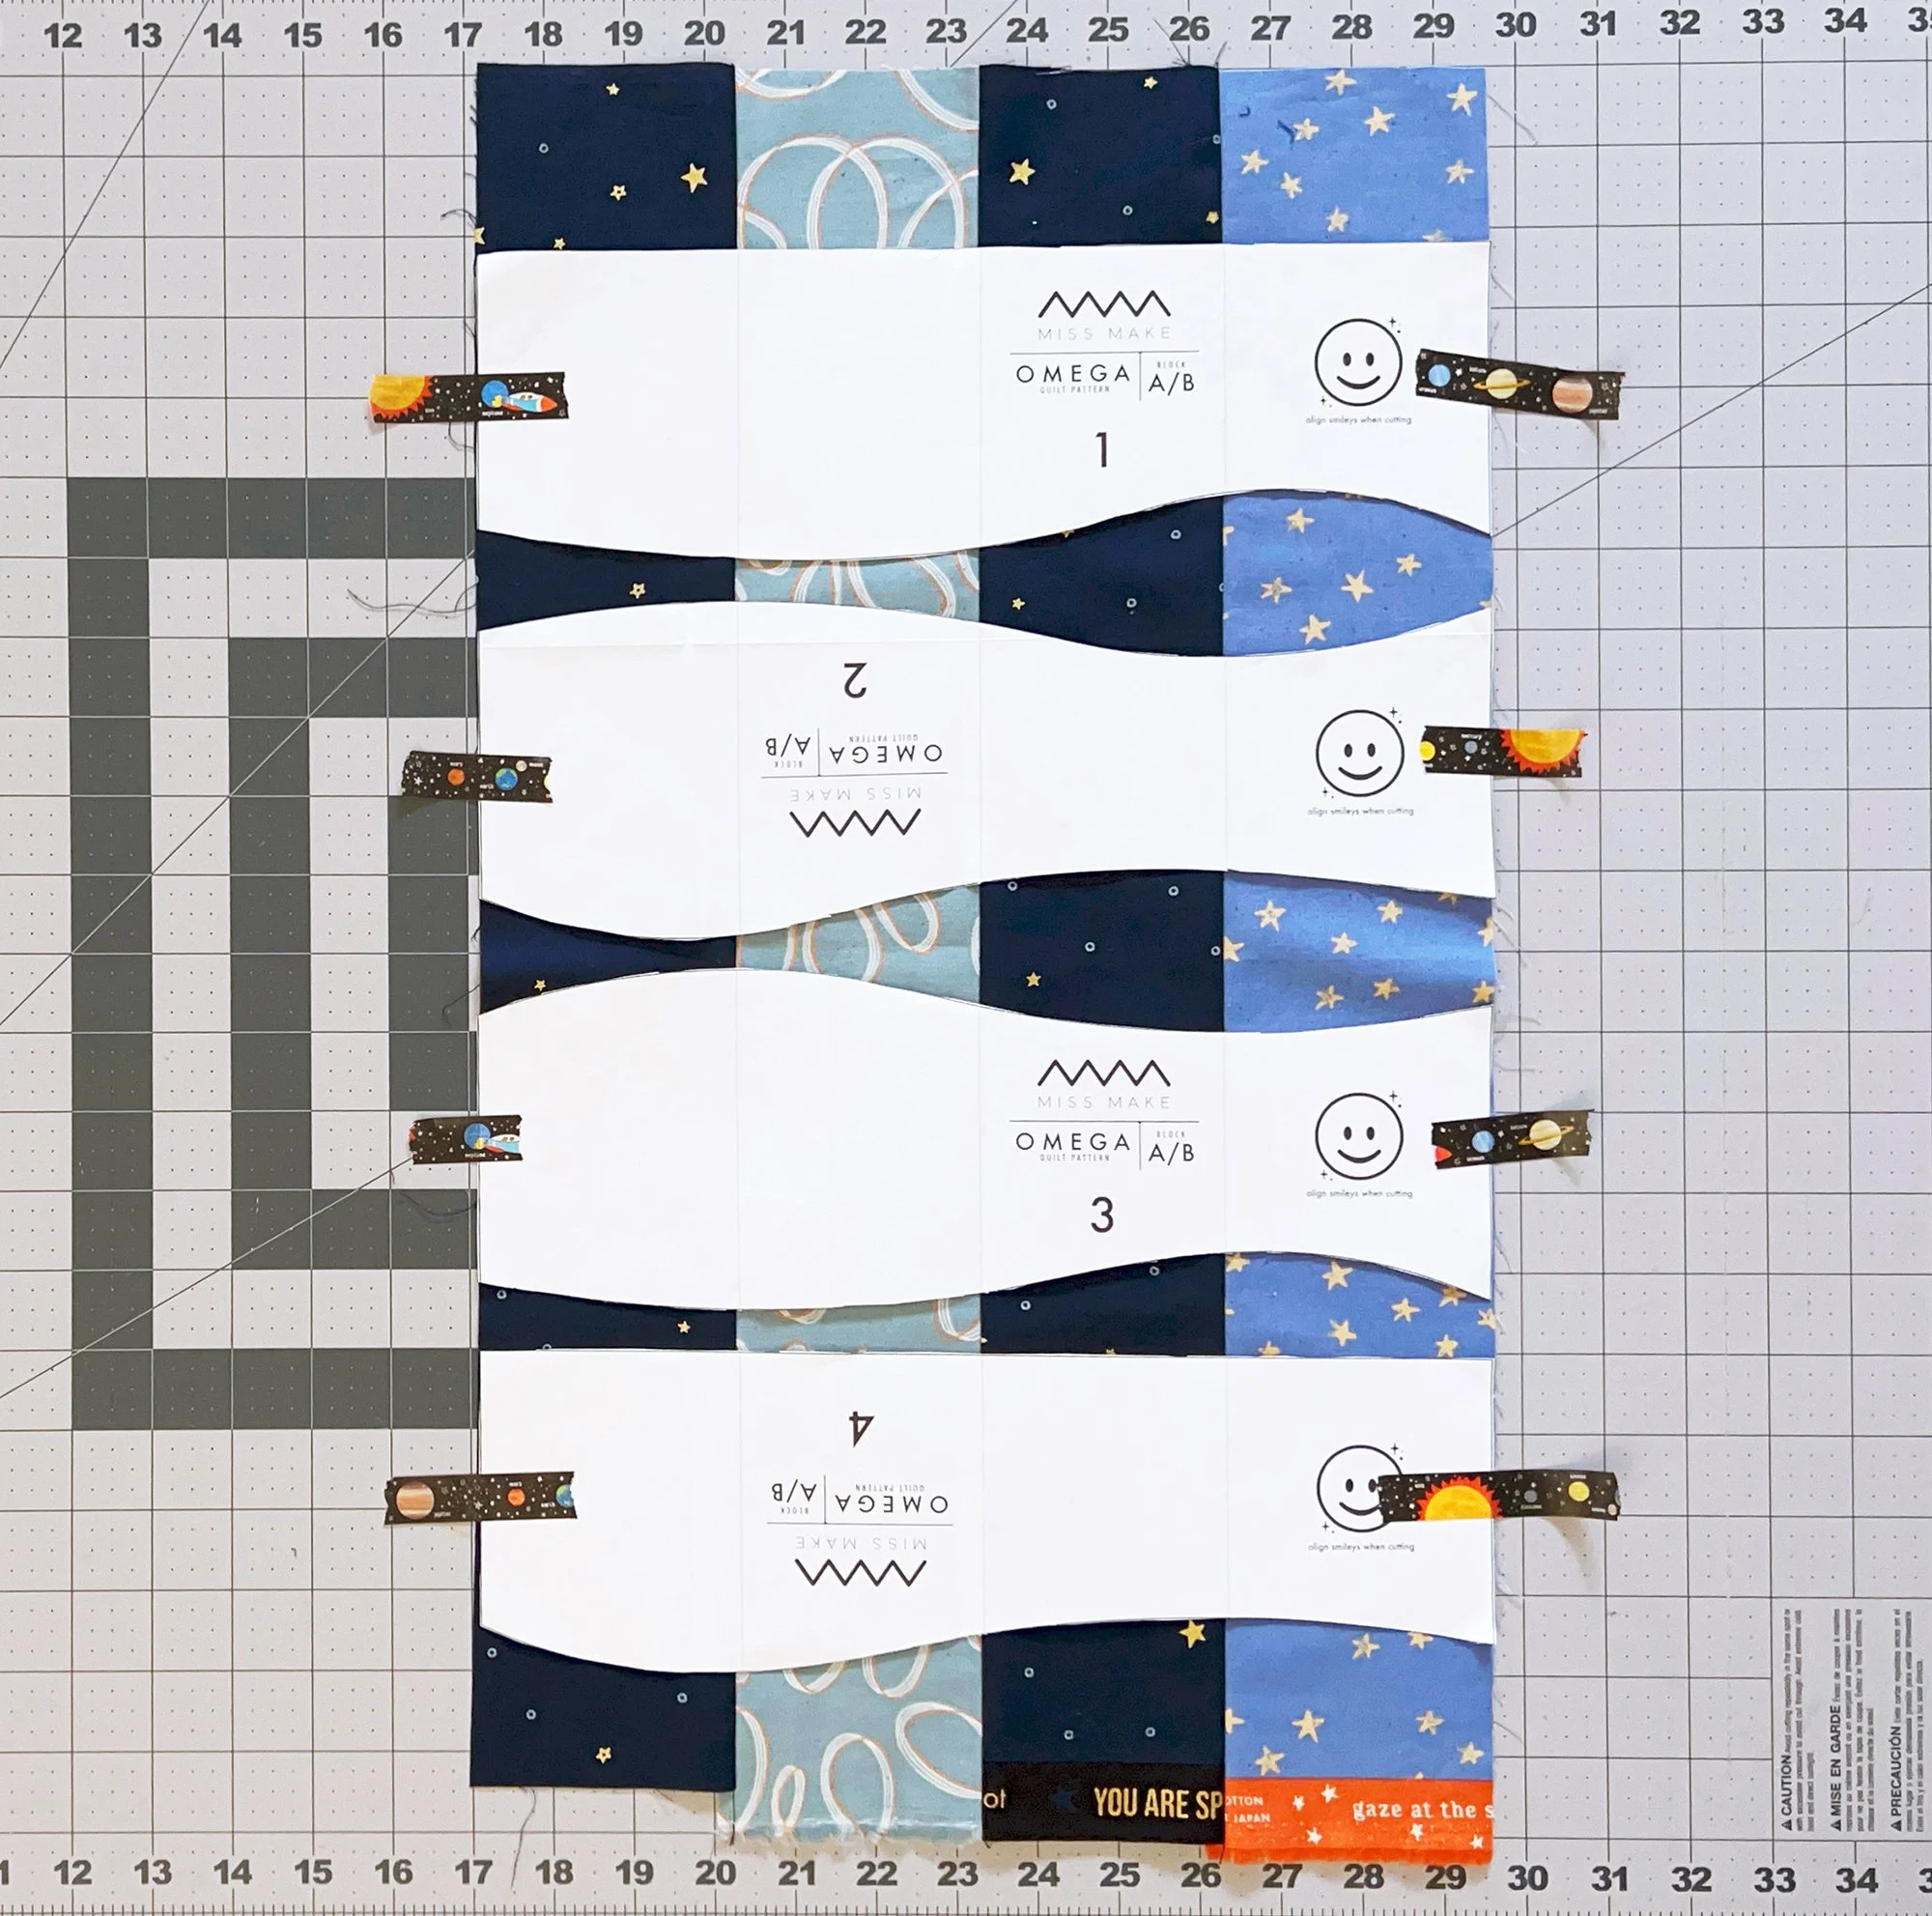
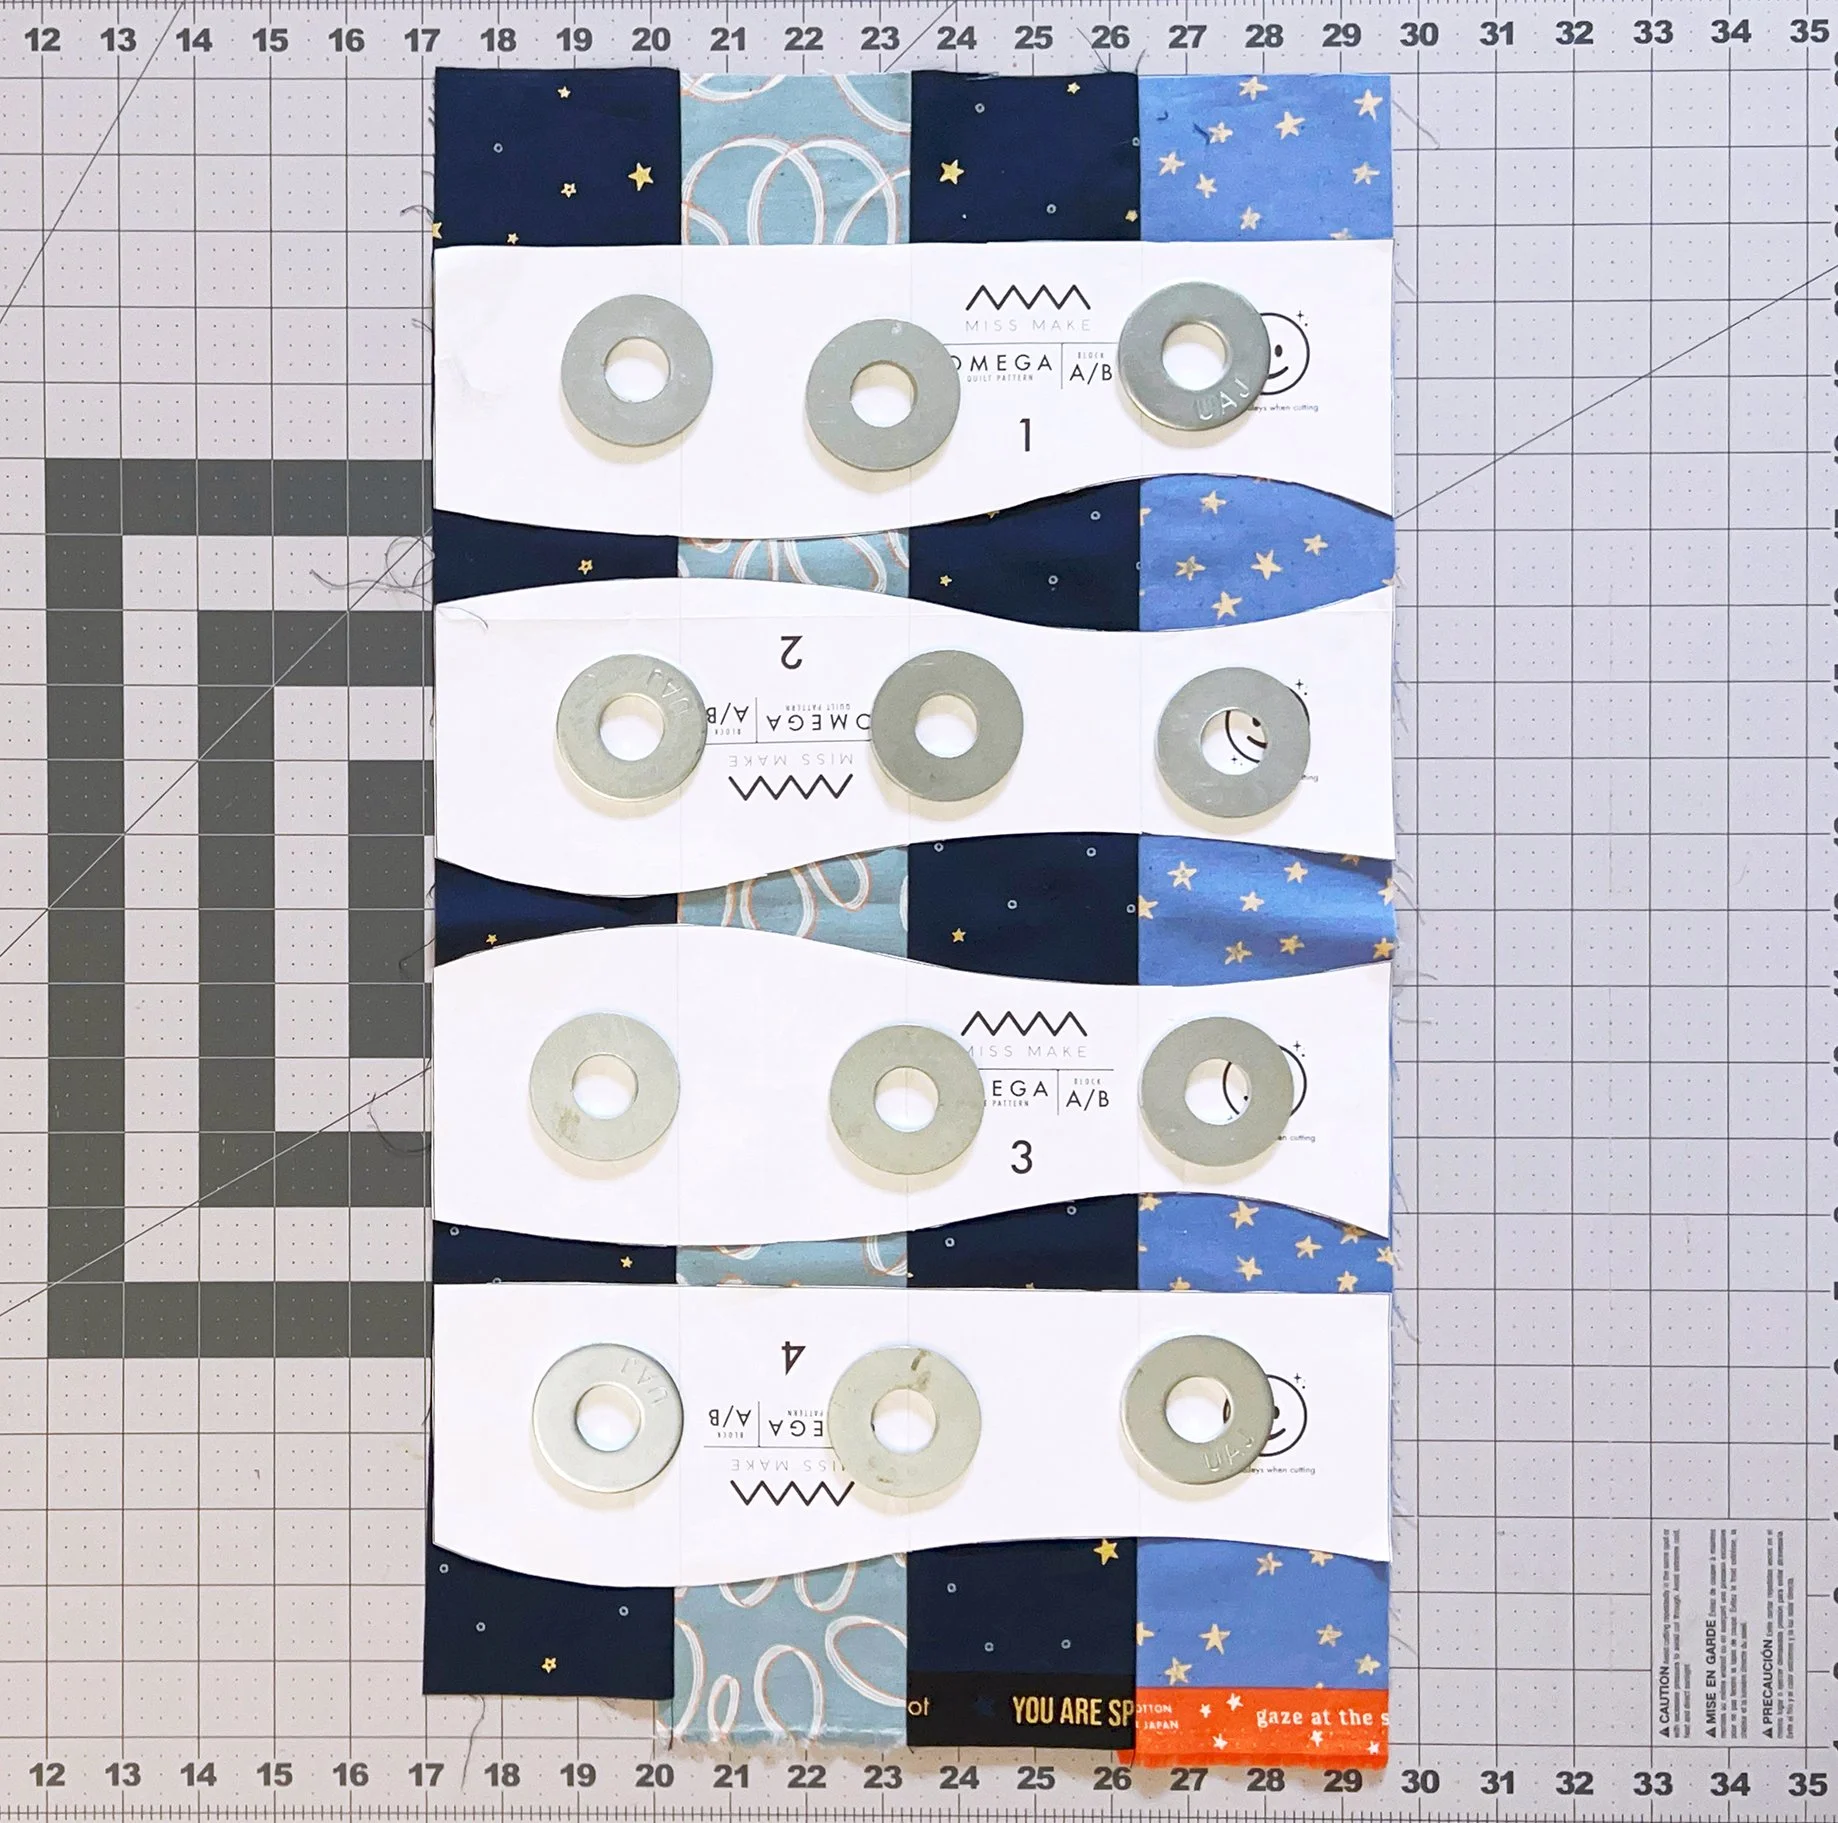
Once everything is in position, use pattern weights to hold the templates down on the fabric. I use 2” washers from the hardware store, they are inexpensive and pretty handy. I have also been known to use scissors, pincushions, my cup of coffee, anything within reach in a pinch. Alternatively you can buy much cuter pattern weights from fabric stores and on Etsy. And shoutout to @shaneburkeen on Instagram for the clever idea of using painter’s tape to hold the templates down (washi tape works too). You can leave the tape stuck to the paper the whole time and just lightly stick/unstick it from the cutting mat as you need.
Very carefully use your rotary cutter to cut along the top and bottom edges of all the templates. I like to position my cutting mat and fabric at the right corner of my cutting table so that I can move around the corner and stand there while cutting, so that I am cutting away from myself instead of across. (See more cutting safety below.)
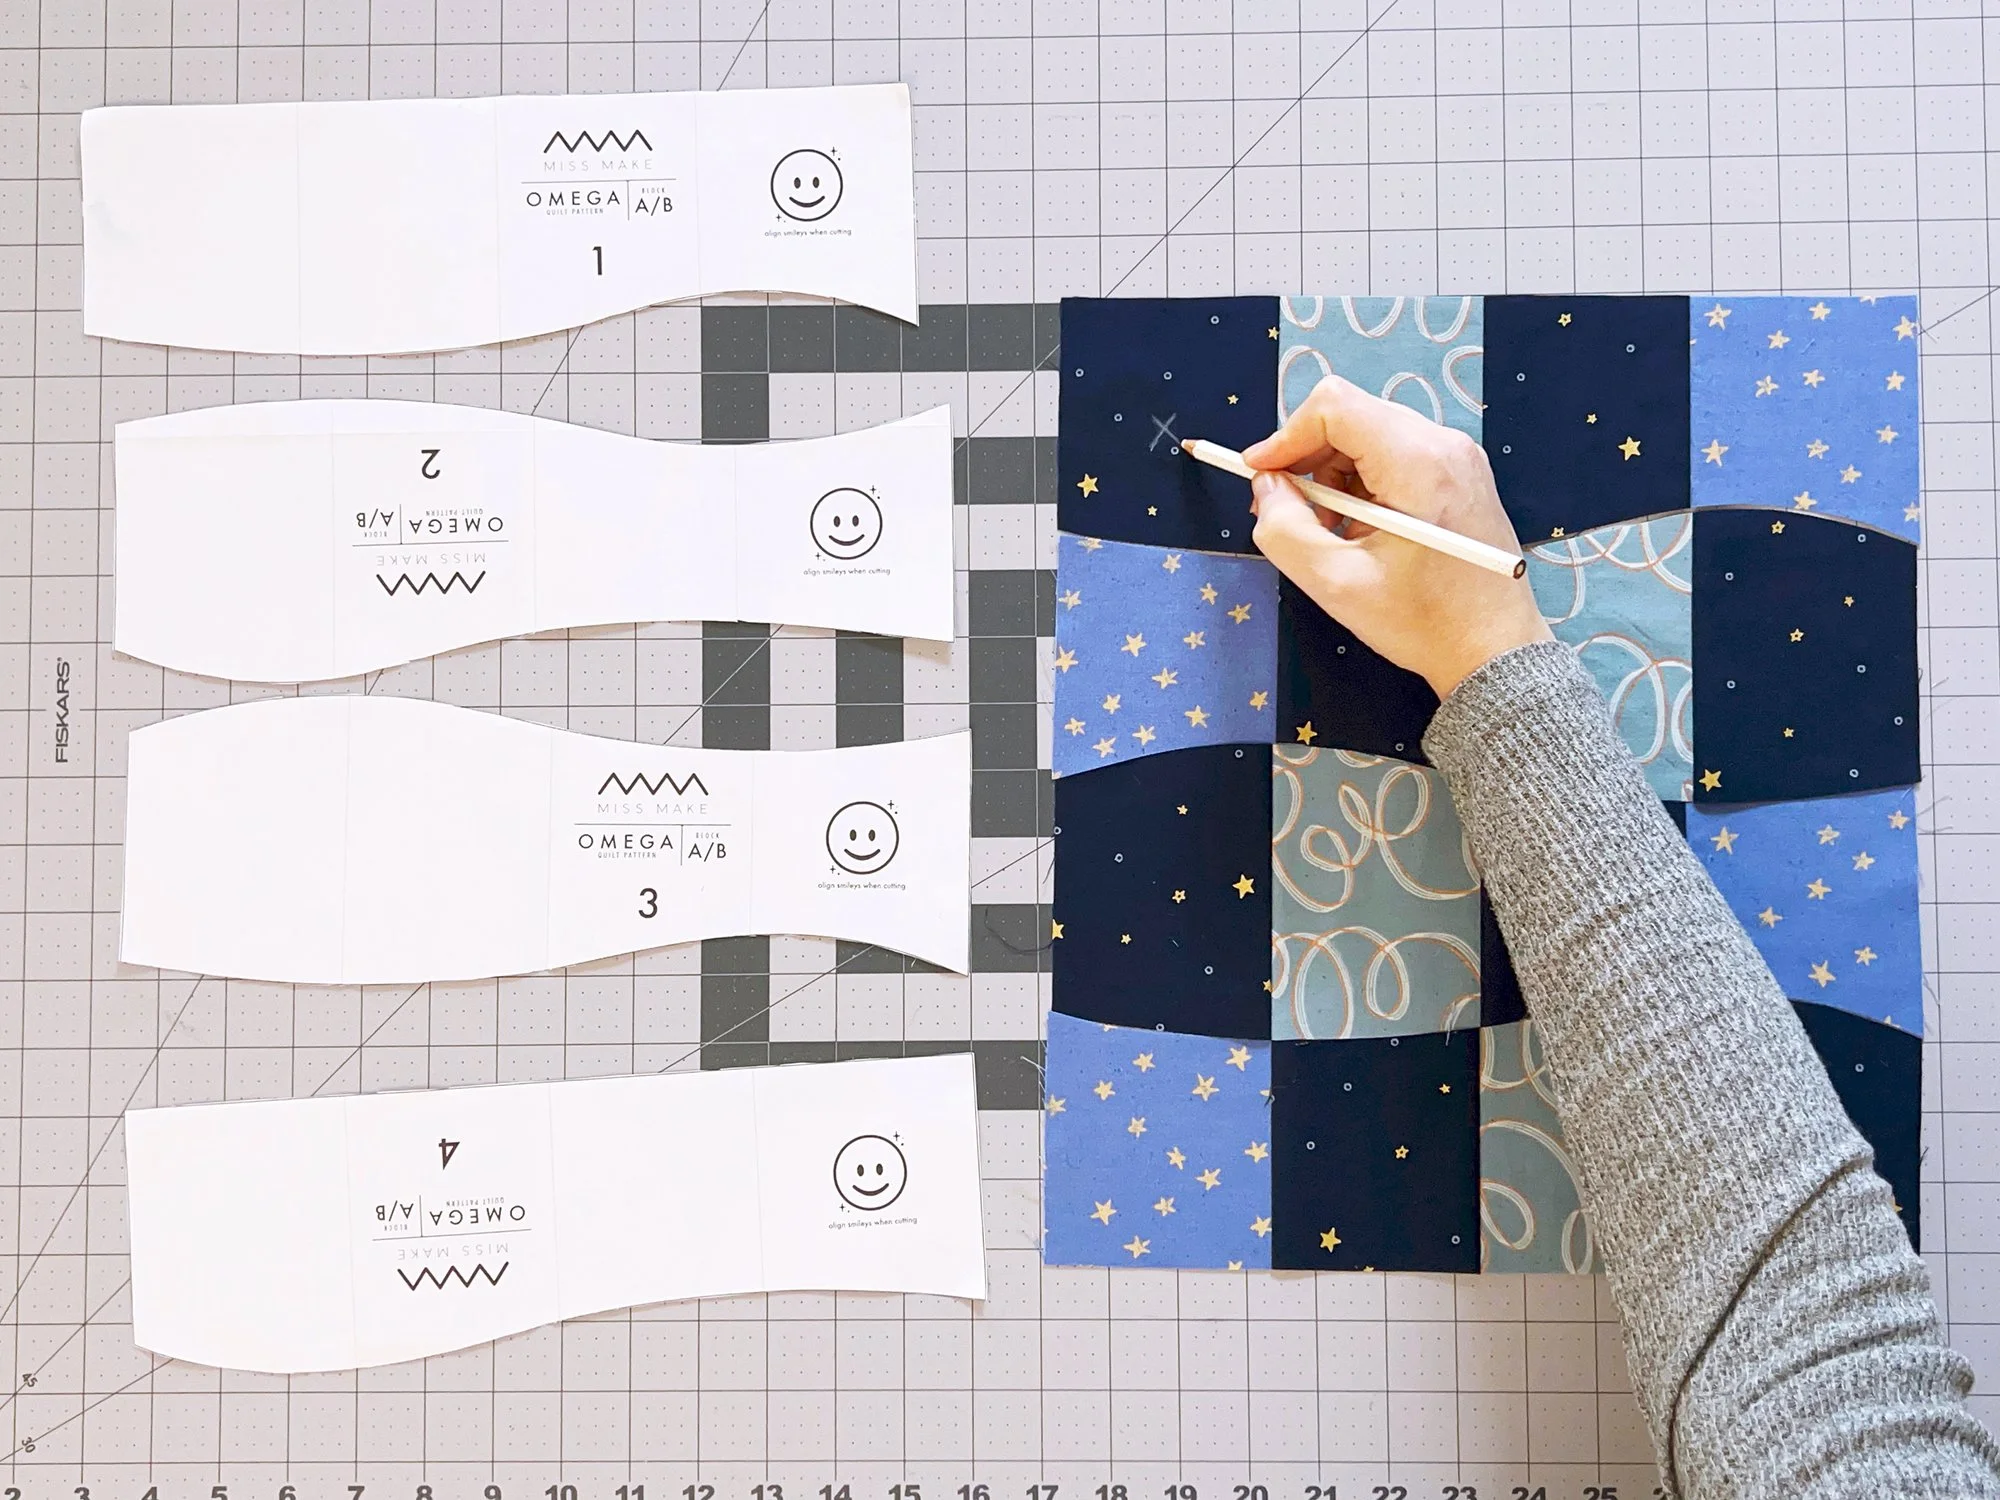
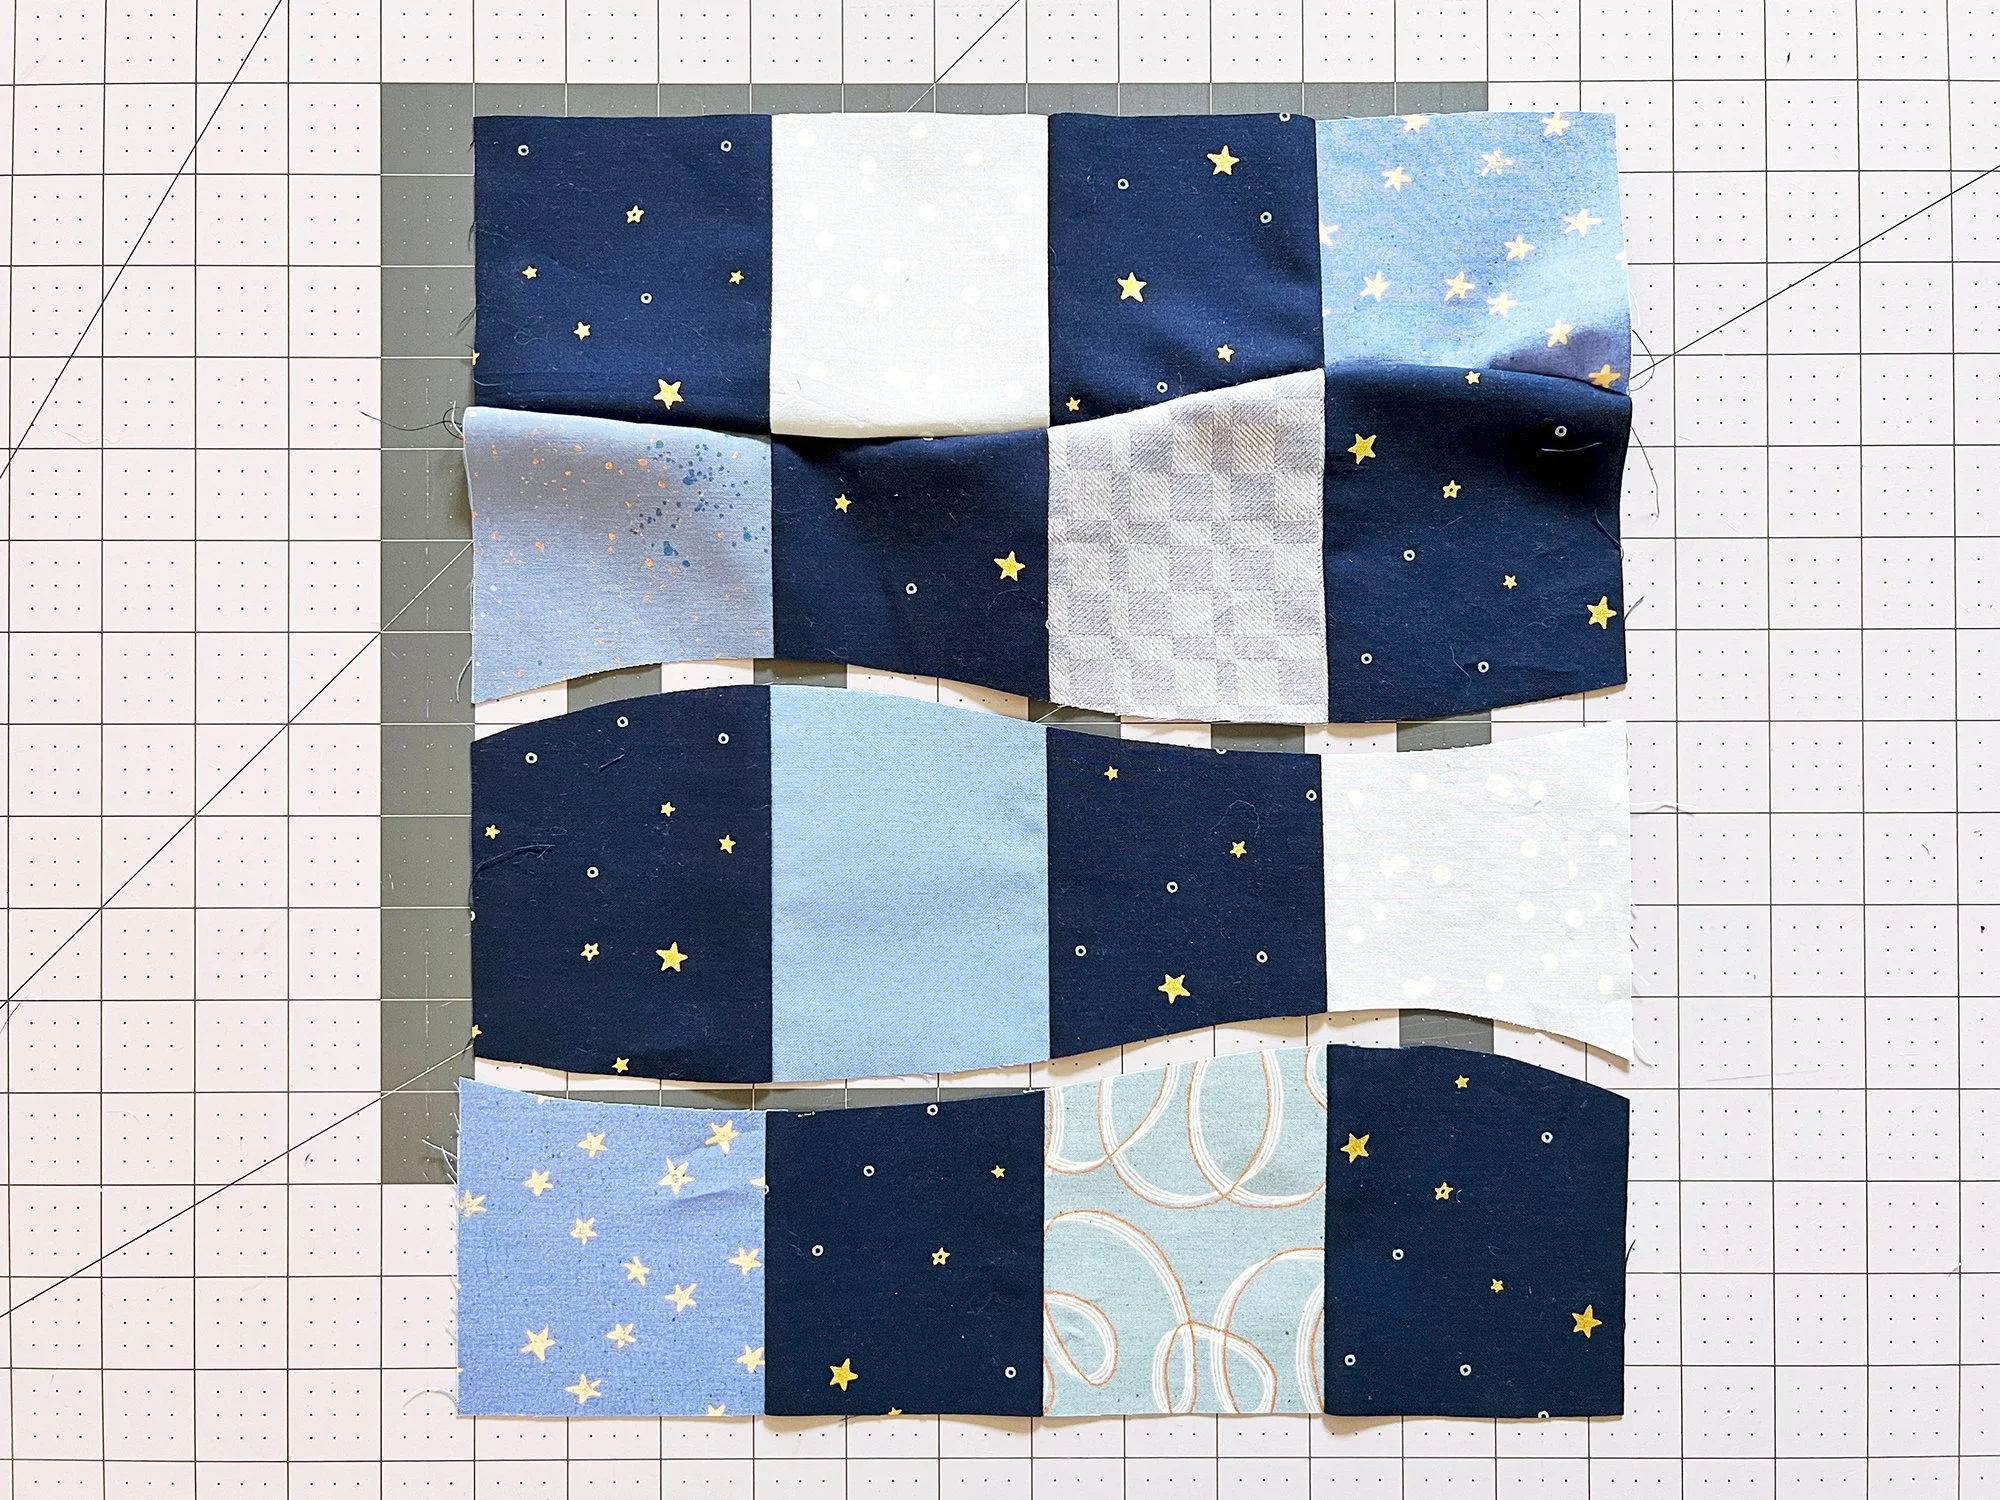
Remove the paper templates. Keeping them in numerical order with 1 at the top, move the cut fabric pieces to wherever you are going to be stacking all your cut pieces. Rotate pieces 2 and 4 180° - this will put your fabric in a checkerboard pattern, and now all your edges will nicely fit together. How satisfying!
Check out this reel on instagram for a sped-up version of placing and cutting your Block A templates.
Continue cutting until you’ve cut a set of templates 1, 2, 3, and 4 from all your A strip pieced units, putting them in stacks by template as you go. Once they are all cut, go through the template 1 stack and mark each left-most Fabric 1 square with a little piece of washi tape or a water-soluble fabric marker/pencil. This will help you position your blocks when it comes time for assembly. It’s more important for the Two Color version than the Scrappy version.
Keep cutting until you’ve cut all your Block A strip pieced units. You should have the number of Block A template sets listed on page 12/8.
If you are making either Scrappy version and you are just dyyying to sew the first set of templates together after you cut them out…don’t do it! In the Scrappy version, you’ll be mixing template 1, 2, 3, and 4 pieces from different strip pieced units so that you have 4 unique print sets in each block, otherwise your prints will chunk together. So, cut at least 4 sets first so that you can have unique 1, 2, 3, and 4 pieces before sewing.
One final tidbit: as a shortcut, I like to stack two A/B units on top of each other when cutting, to get through the template cutting faster. First I layer them (make sure selvages of both are at the bottom), then from the top I peel back the top layer about halfway. Then I roll it back flat, aligning the seams as I go. Repeat for the bottom half.
TRULY SCRAPPY VERSION
Reminder, this is for people making Omega with individual pieces for every square instead of strip piecing. Follow all the instructions above, except instead of a strip pieced unit, use four of your pieced A/B units, and position them all in a vertical column so that the left-most fabric in each unit is Fabric 1. This is very important, and it is the only procedural difference between Block A and B. If you flip them so that the left-most fabric is Fabric 2, you are making Block B.
Place a template on top of each unit, printed side up and aligning all the smileys. This means that templates 2 and 4 will be upside down. Be sure that all edges of each template are within the edges of the fabric unit.
Follow instructions above to carefully trim around the long edges of each template, stack, rotate, and mark. Cut until you have quantity of template sets for Block A listed on page 19/11 of instructions.
IMPROV ONLY: CUT BLOCK C TEMPLATES
Cutting your Block C templates is nearly the same as Block A, so we’ll just summarize here.
Use all the C units you pieced for cutting. We are only going to sew half the Block C’s this week, but we are cutting out all the C template sets so that Scrappy people have enough to mix and match when they start piecing. (The schedule originally stated that we were only cutting half this week because I didn’t realize Scrappy people would benefit from having them all.) If you’re doing the Two Color version and just want to cut half this week, that’s fine!
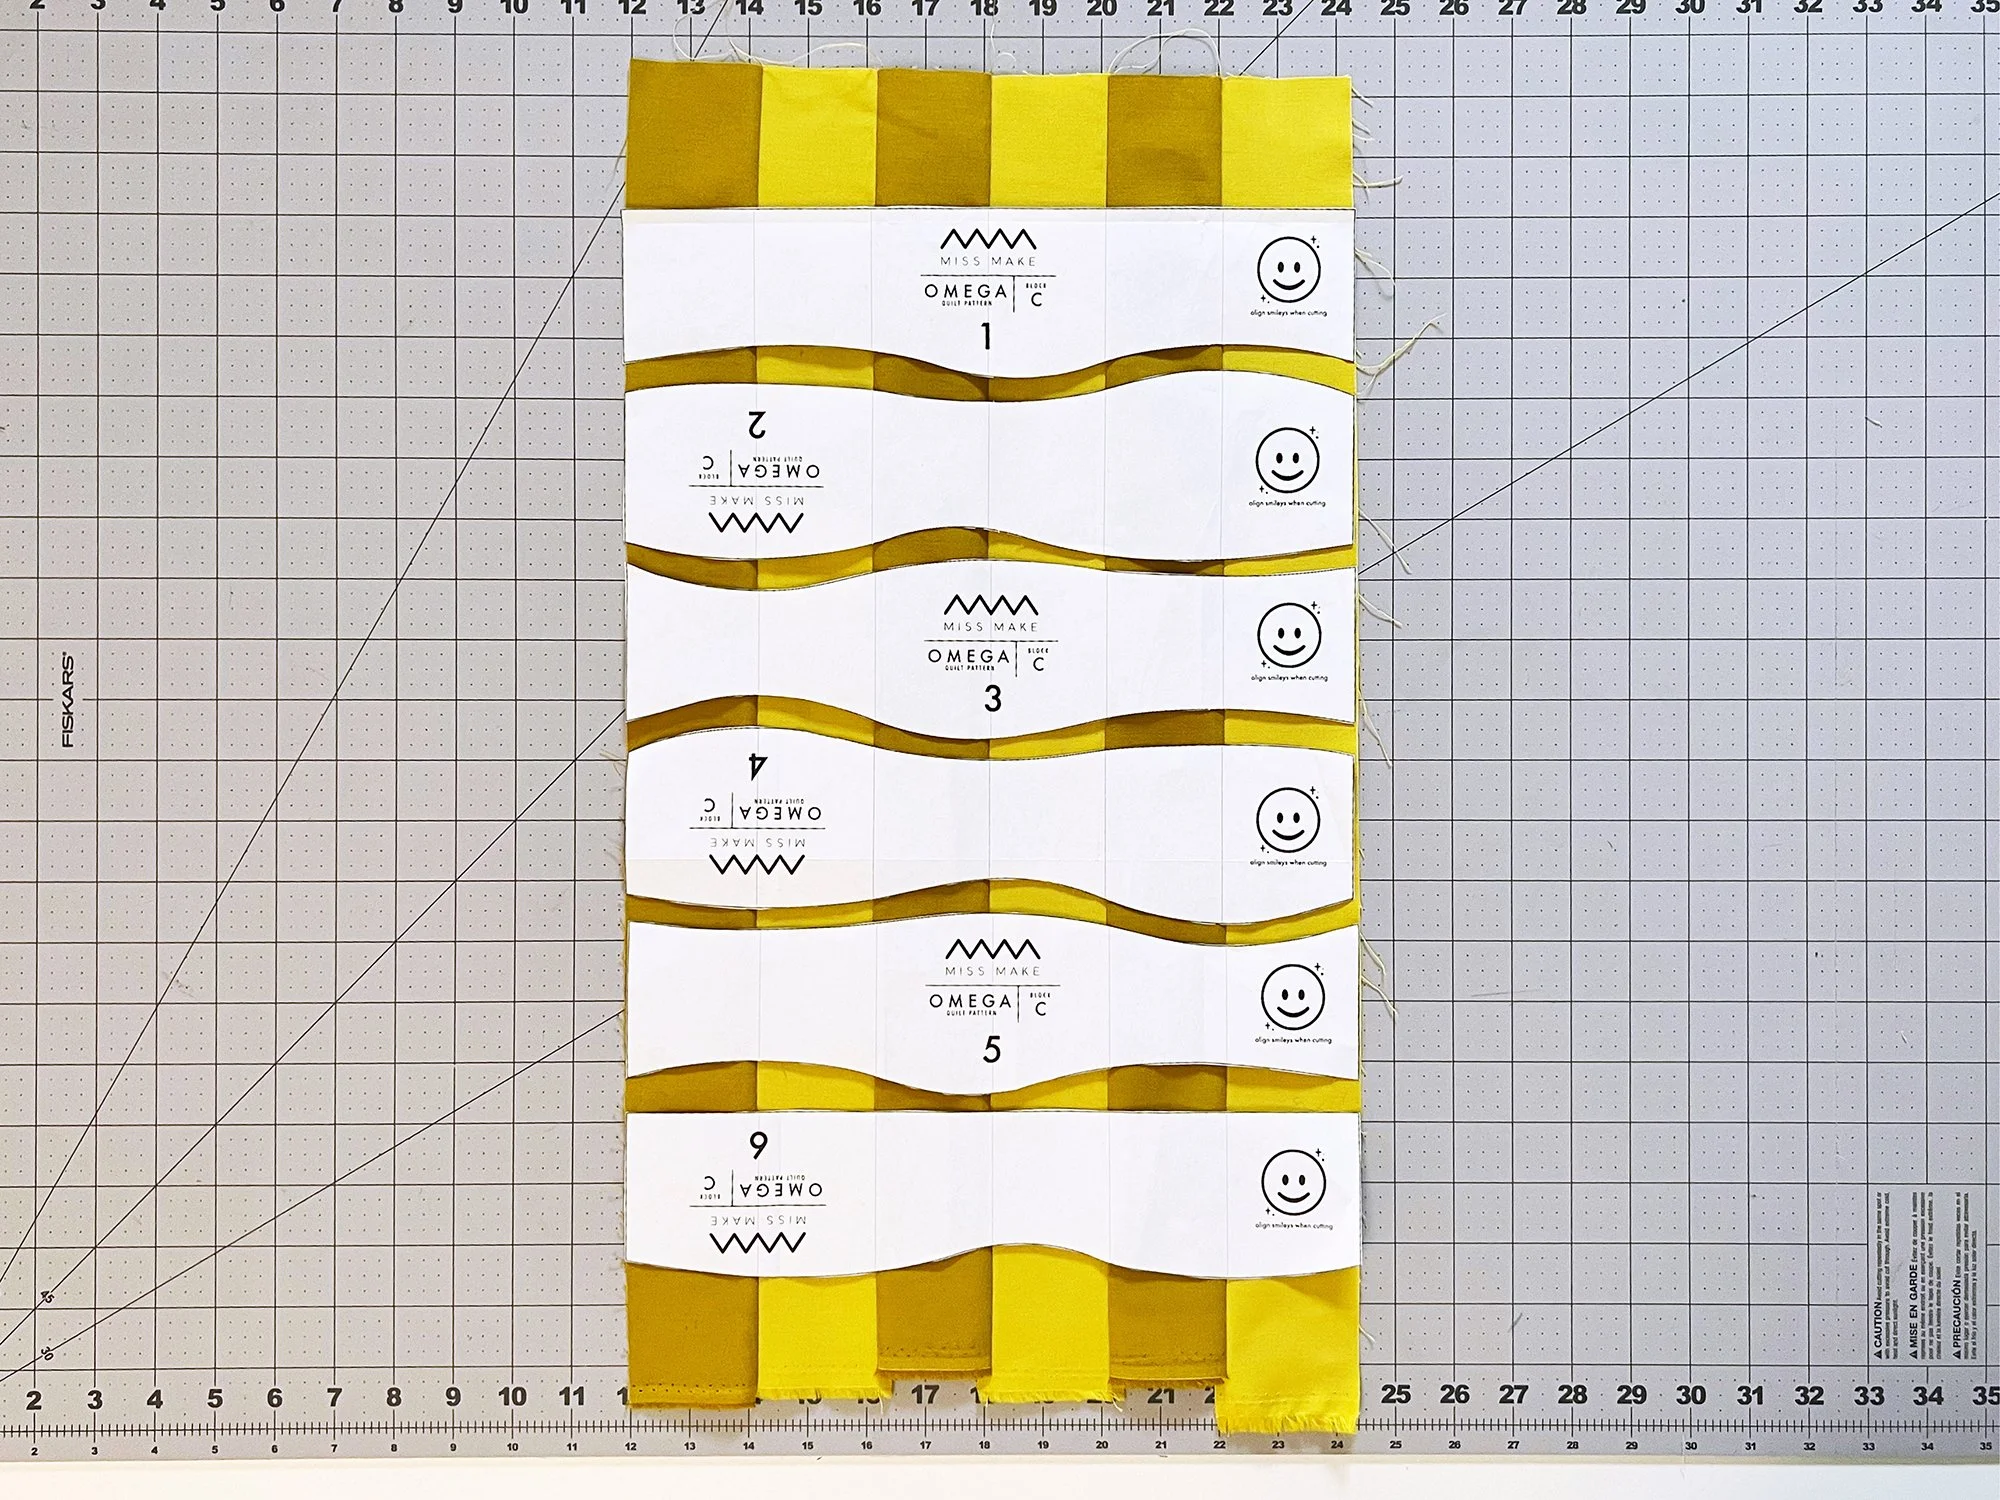
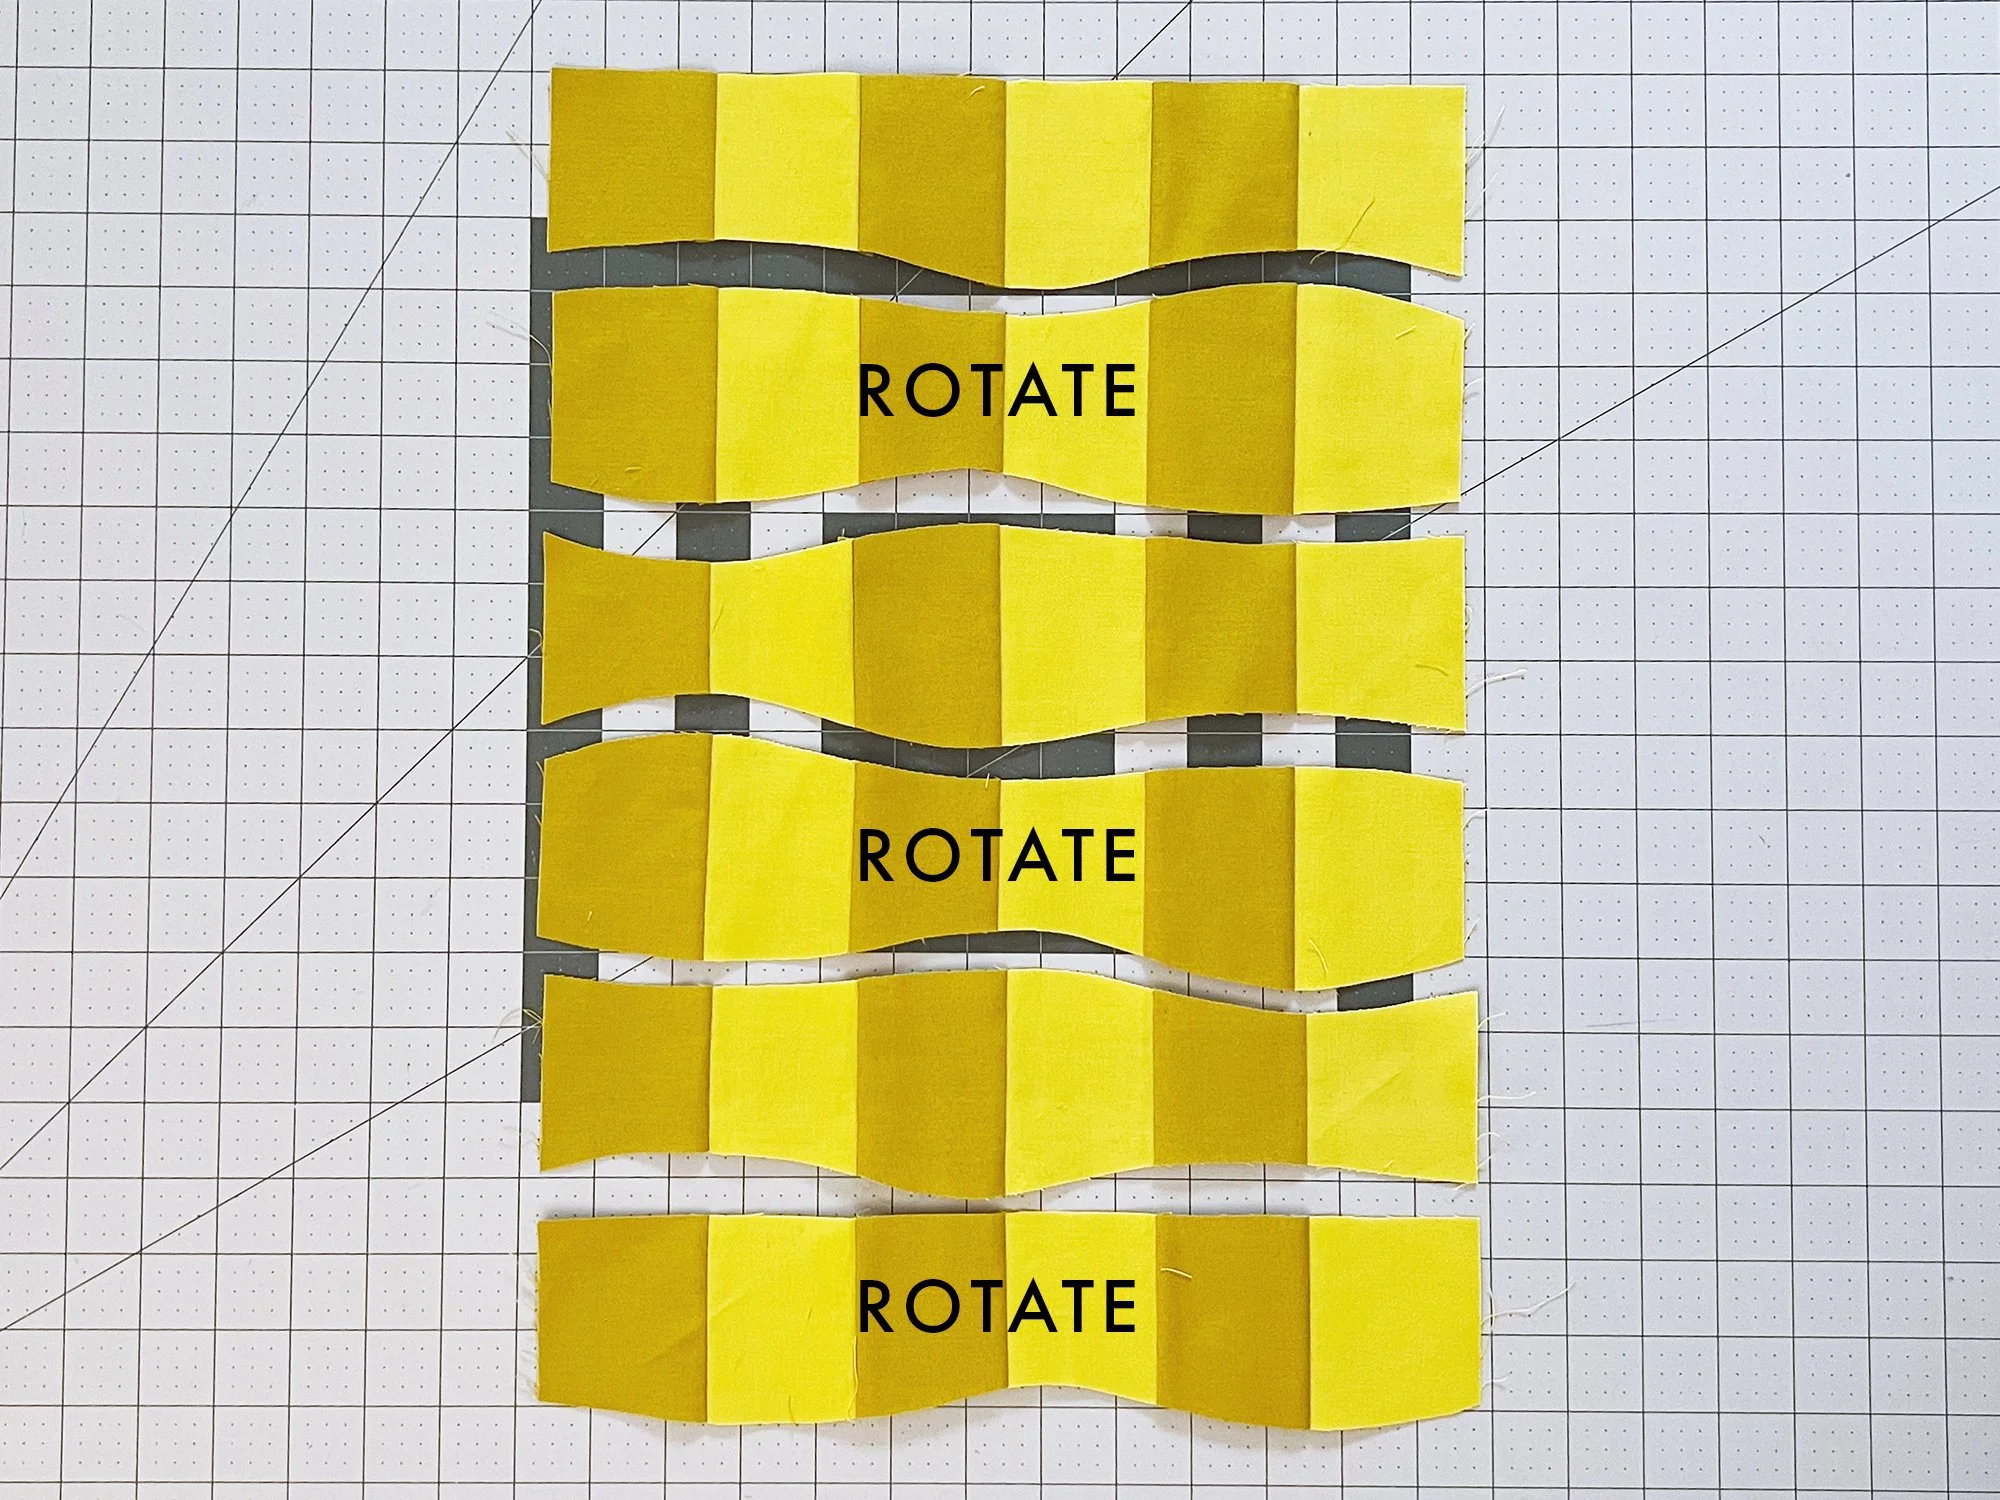
Place a C unit on your cutting mat with the selvages at the bottom. Just like Block A, if you sewed your units correctly, this will make the left-most fabric Fabric 1. Place your Block C templates on top (there are 6 total), face up and with smileys aligned. This will mean templates 2, 4, and 6 are upside down.
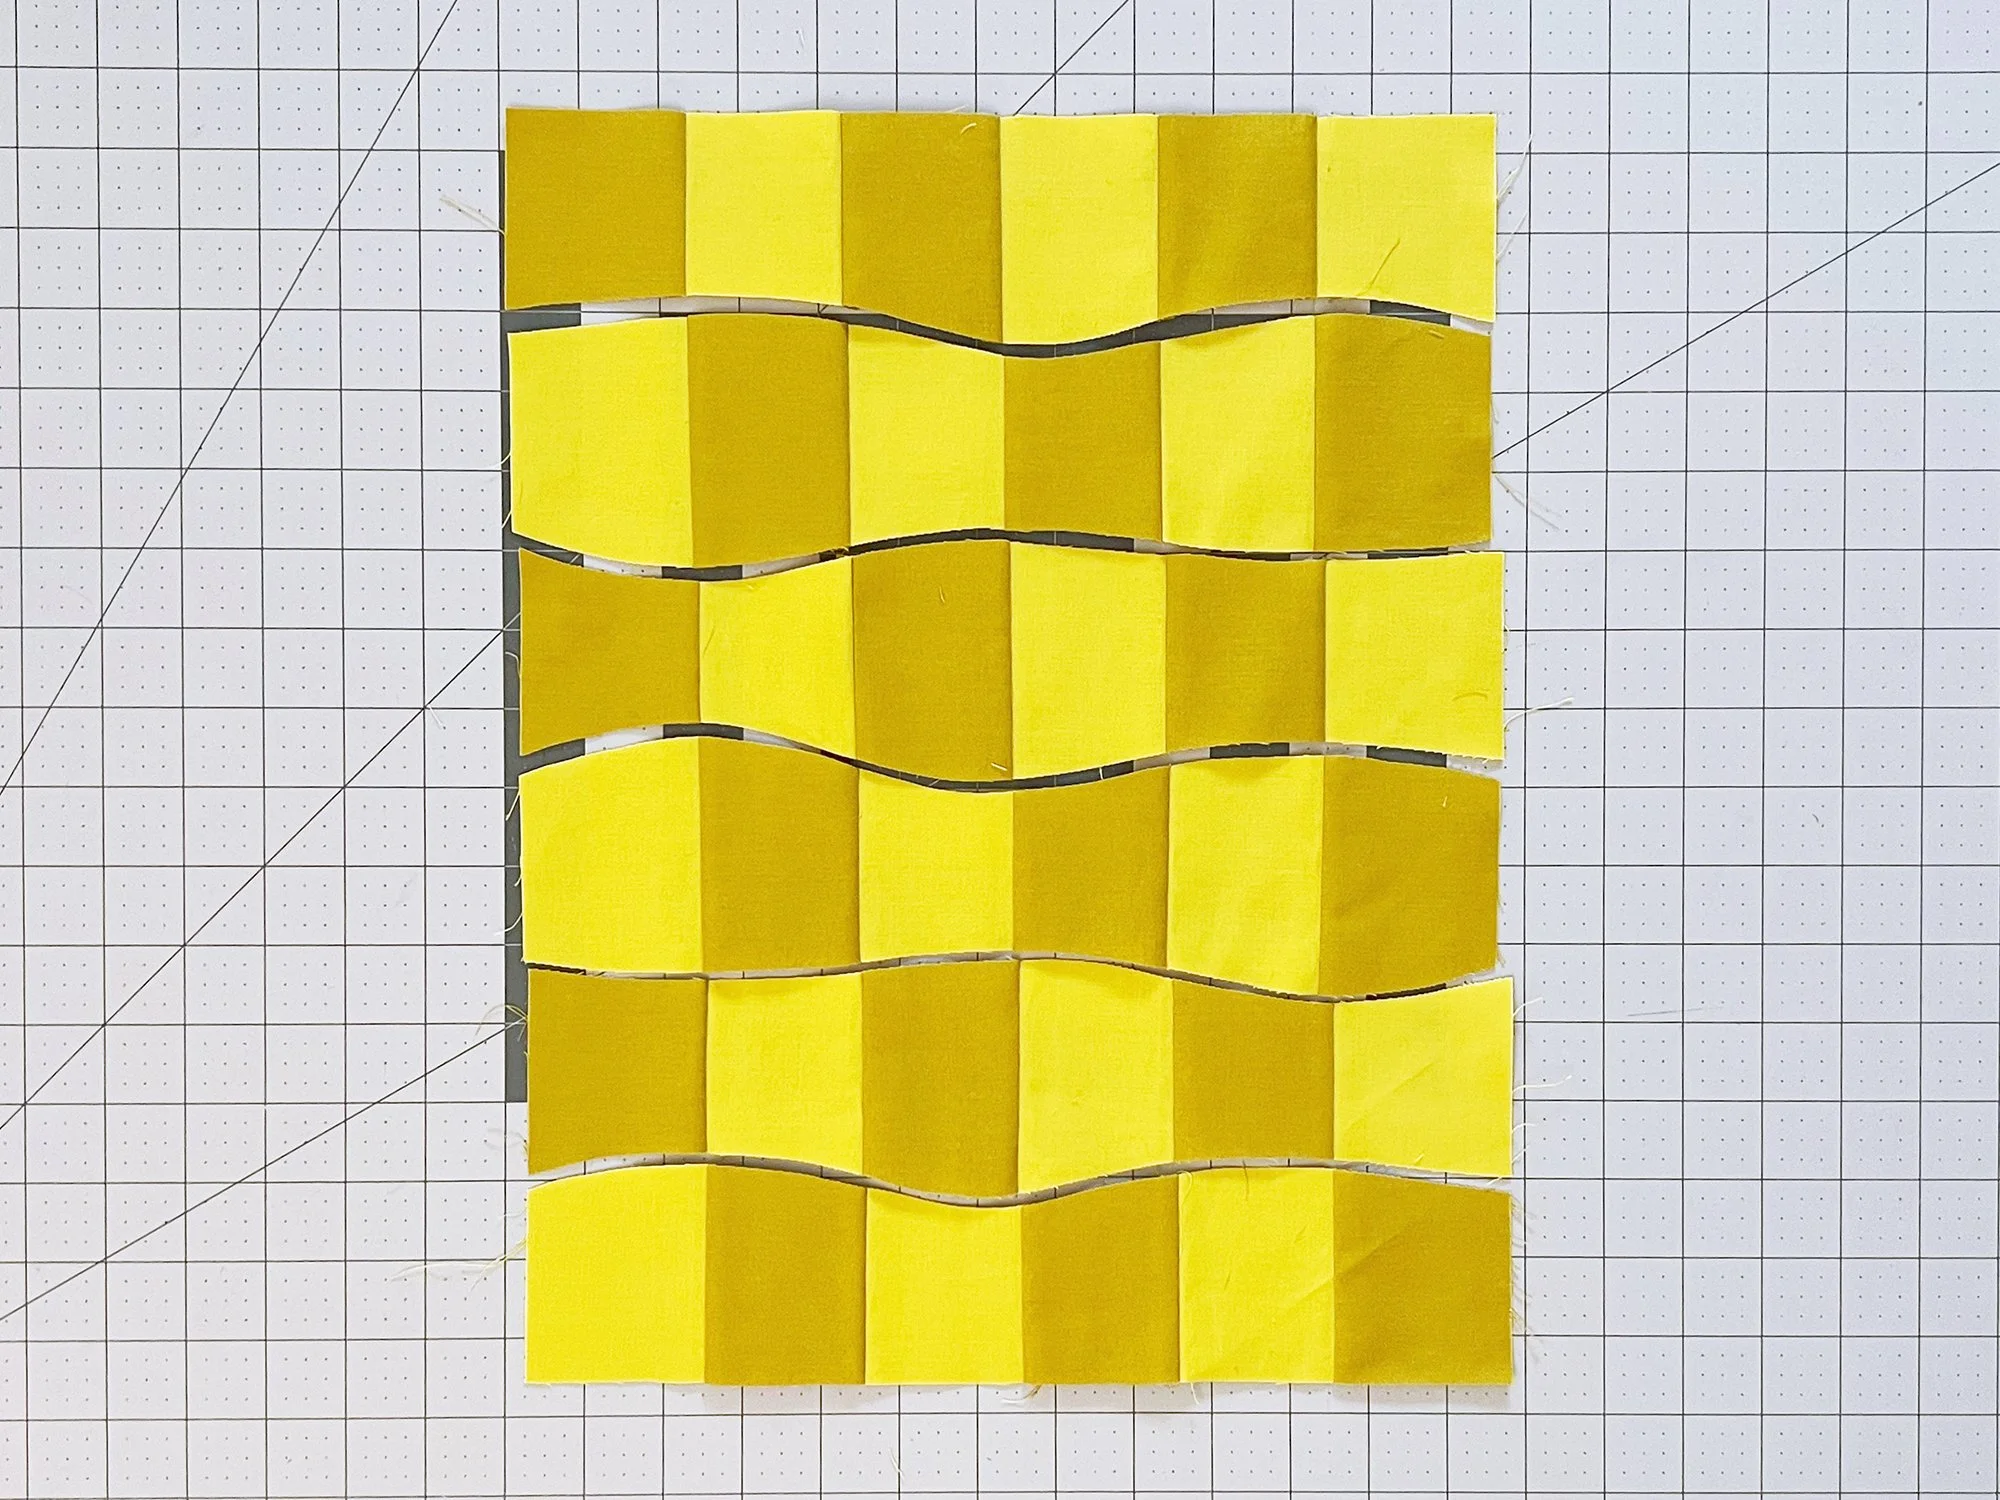
Carefully cut around the top and bottom of each template. Rotate templates 2, 4, and 6 180° to make a checkerboard pattern. As you cut, keep all the template pieces stacked by template. There’s no need to mark any pieces for Block C. Repeat for the rest of your counted-out C units. You should have the number of Block C template sets listed on page 16/10.
TRULY SCRAPPY VERSION
Cut your Block C templates the same way you cut Block A, except use 6 of your pieced C units per set of templates. Cut the quantity of Block C template sets listed at bottom of page 19/11.
CUTTING SAFETY
Using a rotary cutter without a ruler is no joke, and requires you to be on high alert. You’re essentially using a scalpel in pizza cutter format, and you can do some serious damage to yourself if you aren’t careful. Here are some of the habits I try to practice, and some additional ideas for staying safe while cutting:
Always keep your helper hand even with or behind the blade. You will probably need to hold down a template or fabric corner here or there. When doing so, always make sure your non-dominant hand is positioned next to or, even better, behind the rotary cutter. If you are moving the cutter away from you and your other hand is behind it, it will be pretty hard to run over your hand.
Don’t get complacent. For real though. Pay attention. Go slow. Don’t rush. Be deliberate. If you are in a situation with a lot of distractions or without a lot of time, it’s better to just stop for the time being and wait for better circumstances than rush and end up having to take a trip to the ER.
Always close/sheath your rotary cutter when you put it down. Like every single time, even if you are going to immediately pick it back up. At first it might feel silly but eventually you’ll just do it without thinking. I was trained to do this at a fabric store I worked at and now it secretly pains me when I see someone set down an open rotary cutter. Not only is there a safety factor - you might reach for it without looking and cut yourself, or accidentally knock it on the floor and cut your foot/ankle, or your pet(!) - but it’s also way easier to damage your blade if it’s just sitting open. Even if a knock on the floor doesn’t cut you or Fluffins, it’s likely that that blade is ruined. I know we all want to make those things last as long as possible!
Get some cut resistant gloves. If you are really intimidated by using a rotary cutter without a ruler, try cut resistant gloves (easily found on Amazon) usually used for cooking. Full disclosure, I have never personally used these gloves except one time while learning to shuck oysters (which is definitely not the same as using a rotary cutter) but I have seem other quilters using them. It’s essentially an extra safety net - you would still want to follow all the practices listed above, but it will definitely give you some added protection.
Piece Block A
Drumroll! It’s time to piece your Block A templates into blocks! Reminder to set your stitch length to 1.8-2.0 for all piecing.
For each block, you’ll need one set of cut template pieces 1, 2, 3, and 4. Scrappy people, you will want to scramble your template pieces print-wise so that all of your blocks have four unique sets of prints in them. (Be sure to mix them up just by print, meaning still keep all Template 1 together, all Template 2 together, etc.). Just like with strip piecing, you don’t have to necessarily lay them all out in advance (though you can if you have the space!), but when you get to the last 5 or so, stop and lay those out so you don’t accidentally get to the end and have only matching pieces left to choose from.
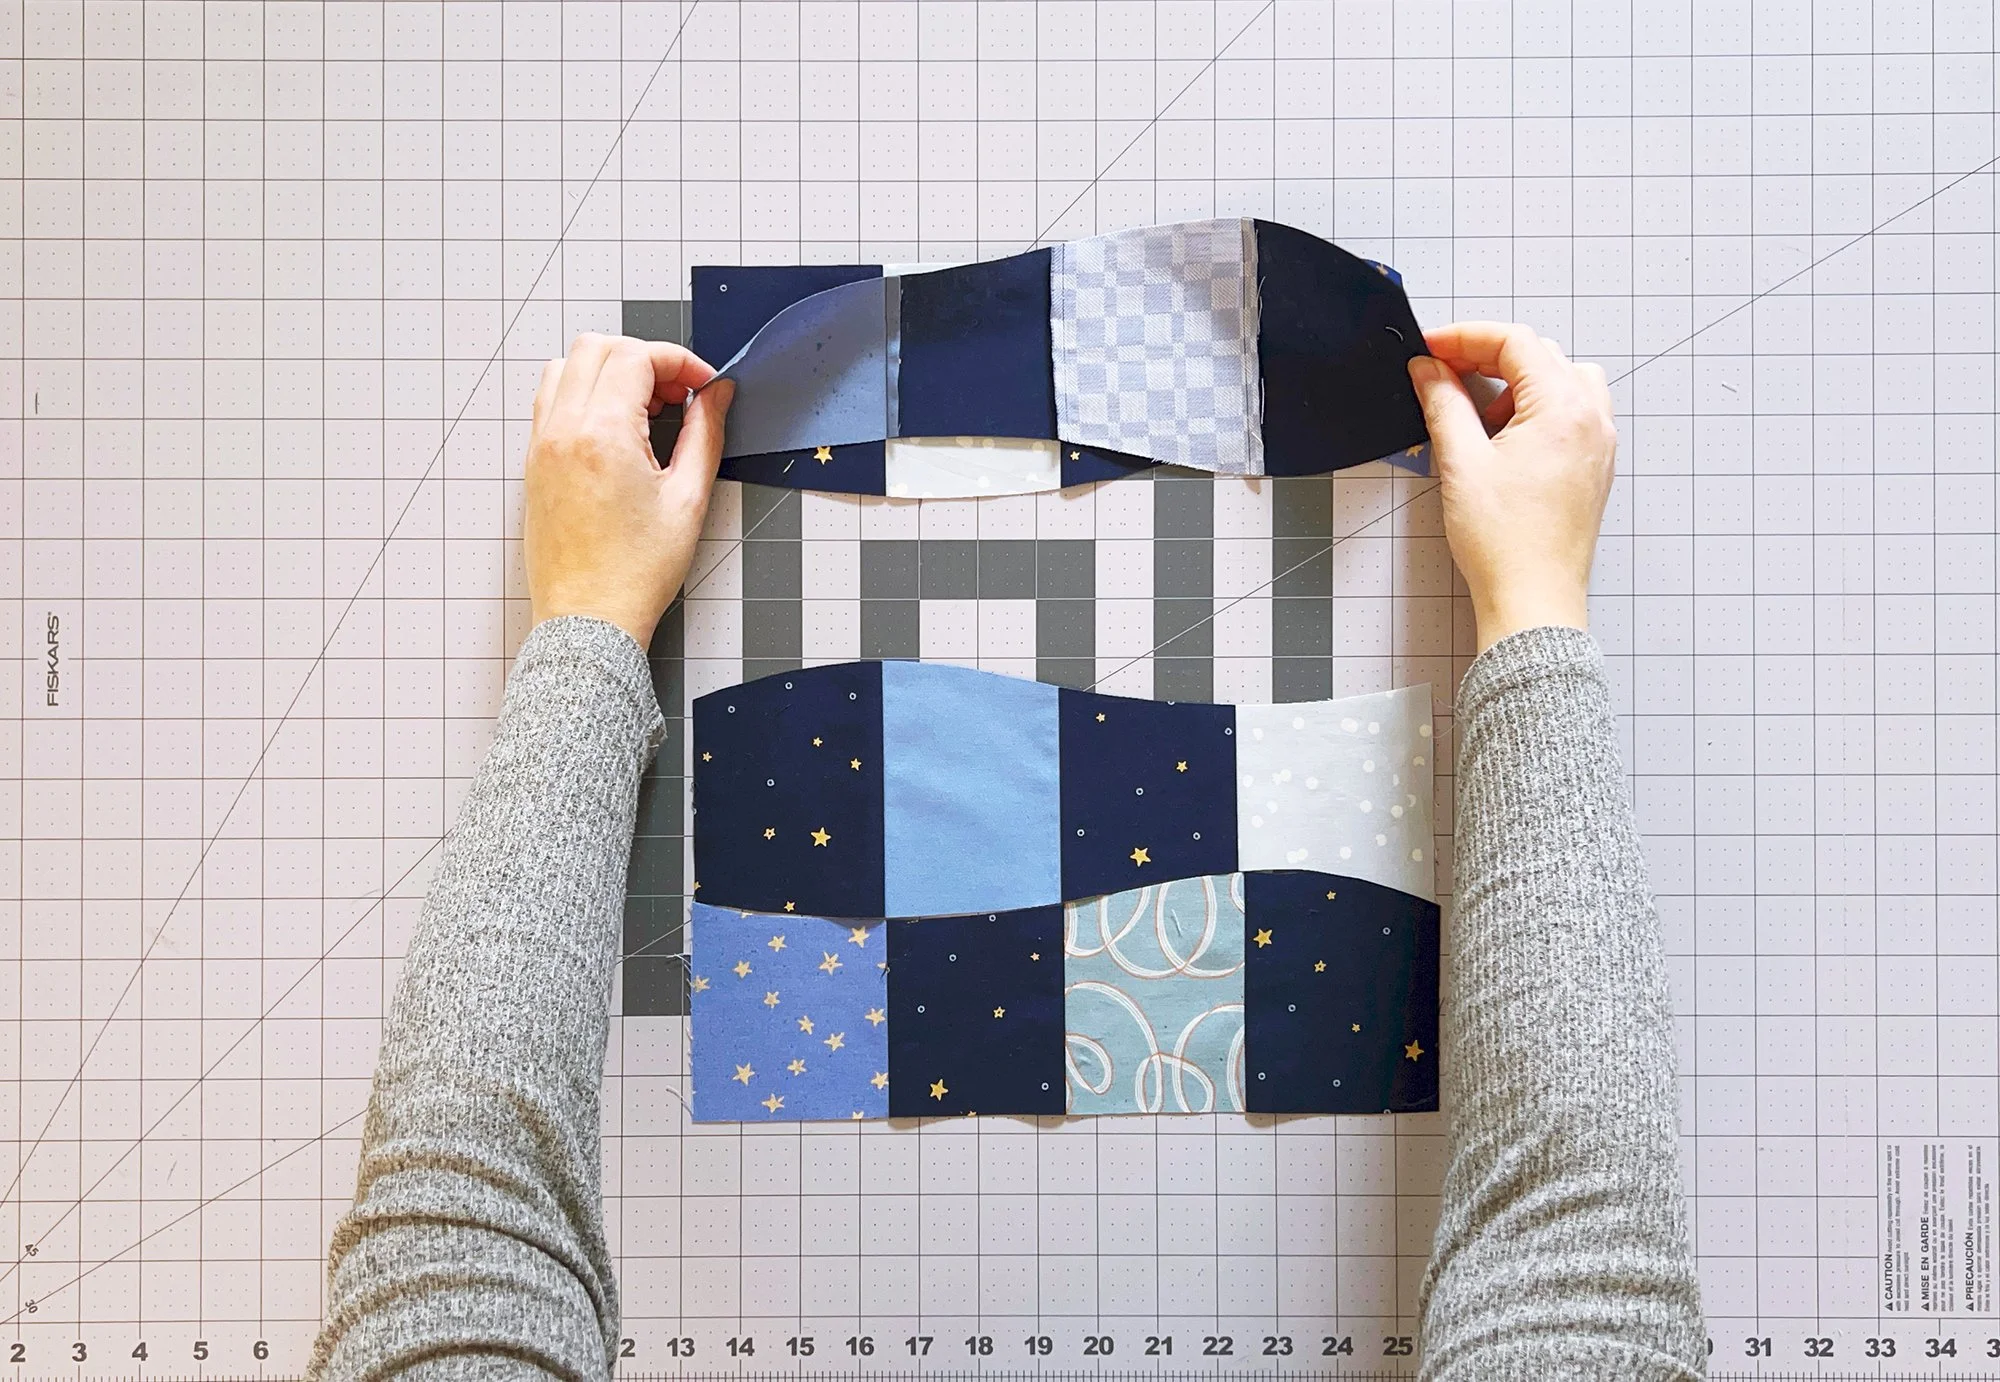
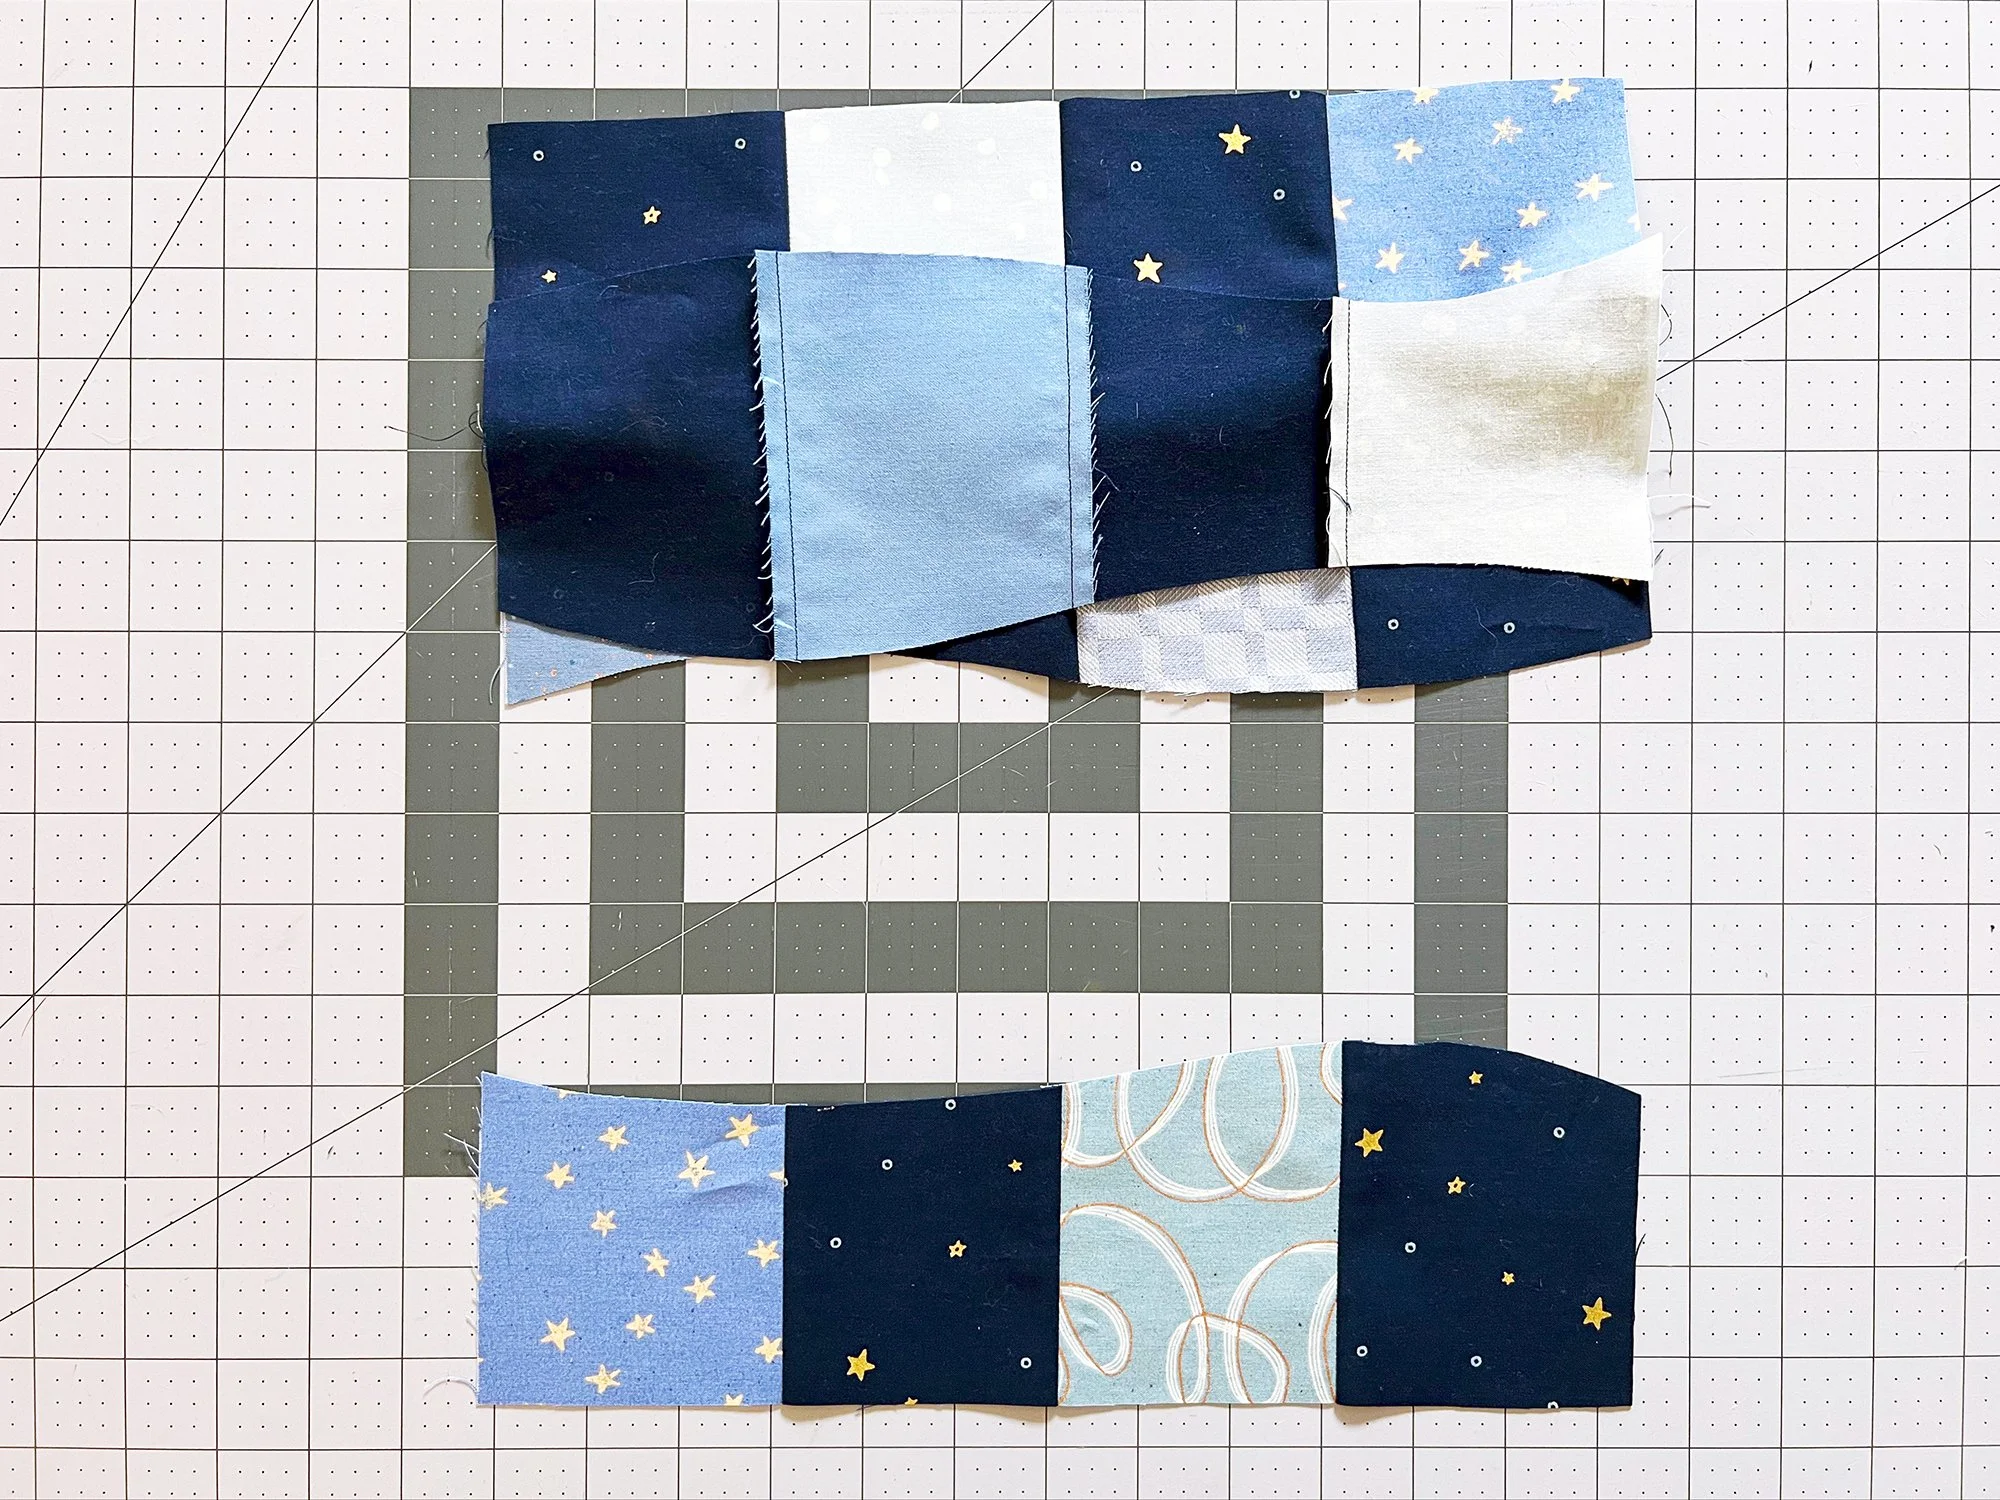
You’ll start by piecing together templates 1 and 2. The easiest way to get set up with minimal confusion is to lay them down in the way they’ll be finished (so, the way you had them stacked). The edges that touch are the edges of each piece that you’ll sew together.
Flip template 2 up over template 1 so they’re right sides together.
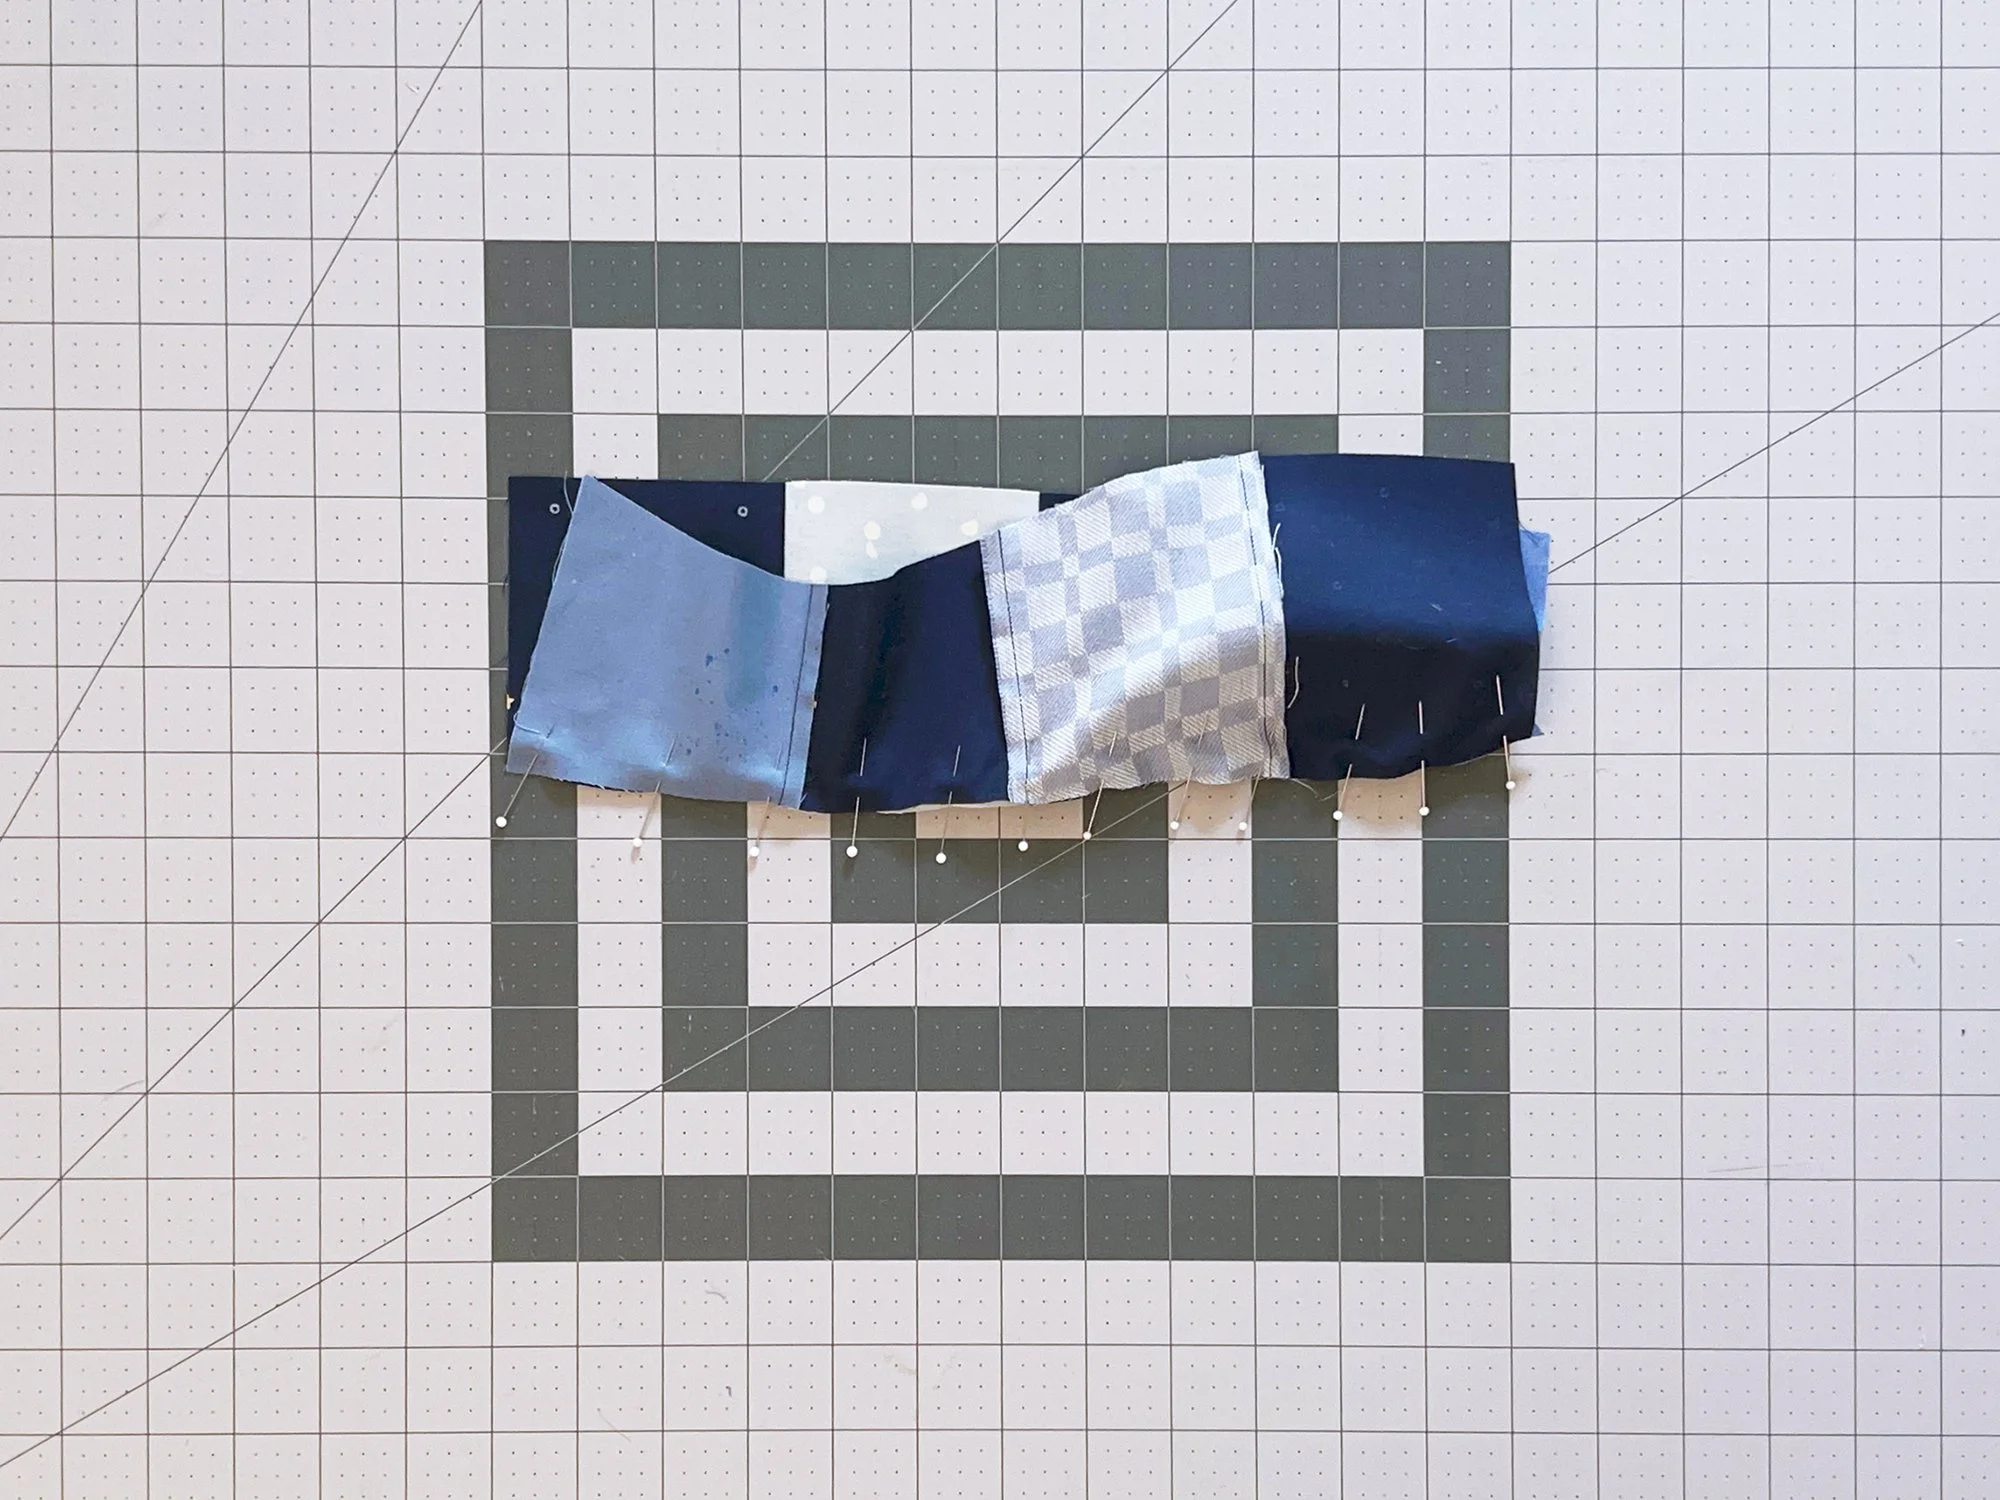
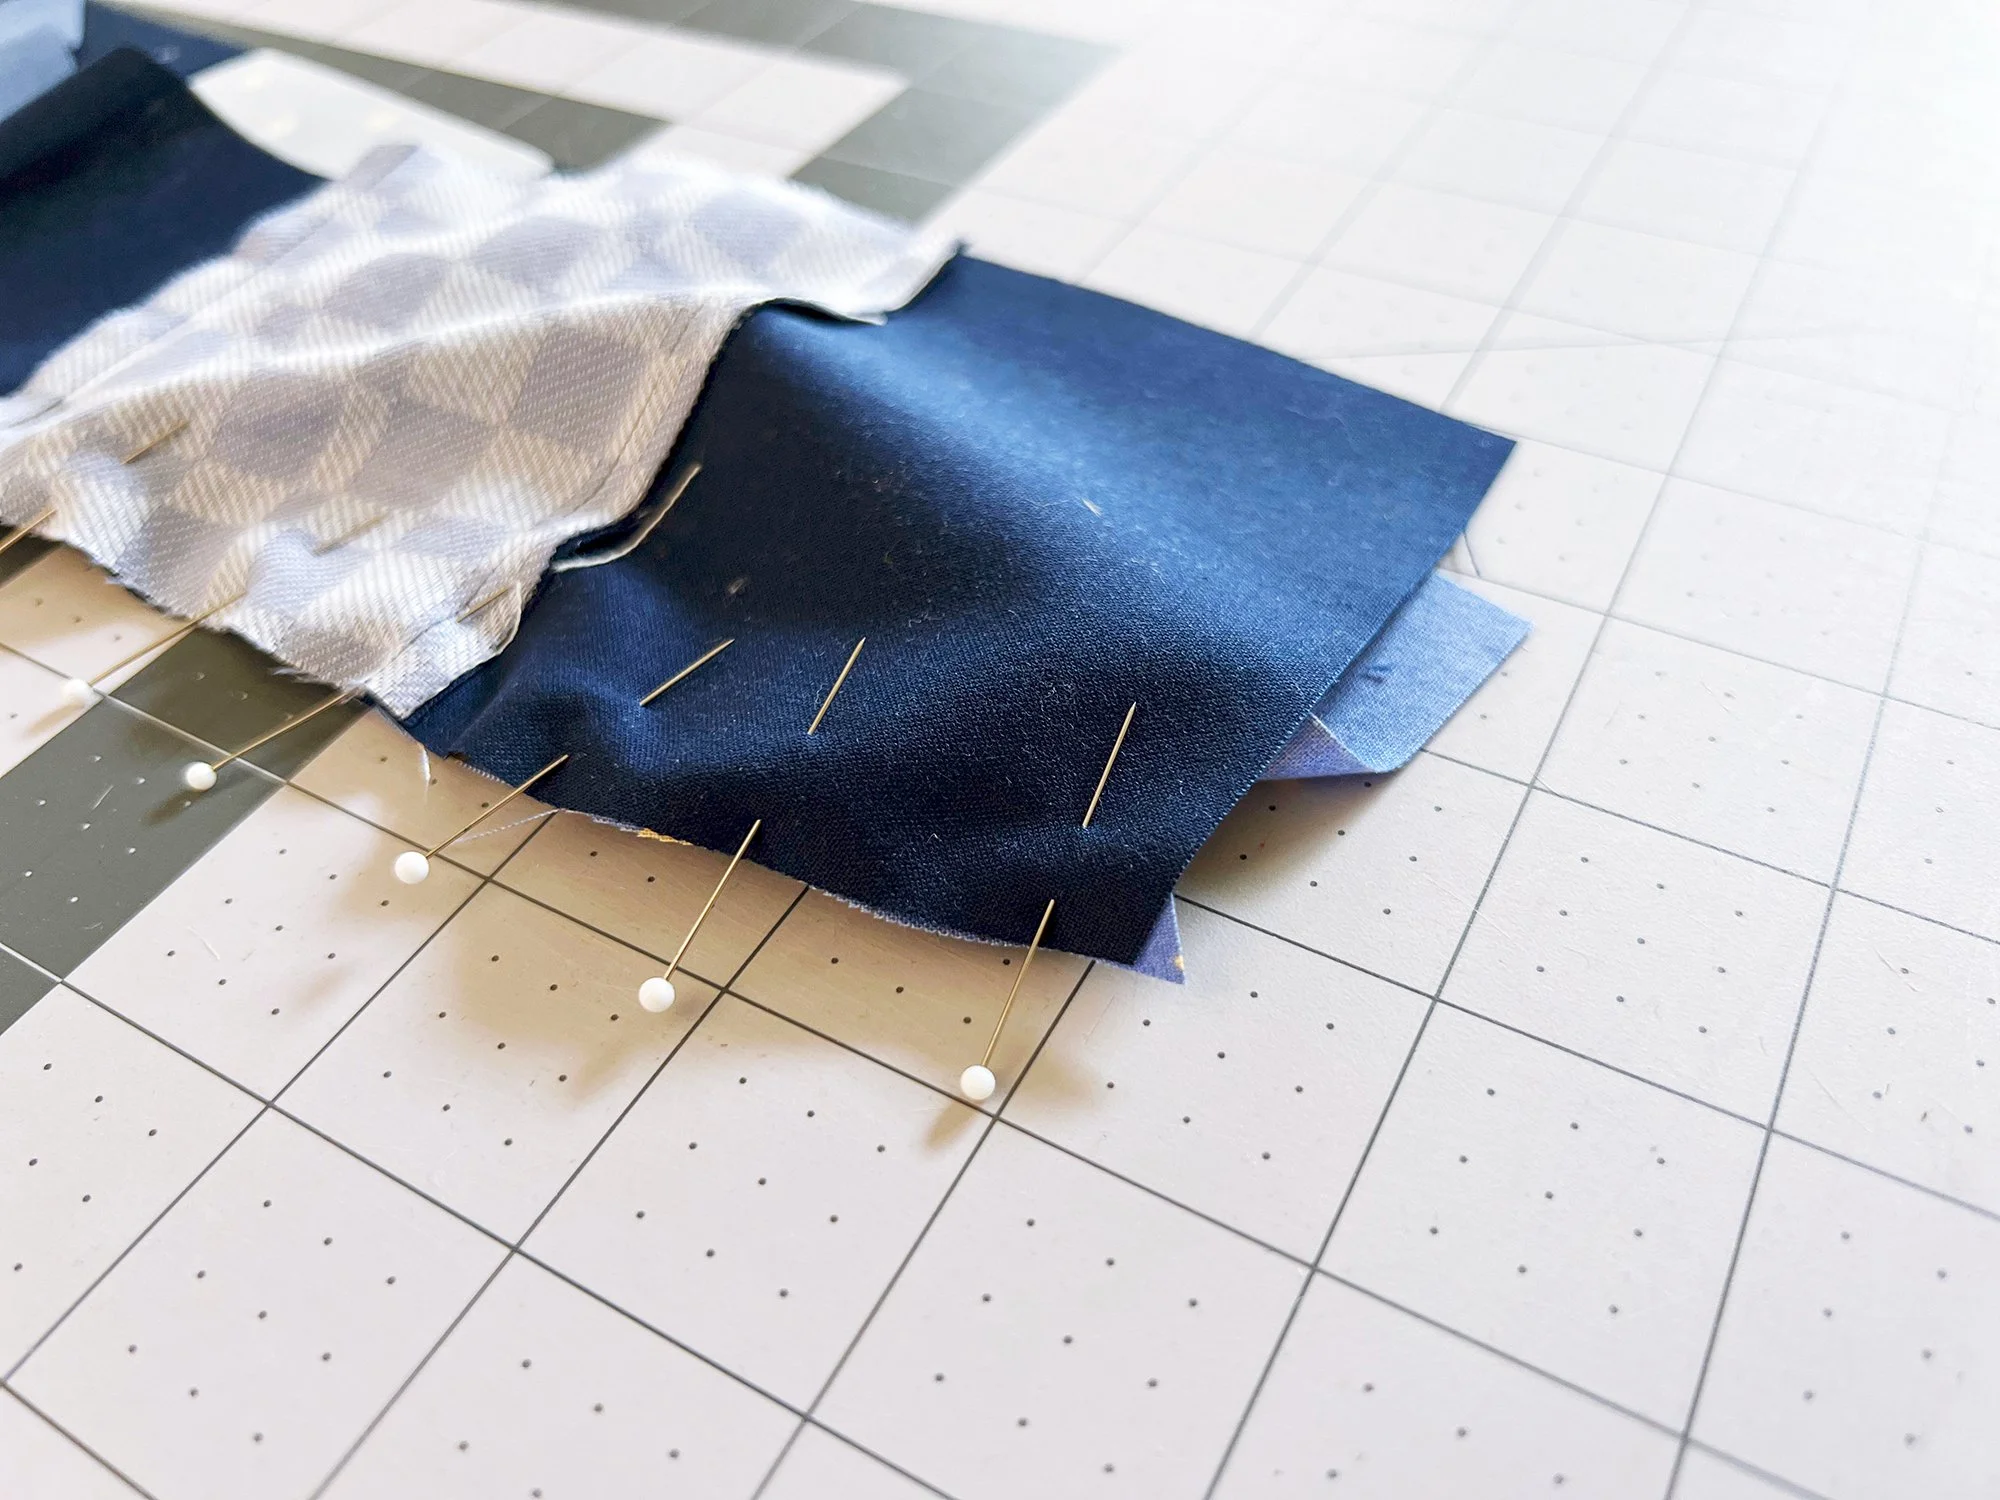
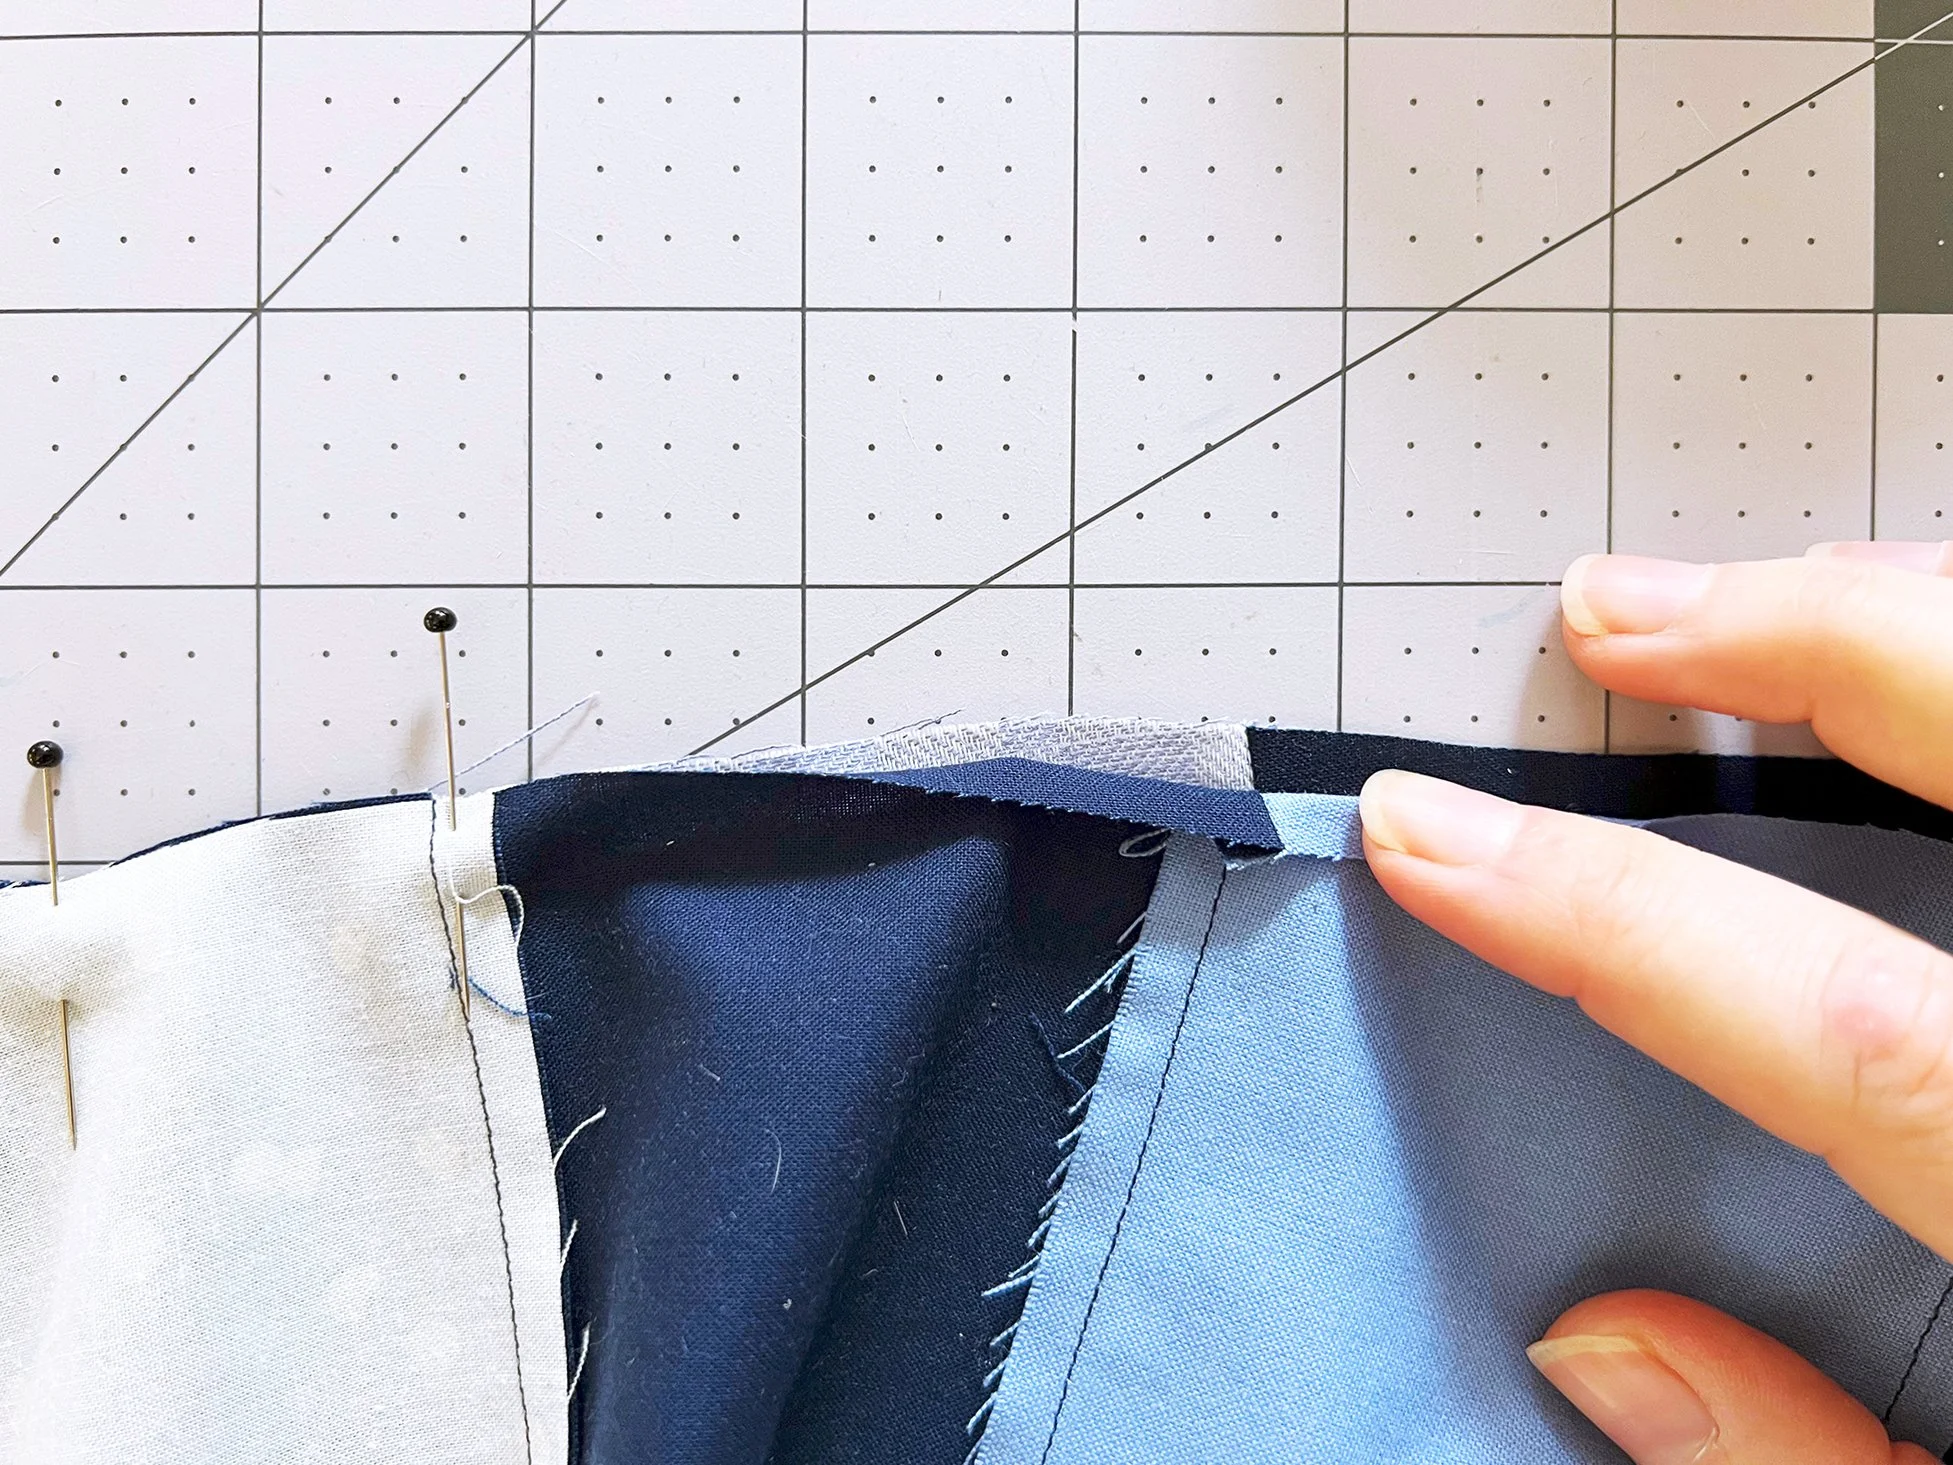
Align the strip-pieced seams - the pressed seam allowances should nest and help you with alignment - and the beginning and end of the seam. At all points, align at the stitching line, which is 1/4” in from the edge. Pin at these points, and a few in between to align all the edges. They won’t want to, you just have to make them. (Alternative no-pin strategy below.)
A note on nesting the strip pieced seam allowances - the first and third set of seam allowances in each curvy seam should nest like normal, since they are at the apex of the curve in those sections. The middle most seams are all at a point where the curve continues in the same direction, which makes them not totally perpendicular to the edge. When pinning, fold back the edge 1/4” to make sure you are aligning these seams at the stitching line, not at the very cut edge of the fabric.
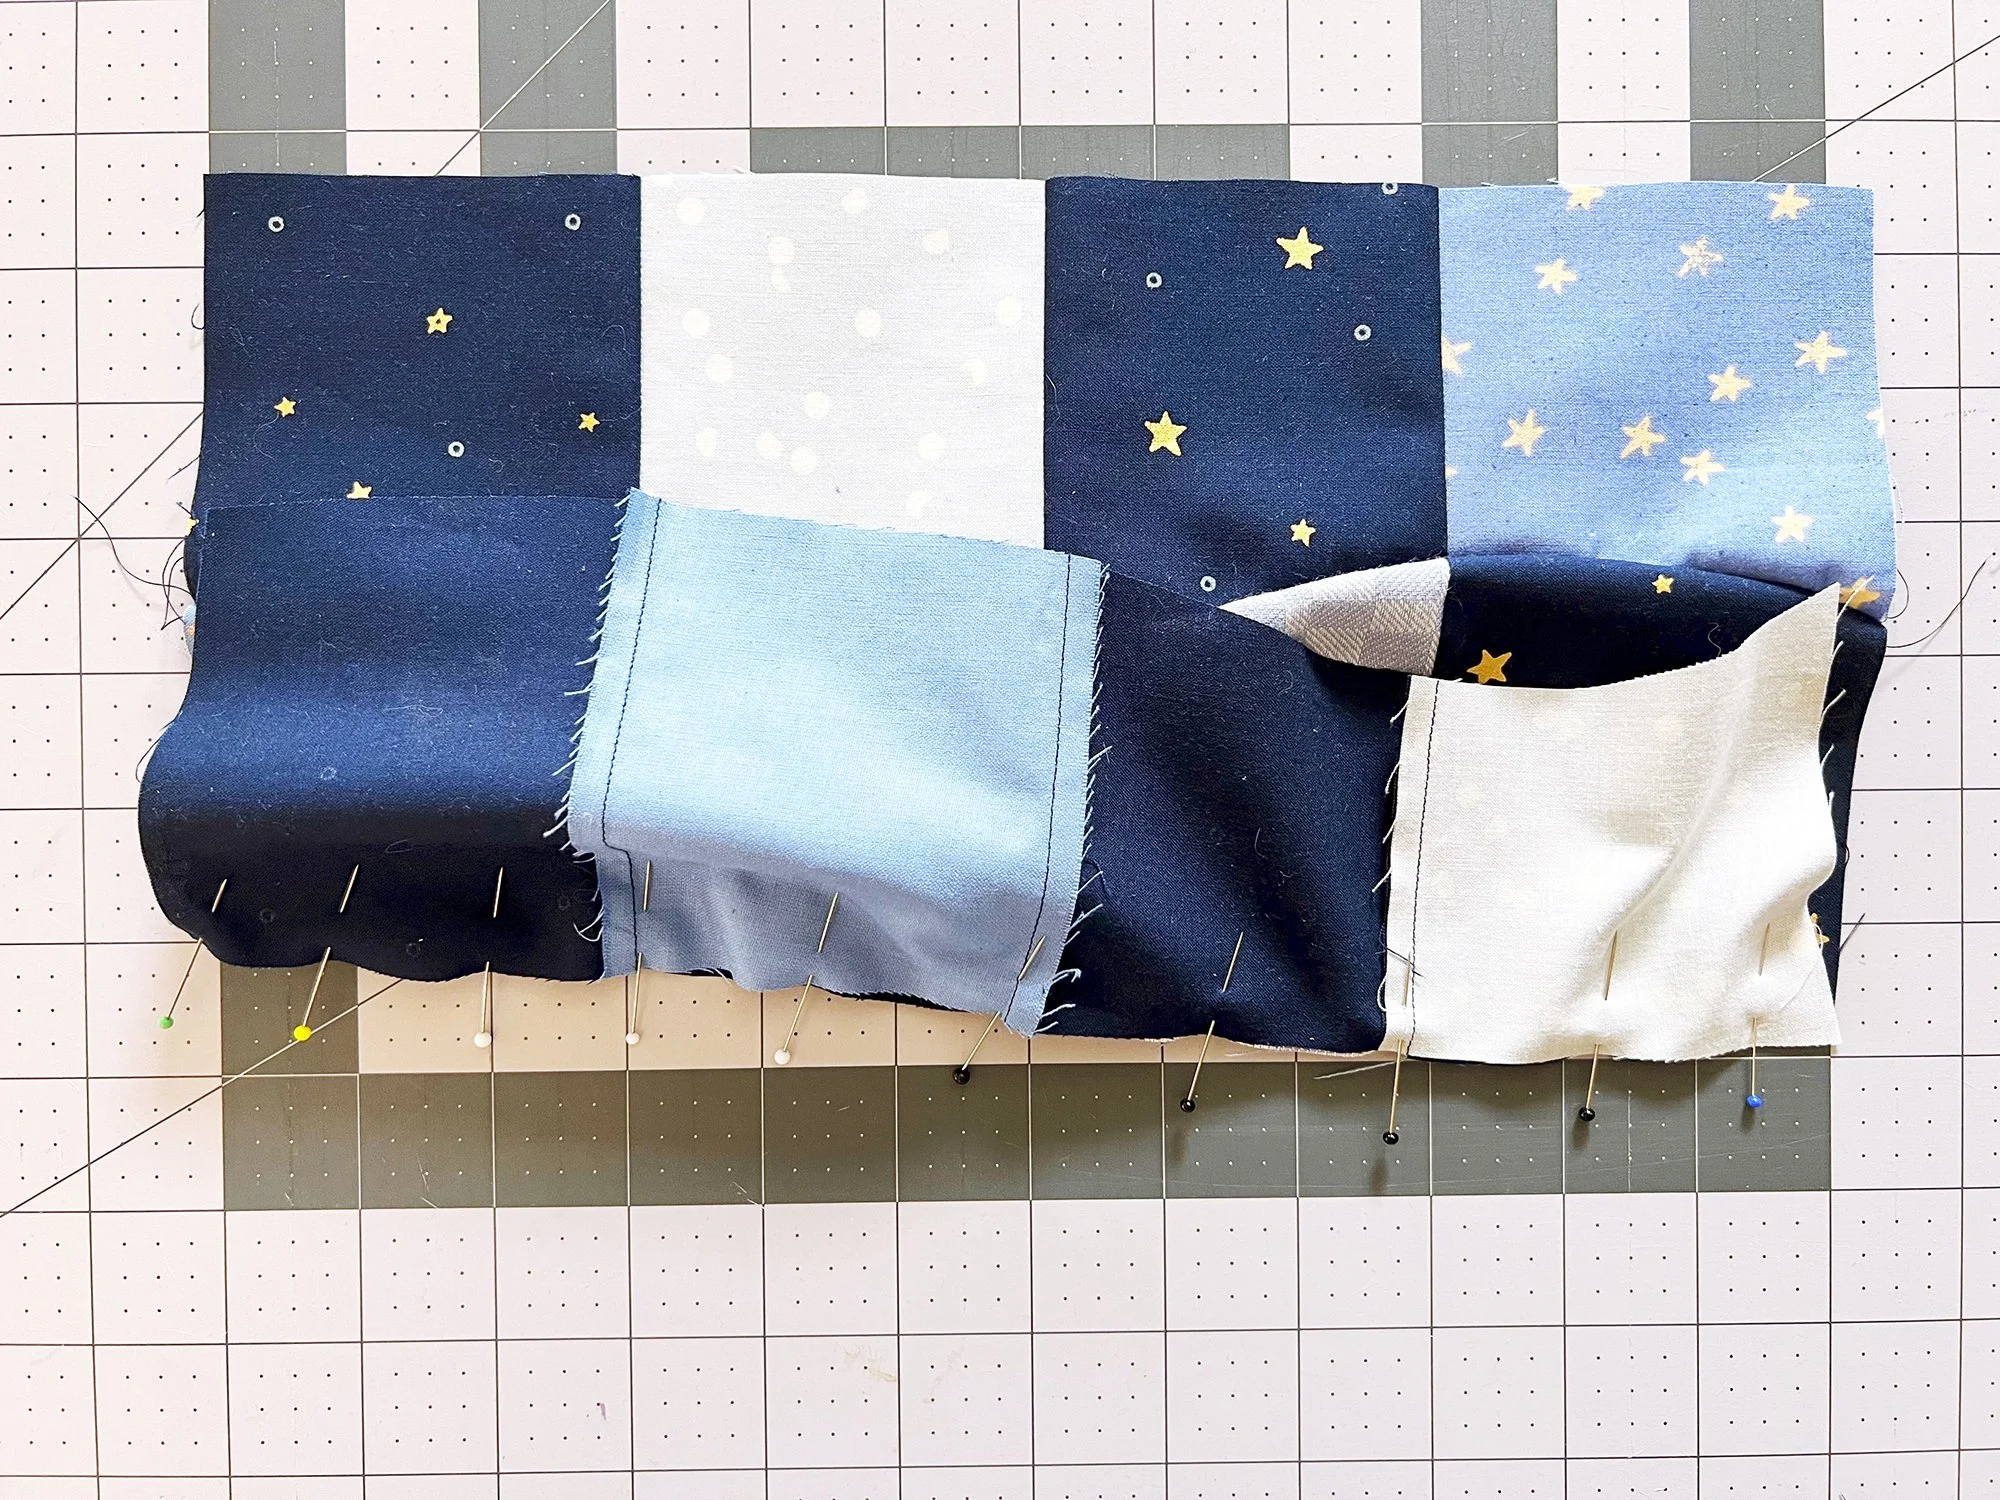
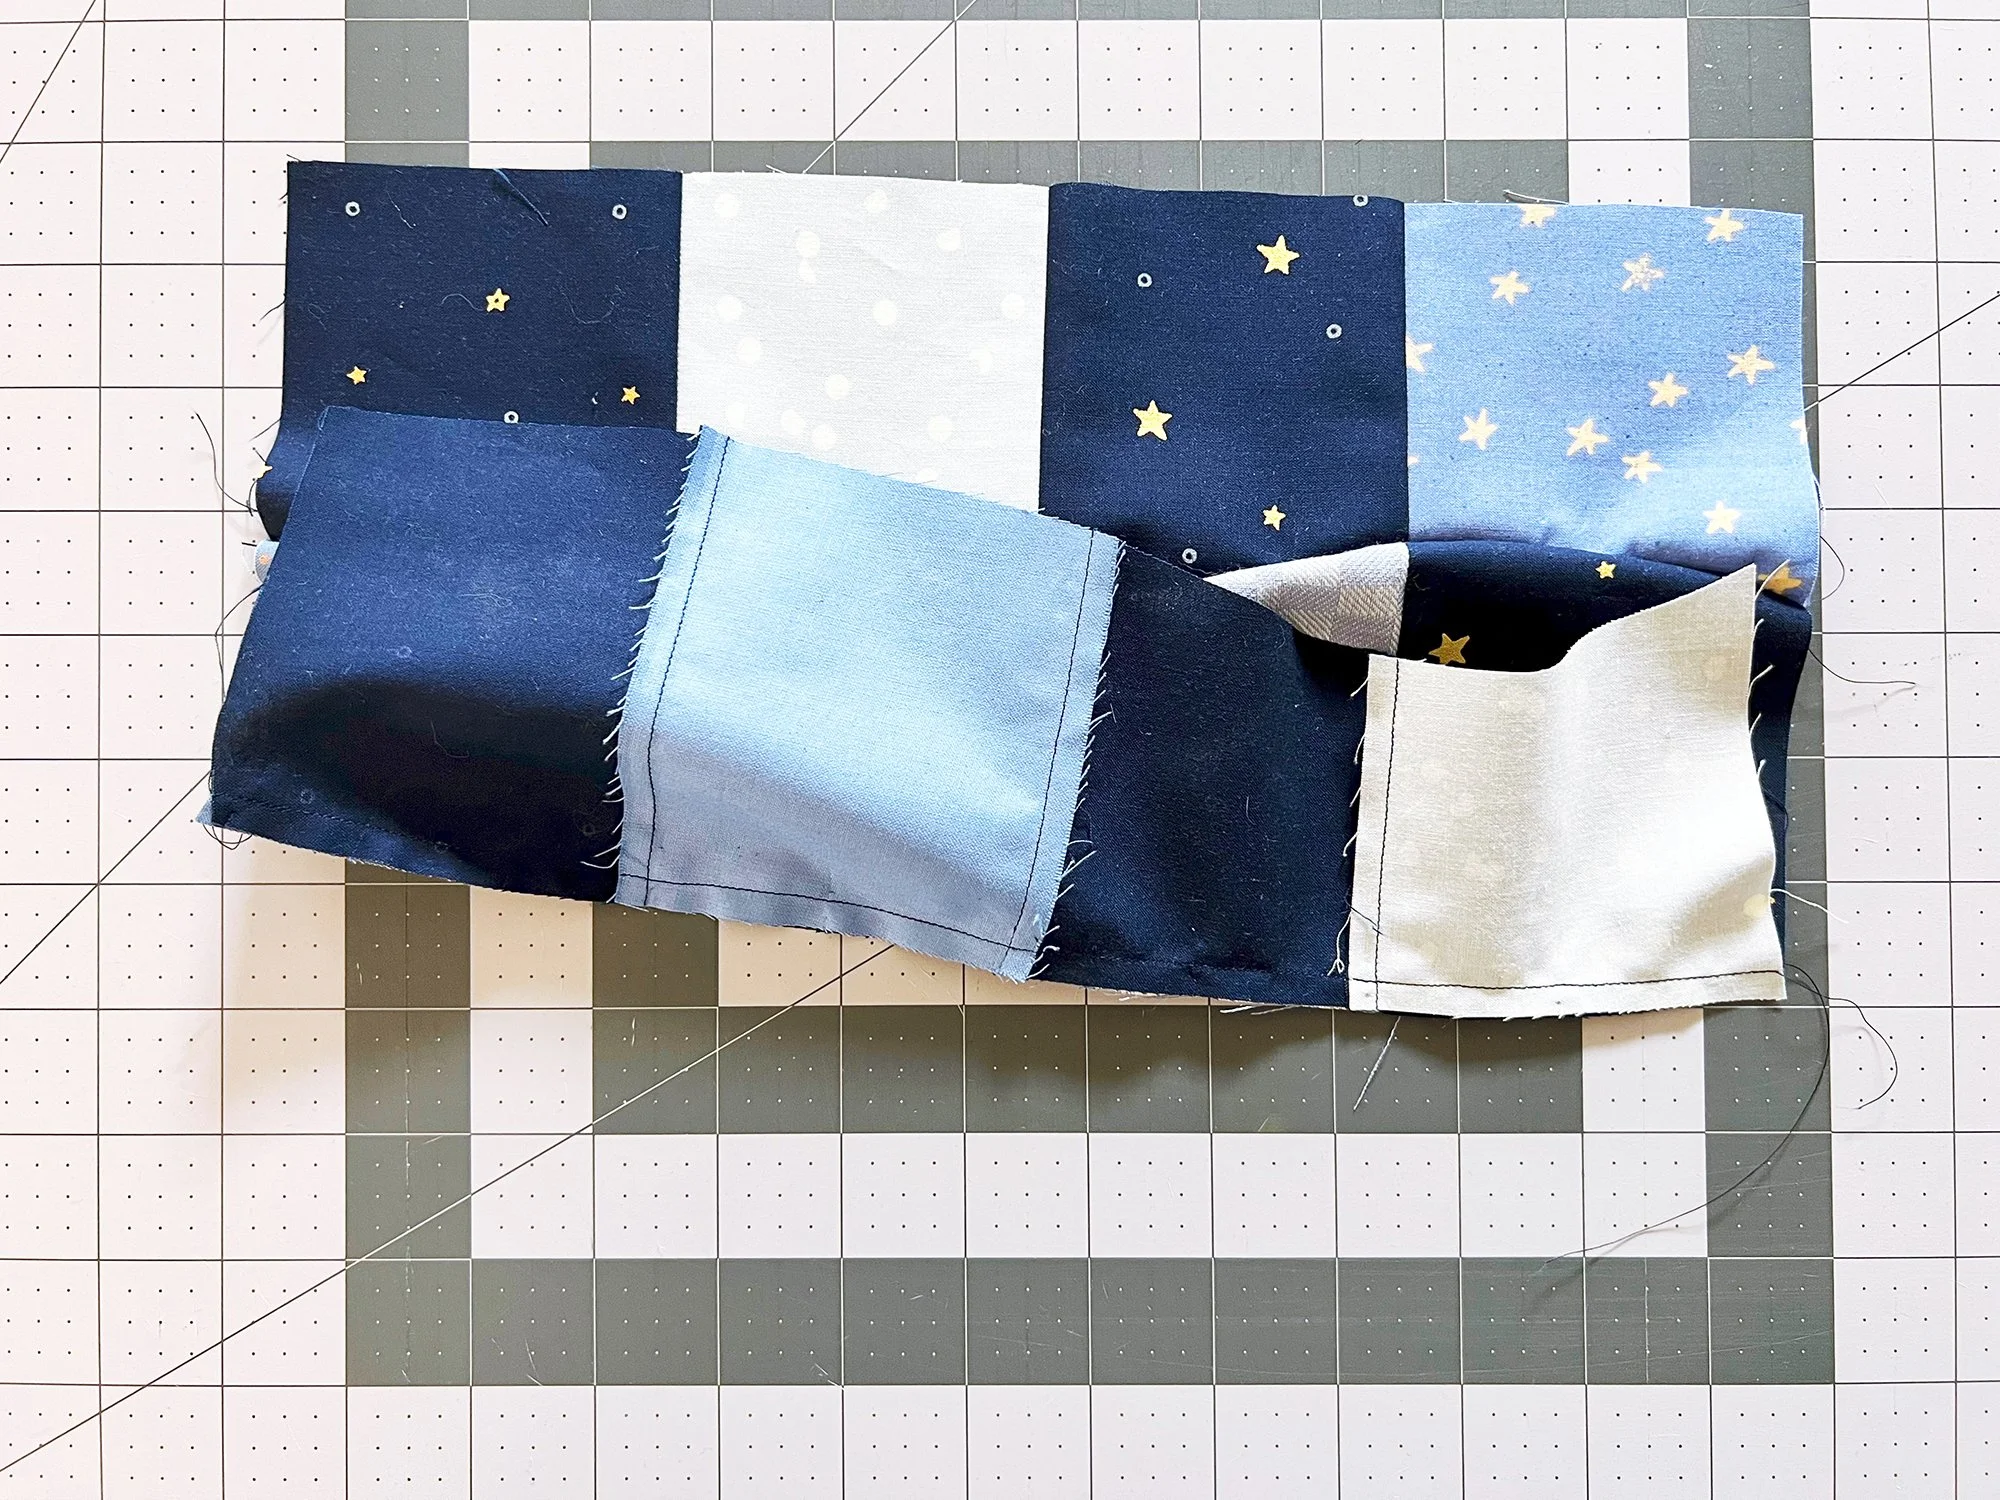
Stitch along the edge, making sure everything going under the needle is smooth as you go. I like sewing with template 2 on the top; this sets you up for starting all the seams on the same side of the block, which will make trimming better. With each seam, sew with the higher number template on top. (Ex. 2 is a higher number than 1 so 2 should go on top.)
It’s gonna feel weird and lumpy; just ignore all the weirdness and focus on what’s right under the needle to make sure that little bit is smooth. I highly recommend using a 1/4” foot for piecing curves, so that you can see the edge of the fabric the whole time. With wider feet, the edge disappears under the foot, which can make sewing curves a lot harder.
Don’t worry about pressing yet. Open the two pieces you just sewed together and put them back in position with the other templates.
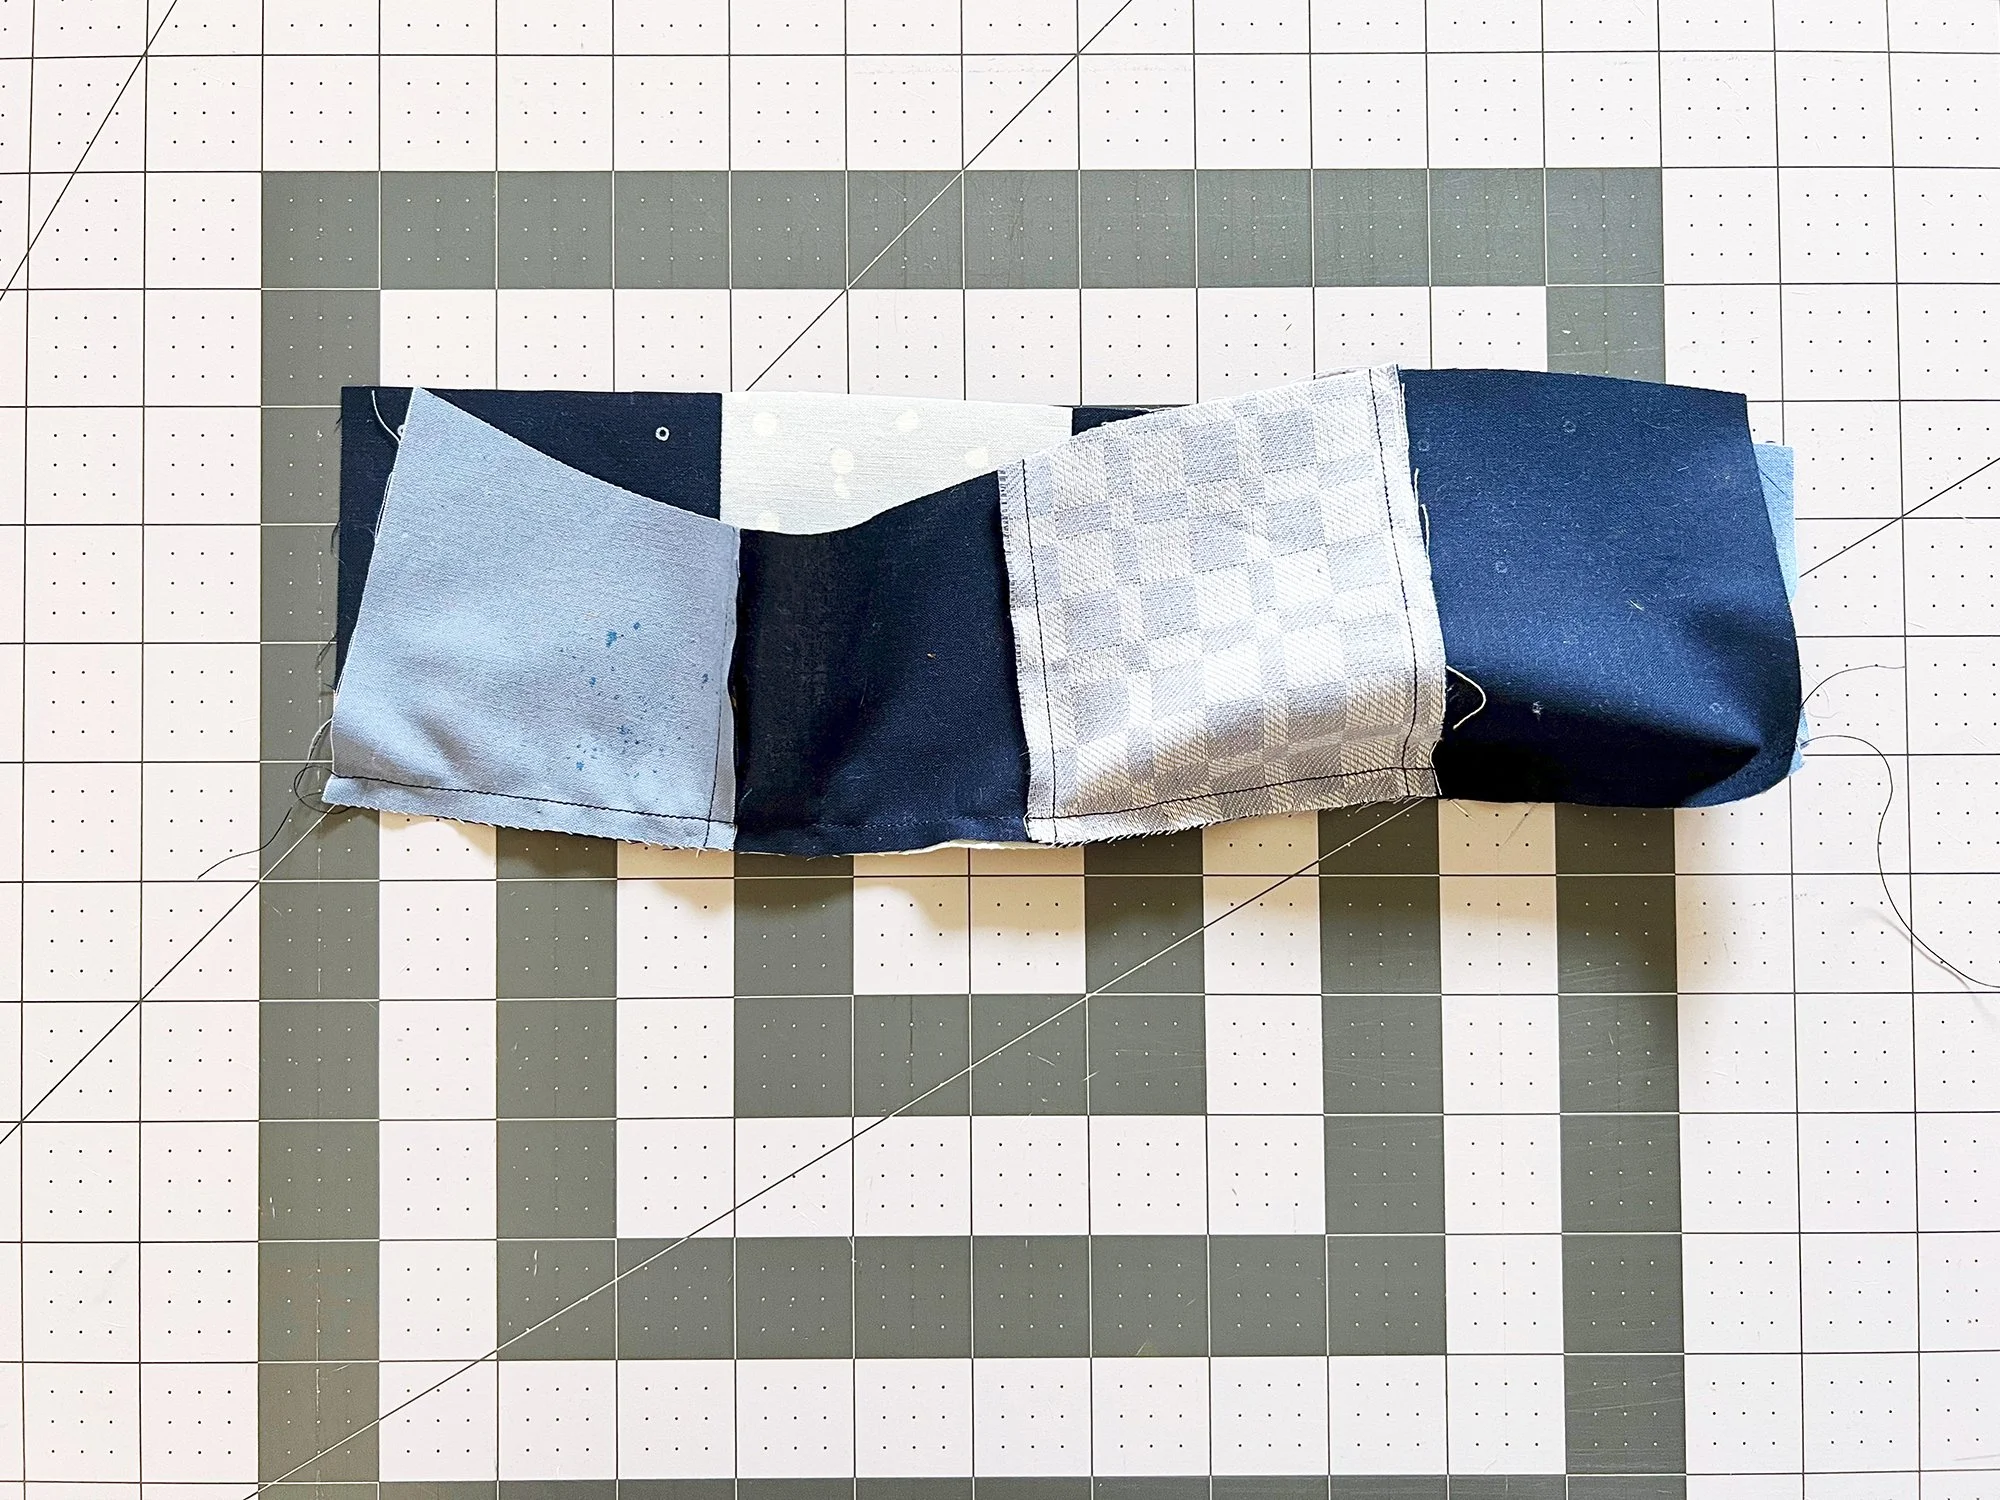
The meeting edges of templates 2 & 3 will be the edges you sew next. Flip template 3 up over template 2 so they’re right sides together.
Repeat your aligning, pinning and stitching process with this seam, sewing with template 3 on top.
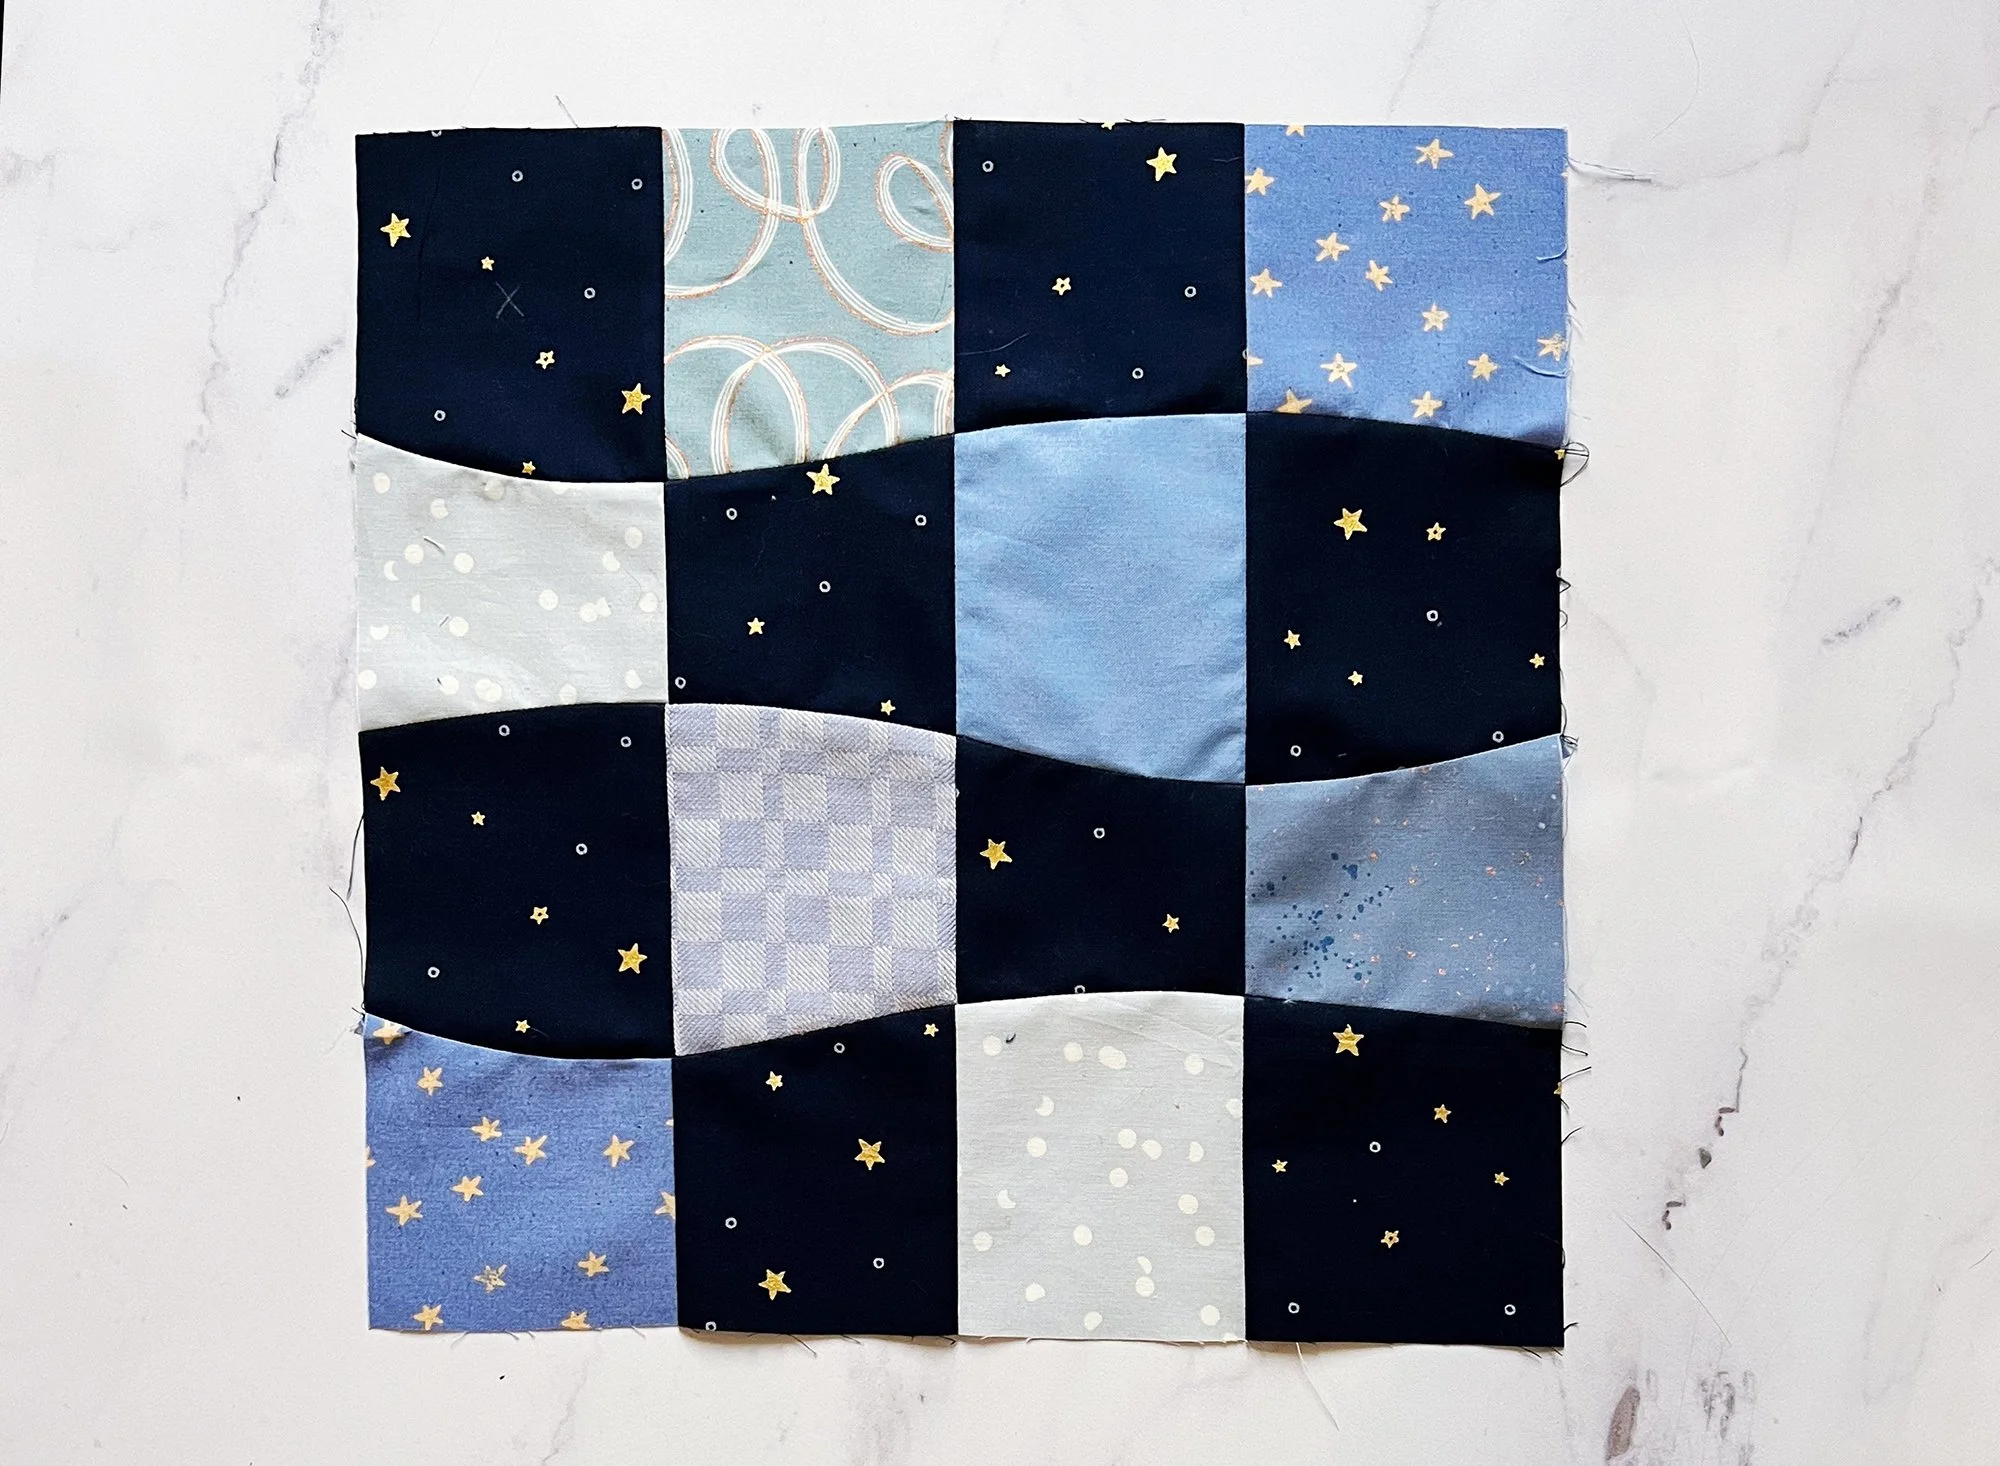
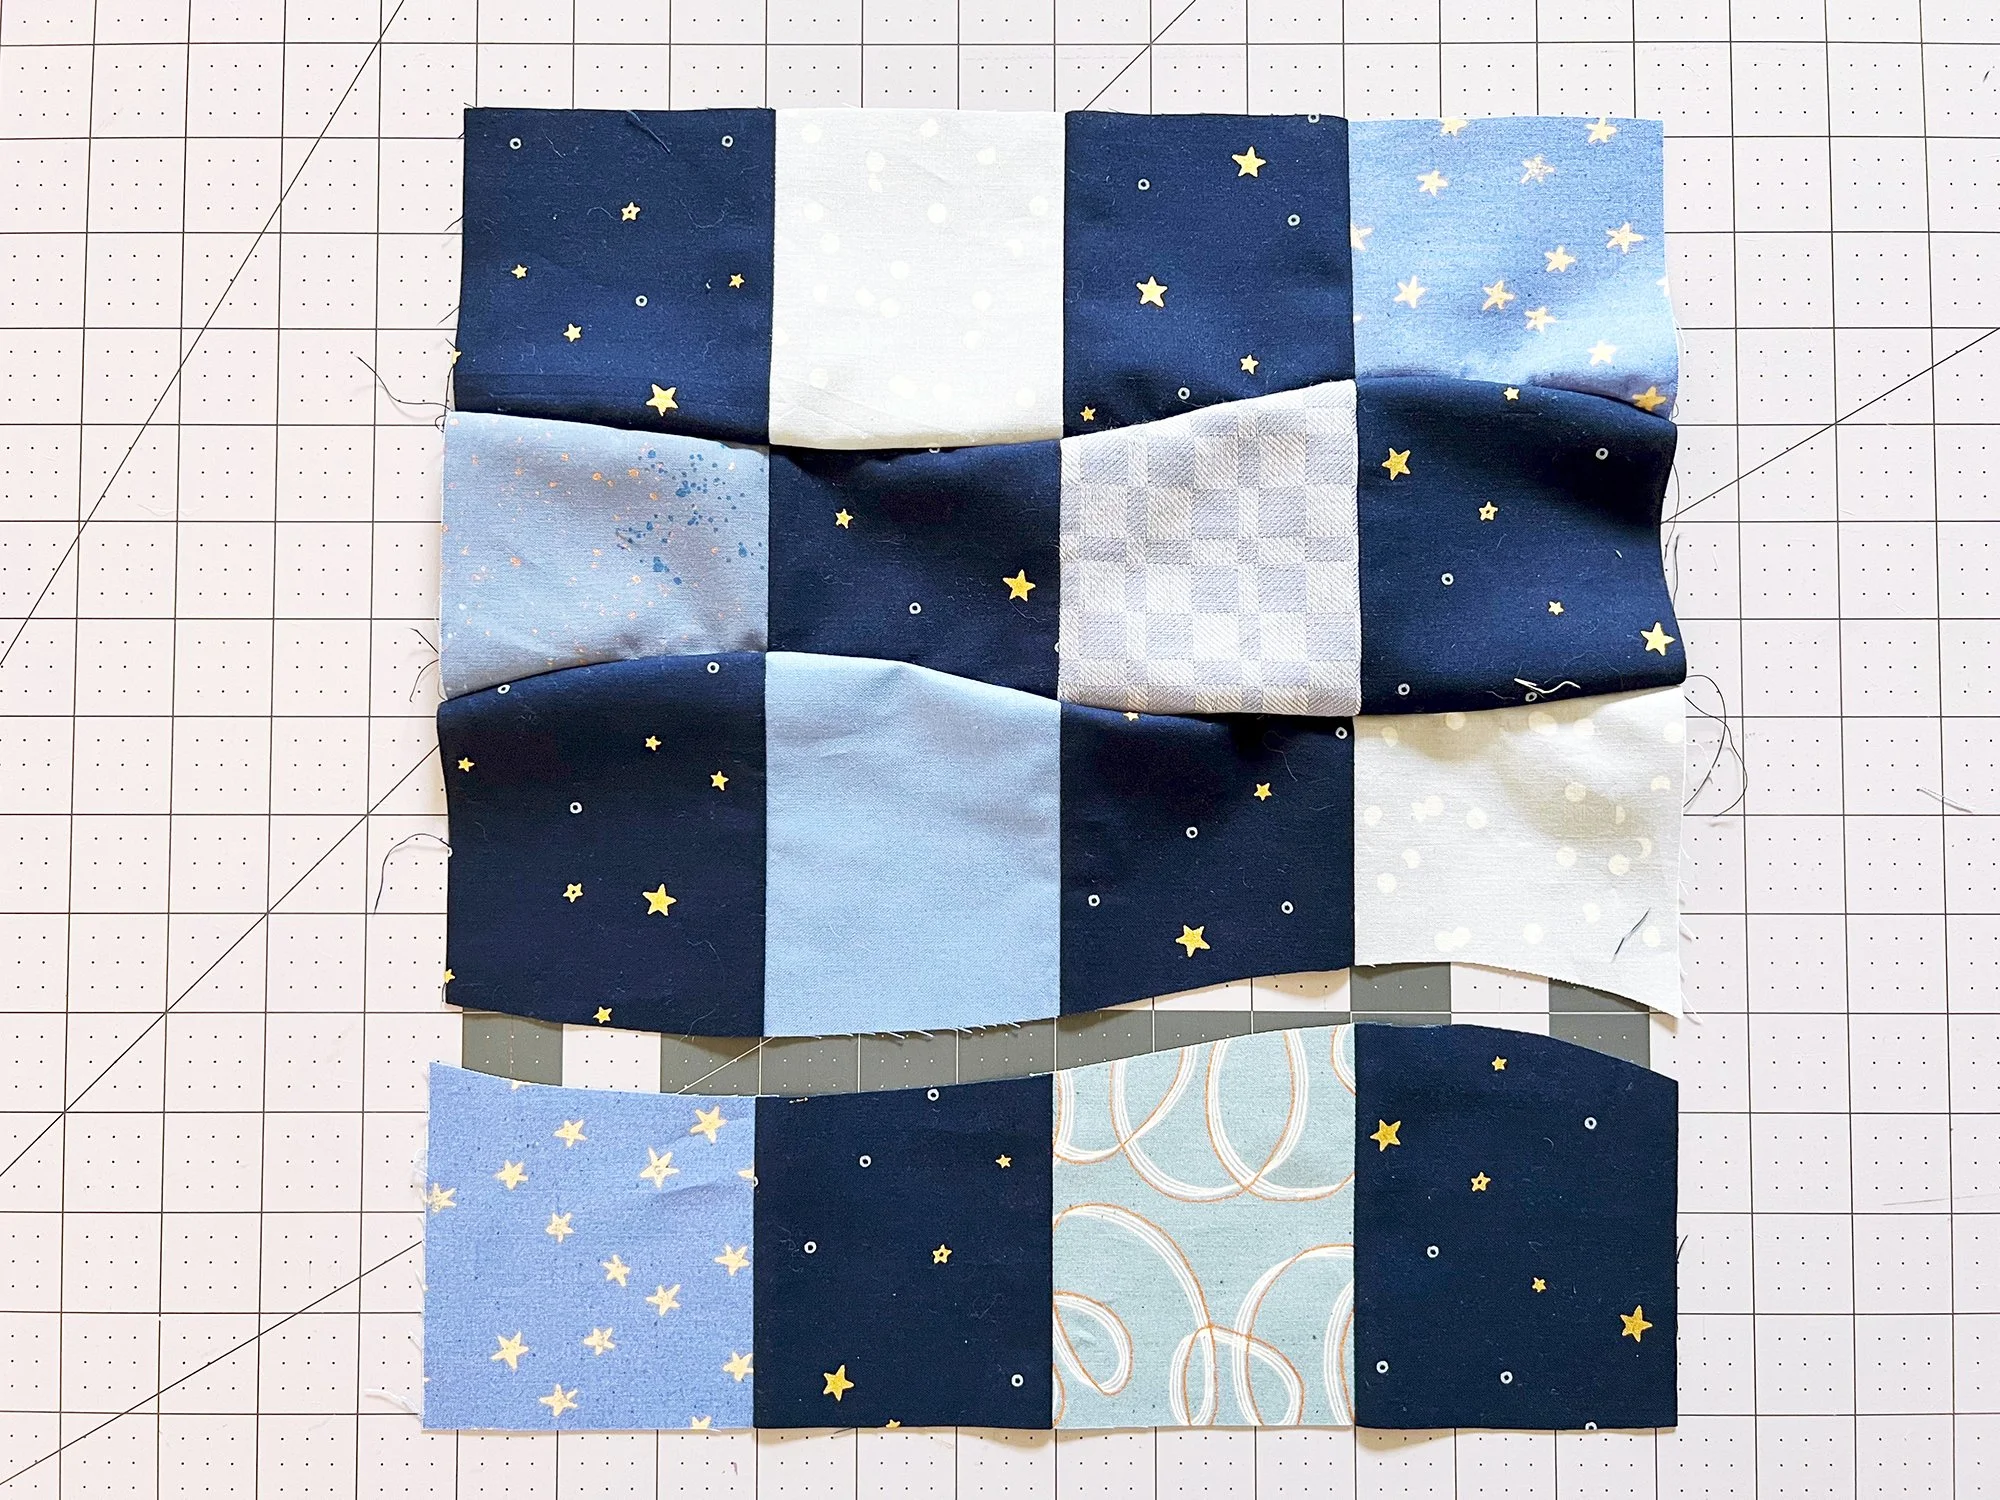
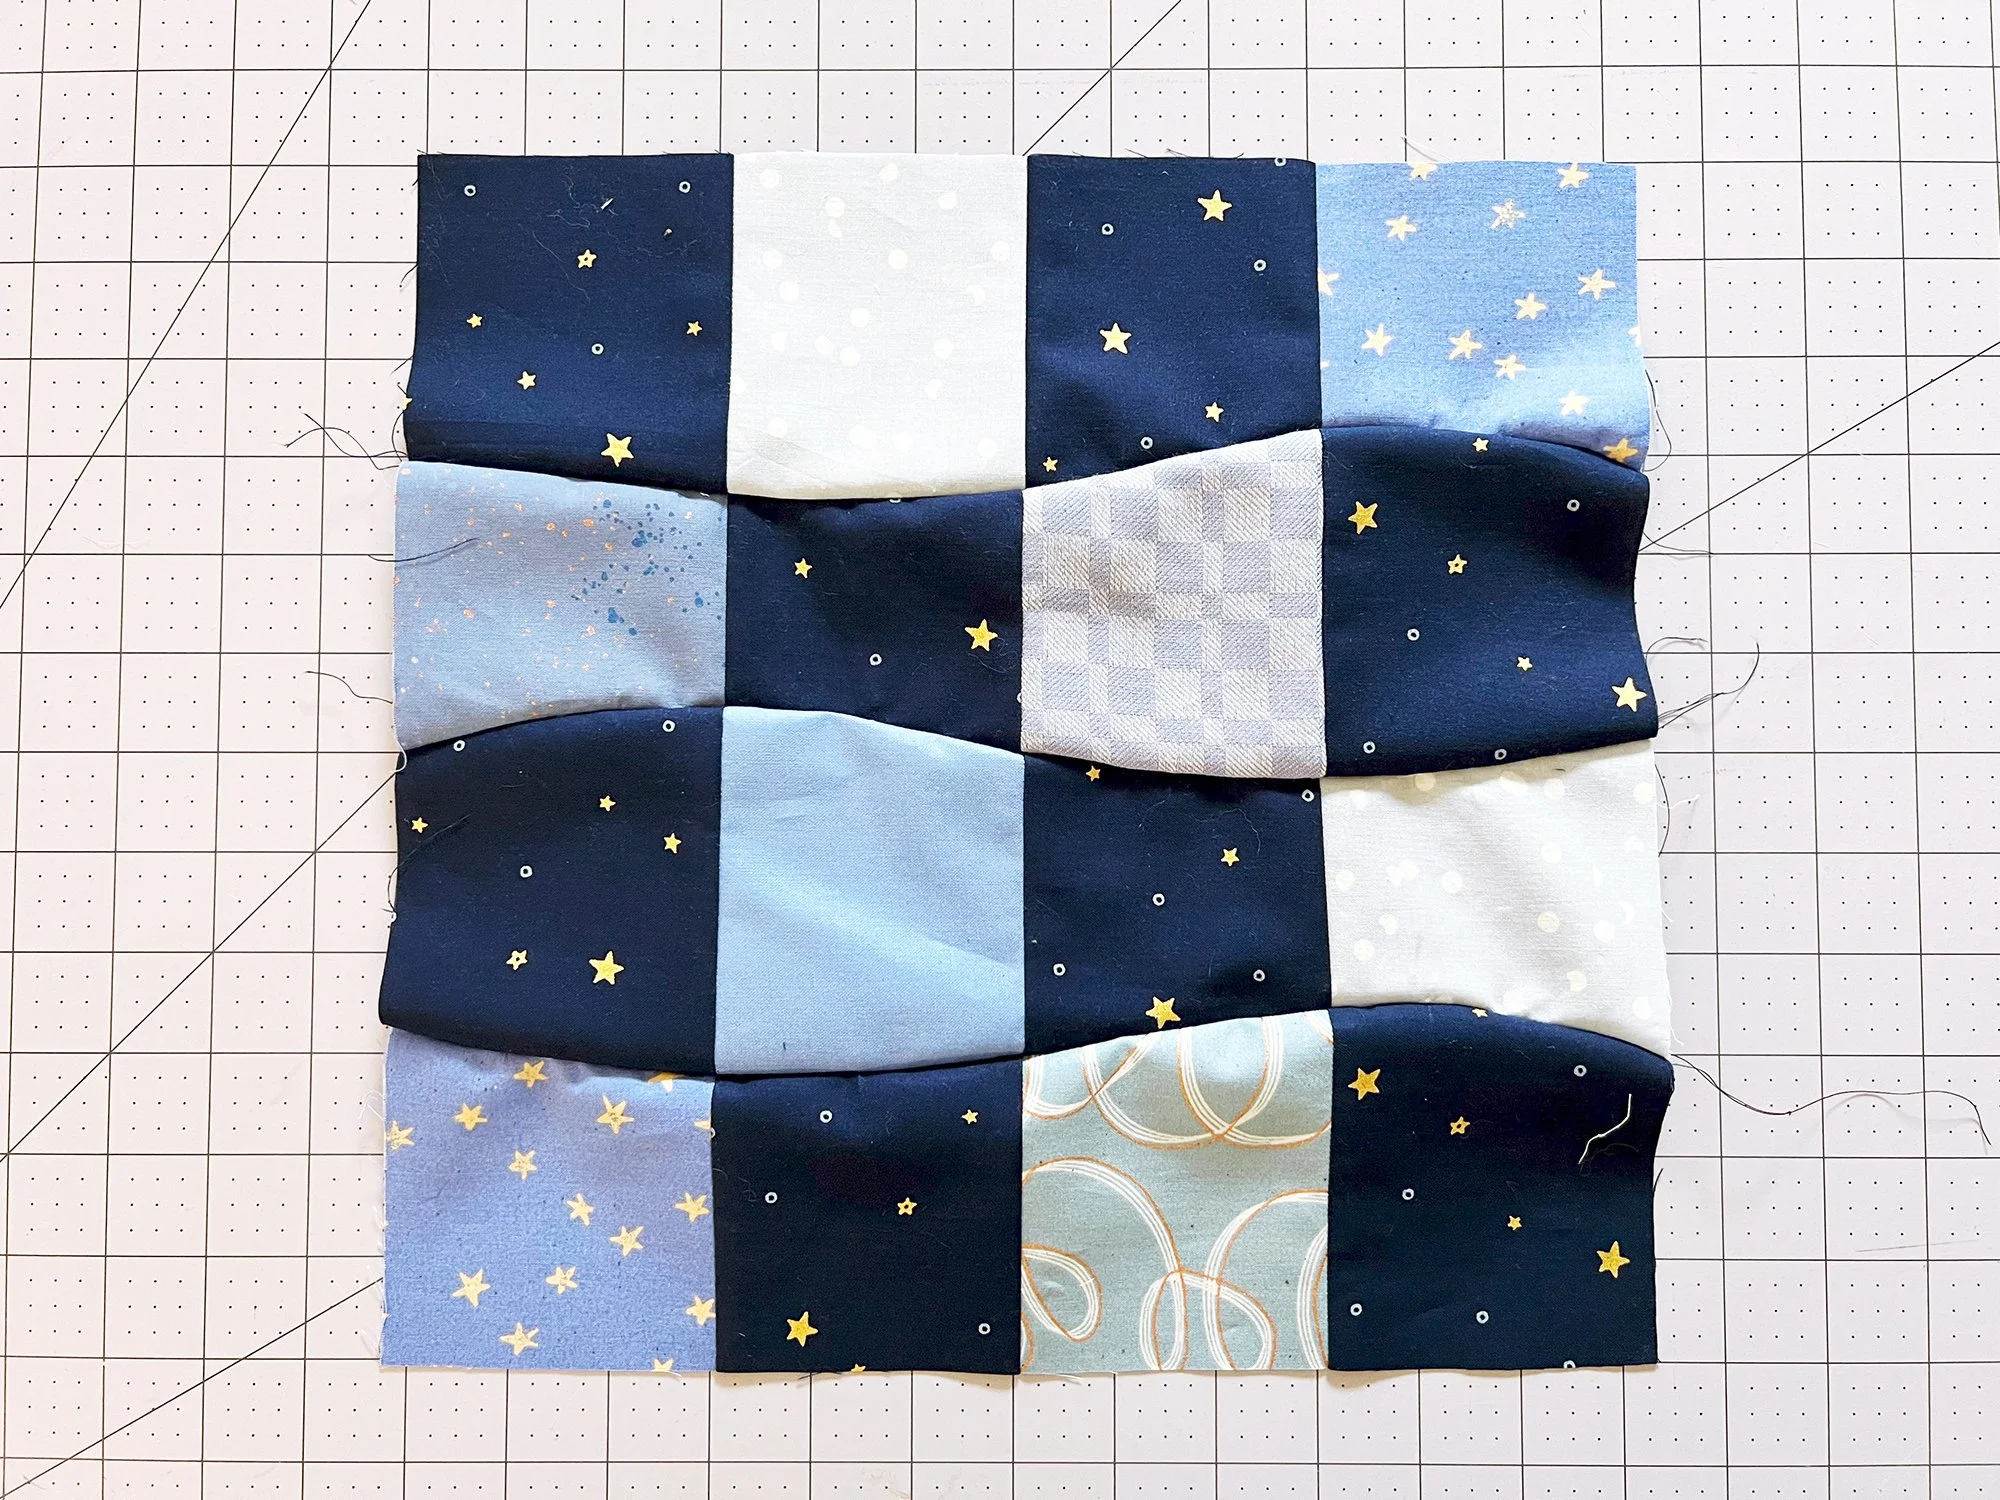
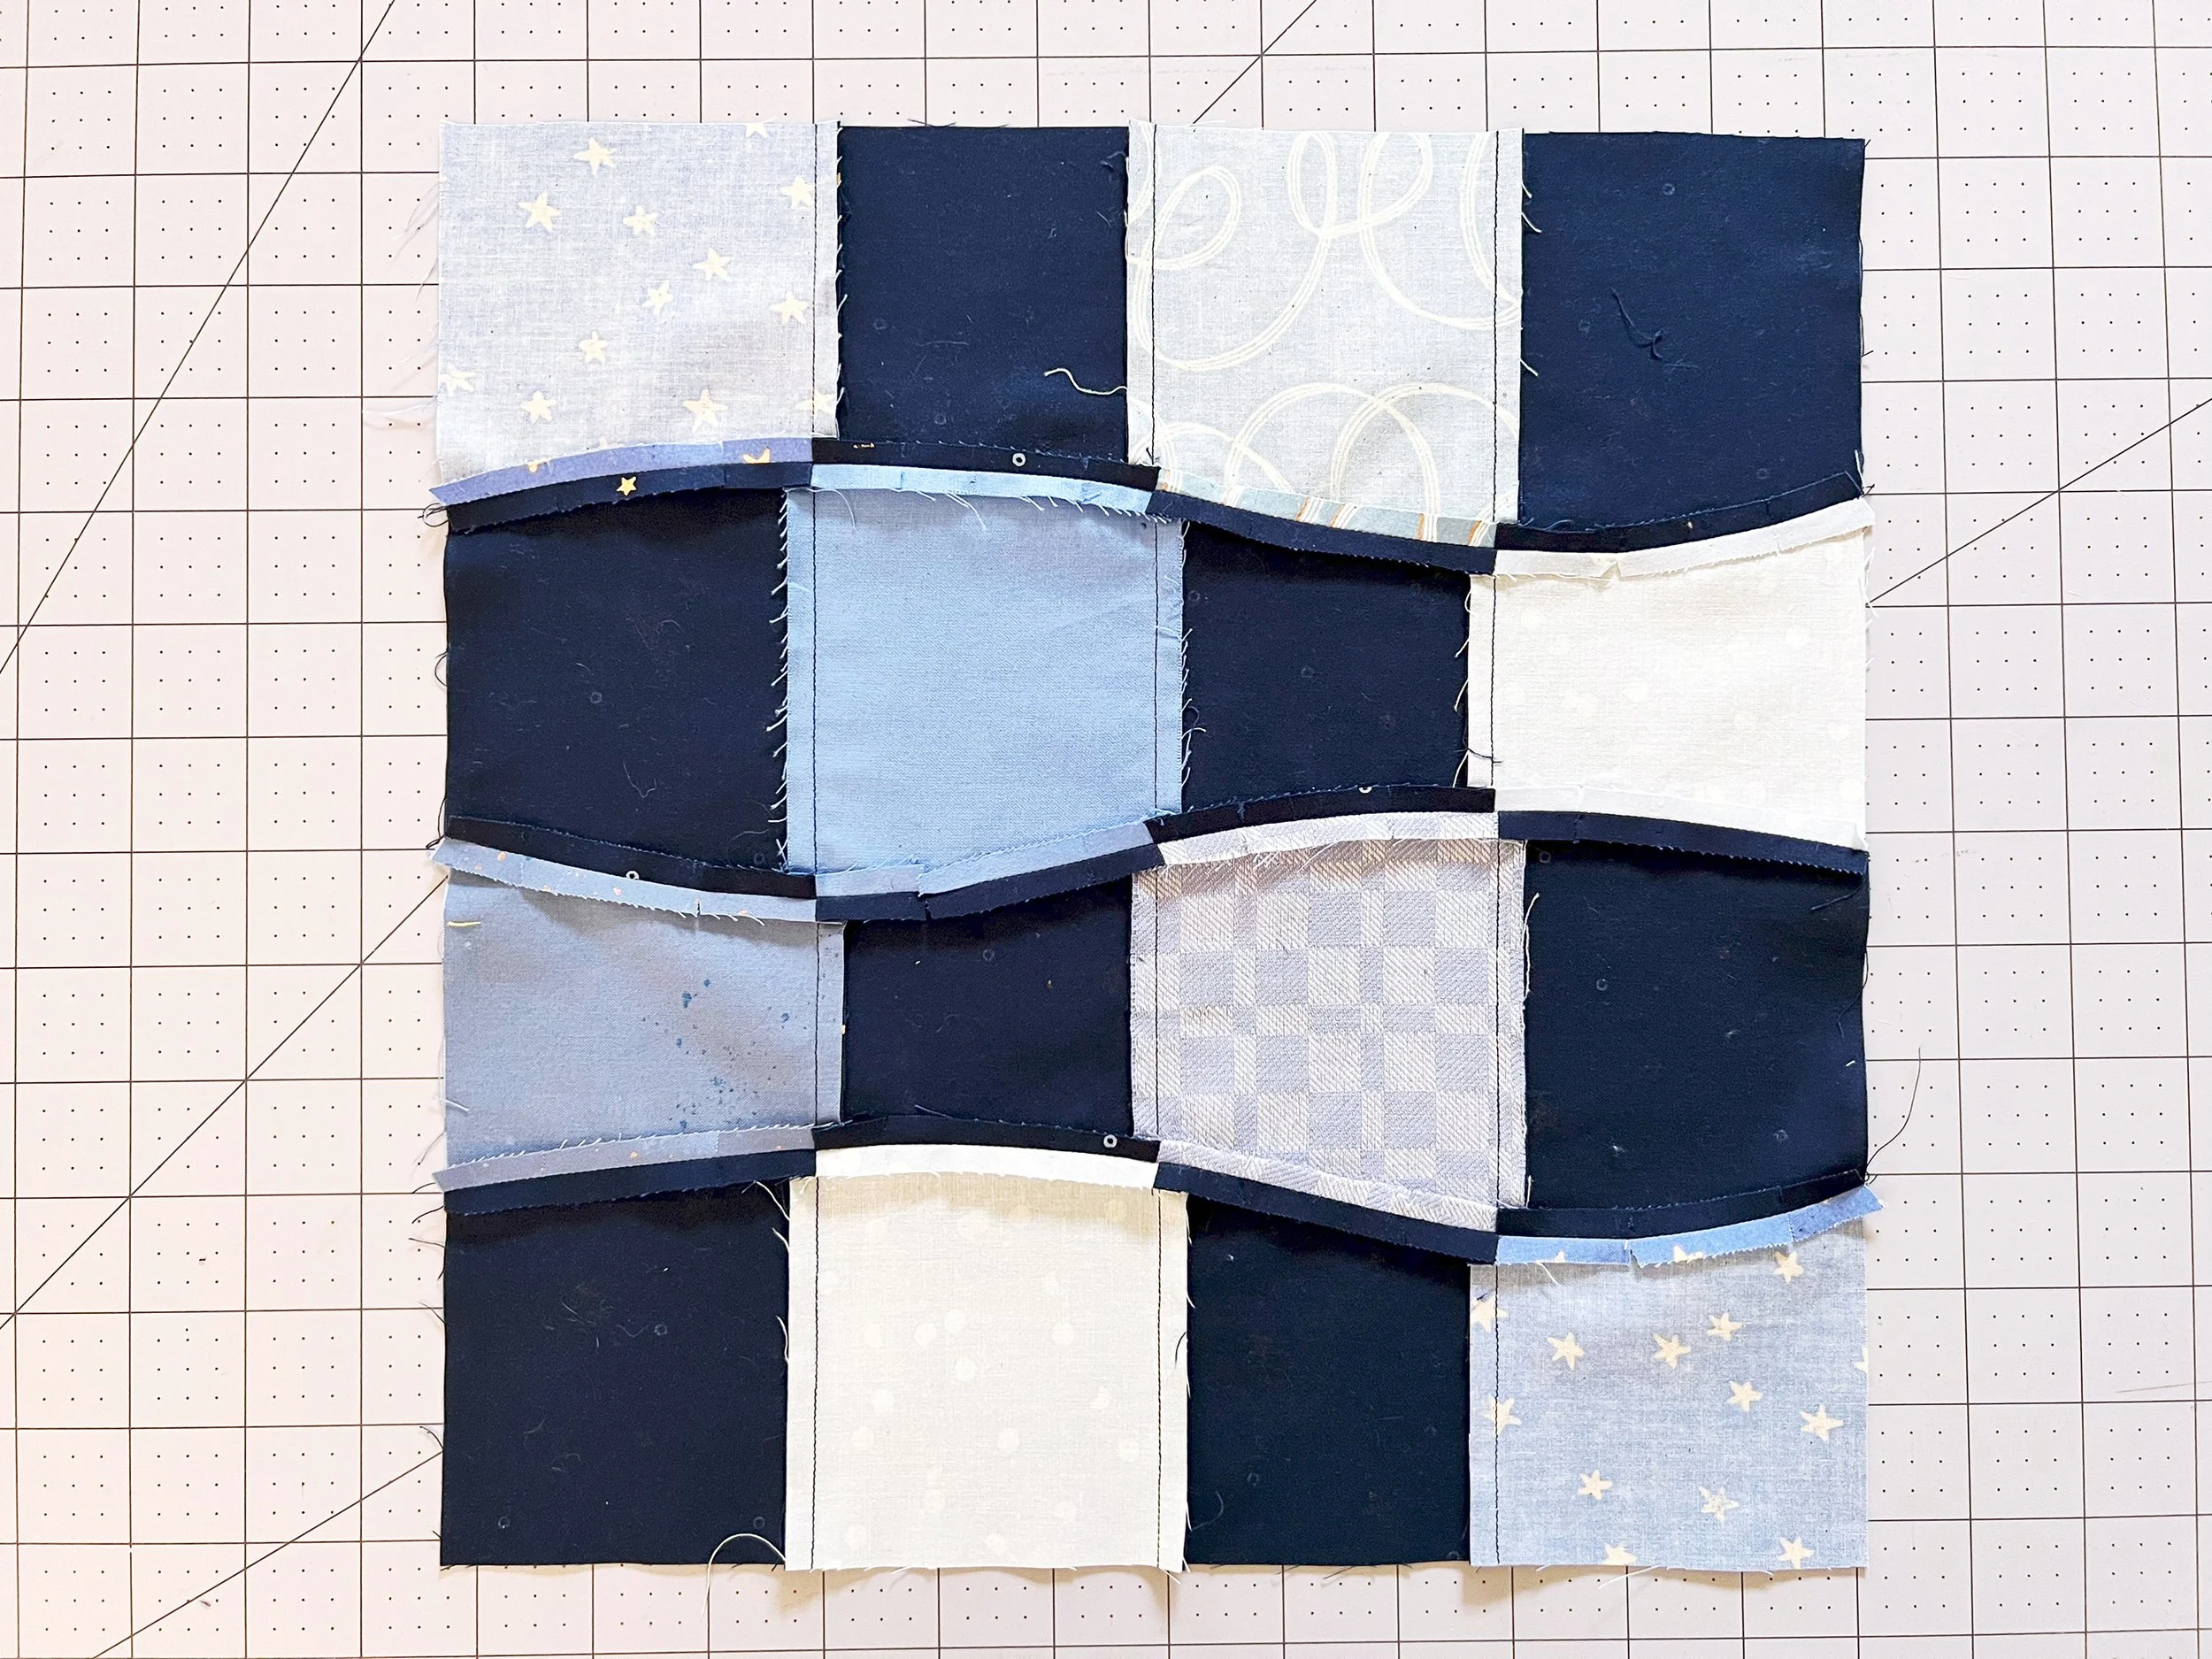
Repeat the whole shebang to attach a template 4 piece to the template 3 piece to complete the block, sewing with template 4 on top. Your block is complete!
Note: if all your seams are not perfectly aligned, absolutely do not sweat it. No sweat allowed! You are making a wonky checkerboard quilt. There are going to be so many seams in the finished object, with much wonk, that no one will ever notice. It might even enhance the look!
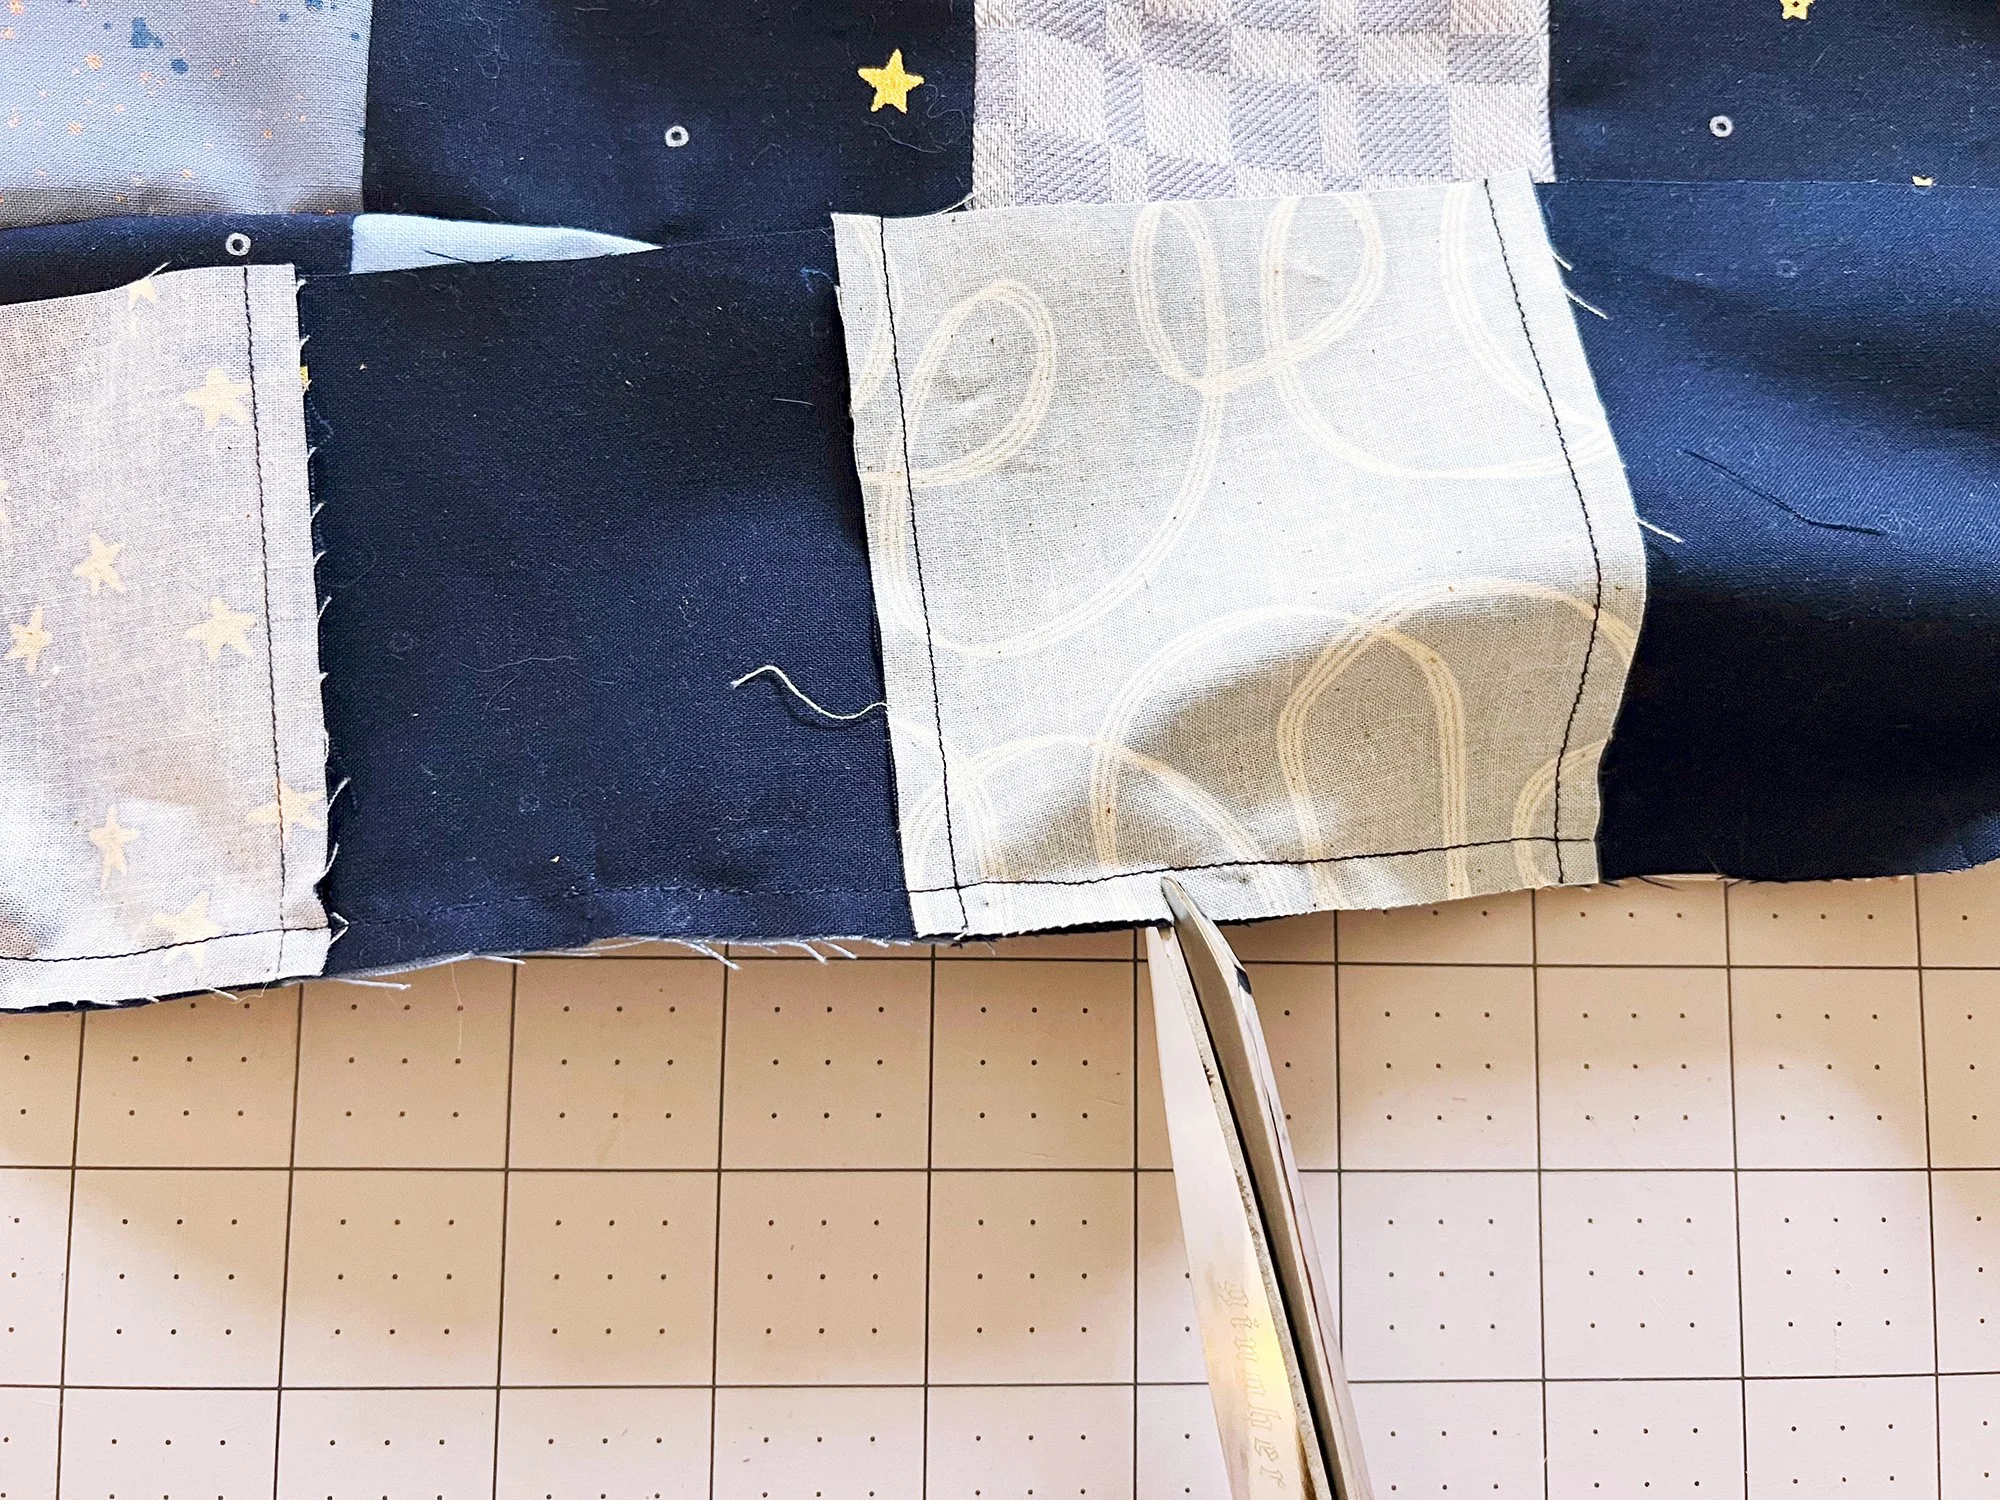
We’ll wait until 2 weeks from now to press all most of the blocks. I know I know, you realllly want to press the first one to see it finished! This is actually a good idea - I’d recommend pressing your first block so you can make sure your seam allowance on the curvy seams isn’t wildly off. Carefully clip into the curvy seam allowances on the back about twice per square, on all three seams, close to but not through the stitching line. Press seams open. The clipping releases the curves so the seams can lay flat. Your block should be close to 12.5” square. You already set the width when you strip pieced, so there shouldn’t be too many surprises there. The height depends on the seams you just sewed. We will be trimming, so it’s ok if it’s a little taller than 12.5”, but make adjustments to your seam allowance moving forward if it’s shorter than 12.5” or way taller.
ALTERNATIVE NO-PIN METHOD
I encourage you to experiment with the method in the video below. While I’m all one for slow, mindful practices, sometimes you do just want things to go a little faster, and I’ve found I can piece Omega blocks speedier this way. If pins work better for you, that’s great too!
Whichever method you use, when you’re done piecing you should have the quantity of Block A listed in the Block Checklist on page 21/12.
CHAIN PIECE! (TRUST ME)
I also encourage you to try chain piecing here! Yes, you can chain piece, even with all the curves. In fact, with your templates all stacked up, they are ready and primed for chain piecing. Sew all your template 1 & 2 together in one pass, then go back and add a template 3 to each unit, grabbing off the stack, and repeat with template 4. Each time, sew with the higher number template on top. Even if you do batches of only 4 or 5 blocks at a time, I find it so much more morale-boosting to finish a little batch of blocks for my effort instead of a single block.
Refer to last week’s post for a reminder on how to chain piece.
IMPROV ONLY: PIECE BLOCK C
Block C comes together the same way as Block A, except, you guessed it, you’ll just use your cut Block C templates instead. There are 6 instead of 4 per block. Align at the stitching line, sew with the higher number template on top, and add templates in order until your block is complete. Piece half your template sets into blocks, which should end up being half the quantity of blocks listed in the Block Checklist on page 21/12.
CHECKLIST
Whew, that was a big week! Here is your checklist. If you have a question, please comment below (rather than commenting on Instagram or DMing) because I definitely won’t miss it, plus everyone else can see the answer!
Cut all Block A template sets (same quantity as number of Block A listed on page 21/12)
Improv layout only: Cut all Block C template sets (same quantity as number of Block C listed on page 21/12)
Piece all Block A (refer to block checklist on page 21/12 for quantities)
Piece half Block C (refer to block checklist on page 21/12 for quantities, piece half amount listed)
PRIZE & DISCOUNT INFO
Now the good stuff! To enter to win the weekly prize, post a photo in your grid on Instagram this week using the hashtag #omegaqal. It can be a photo of your cut pieces, your chain piecing, anything Omega related! One winner will be randomly selected from the hashtag to win a 13 fat quarter bundle and stickers from Wyldwood Creative and two Ponderosa Thread Glosses. Post in your grid, not stories. Your profile must be public for the hashtag picker to see your photo. Open worldwide. You can post to enter multiple times but if you do they must be different photos (no spamming!). Post between 8:00am Feb 13 and 11:55pm Feb 19 (EST) to enter.
FABRIC/SUPPLIES DISCOUNTS
Everyone can get in on these discounts!
Wyldwood Creative: Use code is OMEGA15 for 15% off your order this week! $20 minimum spend, $25 max discount, excludes classes and previously discounted items. Shipping to US and Canada. Code valid through Sunday Feb 19.
Ponderosa Creative: Use code OMEGA for 20% off, and free shipping over $35! Discount applies to patterns and supplies. Code valid through Sunday Feb 19.
LONGARM QUILTING DISCOUNTS
These discounts are available throughout the whole quiltalong. Dig out those languishing quilt tops and send them away to be finished, and make plans for your future Omega!
Autumn Moon Quilting: Use code OMEGA for 10% off longarm services. Code valid Jan 30 - Mar 5.
Stitch Lab Quilting: 20% off longarm quilting services (batting and binding separate). Use code OmegaQAL23 on booking form. Offer expires June 6, 2023.
Thai Charm LLC: All Omega quilts sent Jan 30 - April 12 will automatically get 25% discount. Participants just need to mention the quiltalong when they fill out the quilting form.
Wild Phil Quilting: 20% off edge to edge longarm quilting services on any Omega top. Use code Omega20 when submitting form. Offer valid through May 5, 2023.

