WEEK 6: Assembly
We did it!! We’re in the final week of the Omega QAL!
Below is the full six-week schedule for a review. Look at everything you’ve accomplished!
WEEK 1 (Jan 30): Fabric selection, prep templates
WEEK 2 (Feb 6): Cut strips, strip piece all units
WEEK 3 (Feb 13): Cut & piece all Block A (Cut all and piece half of Block C, Improv only)
WEEK 4 (Feb 20): Cut & piece all Block B (Piece half of Block C, Improv only)
WEEK 5 (Feb 27): Pressing, trimming & catch-up week
WEEK 6 (Mar 6): Assembly
Before we dive in, let’s talk about prizes. The Week 5 random winner was @saphre1964, woo!
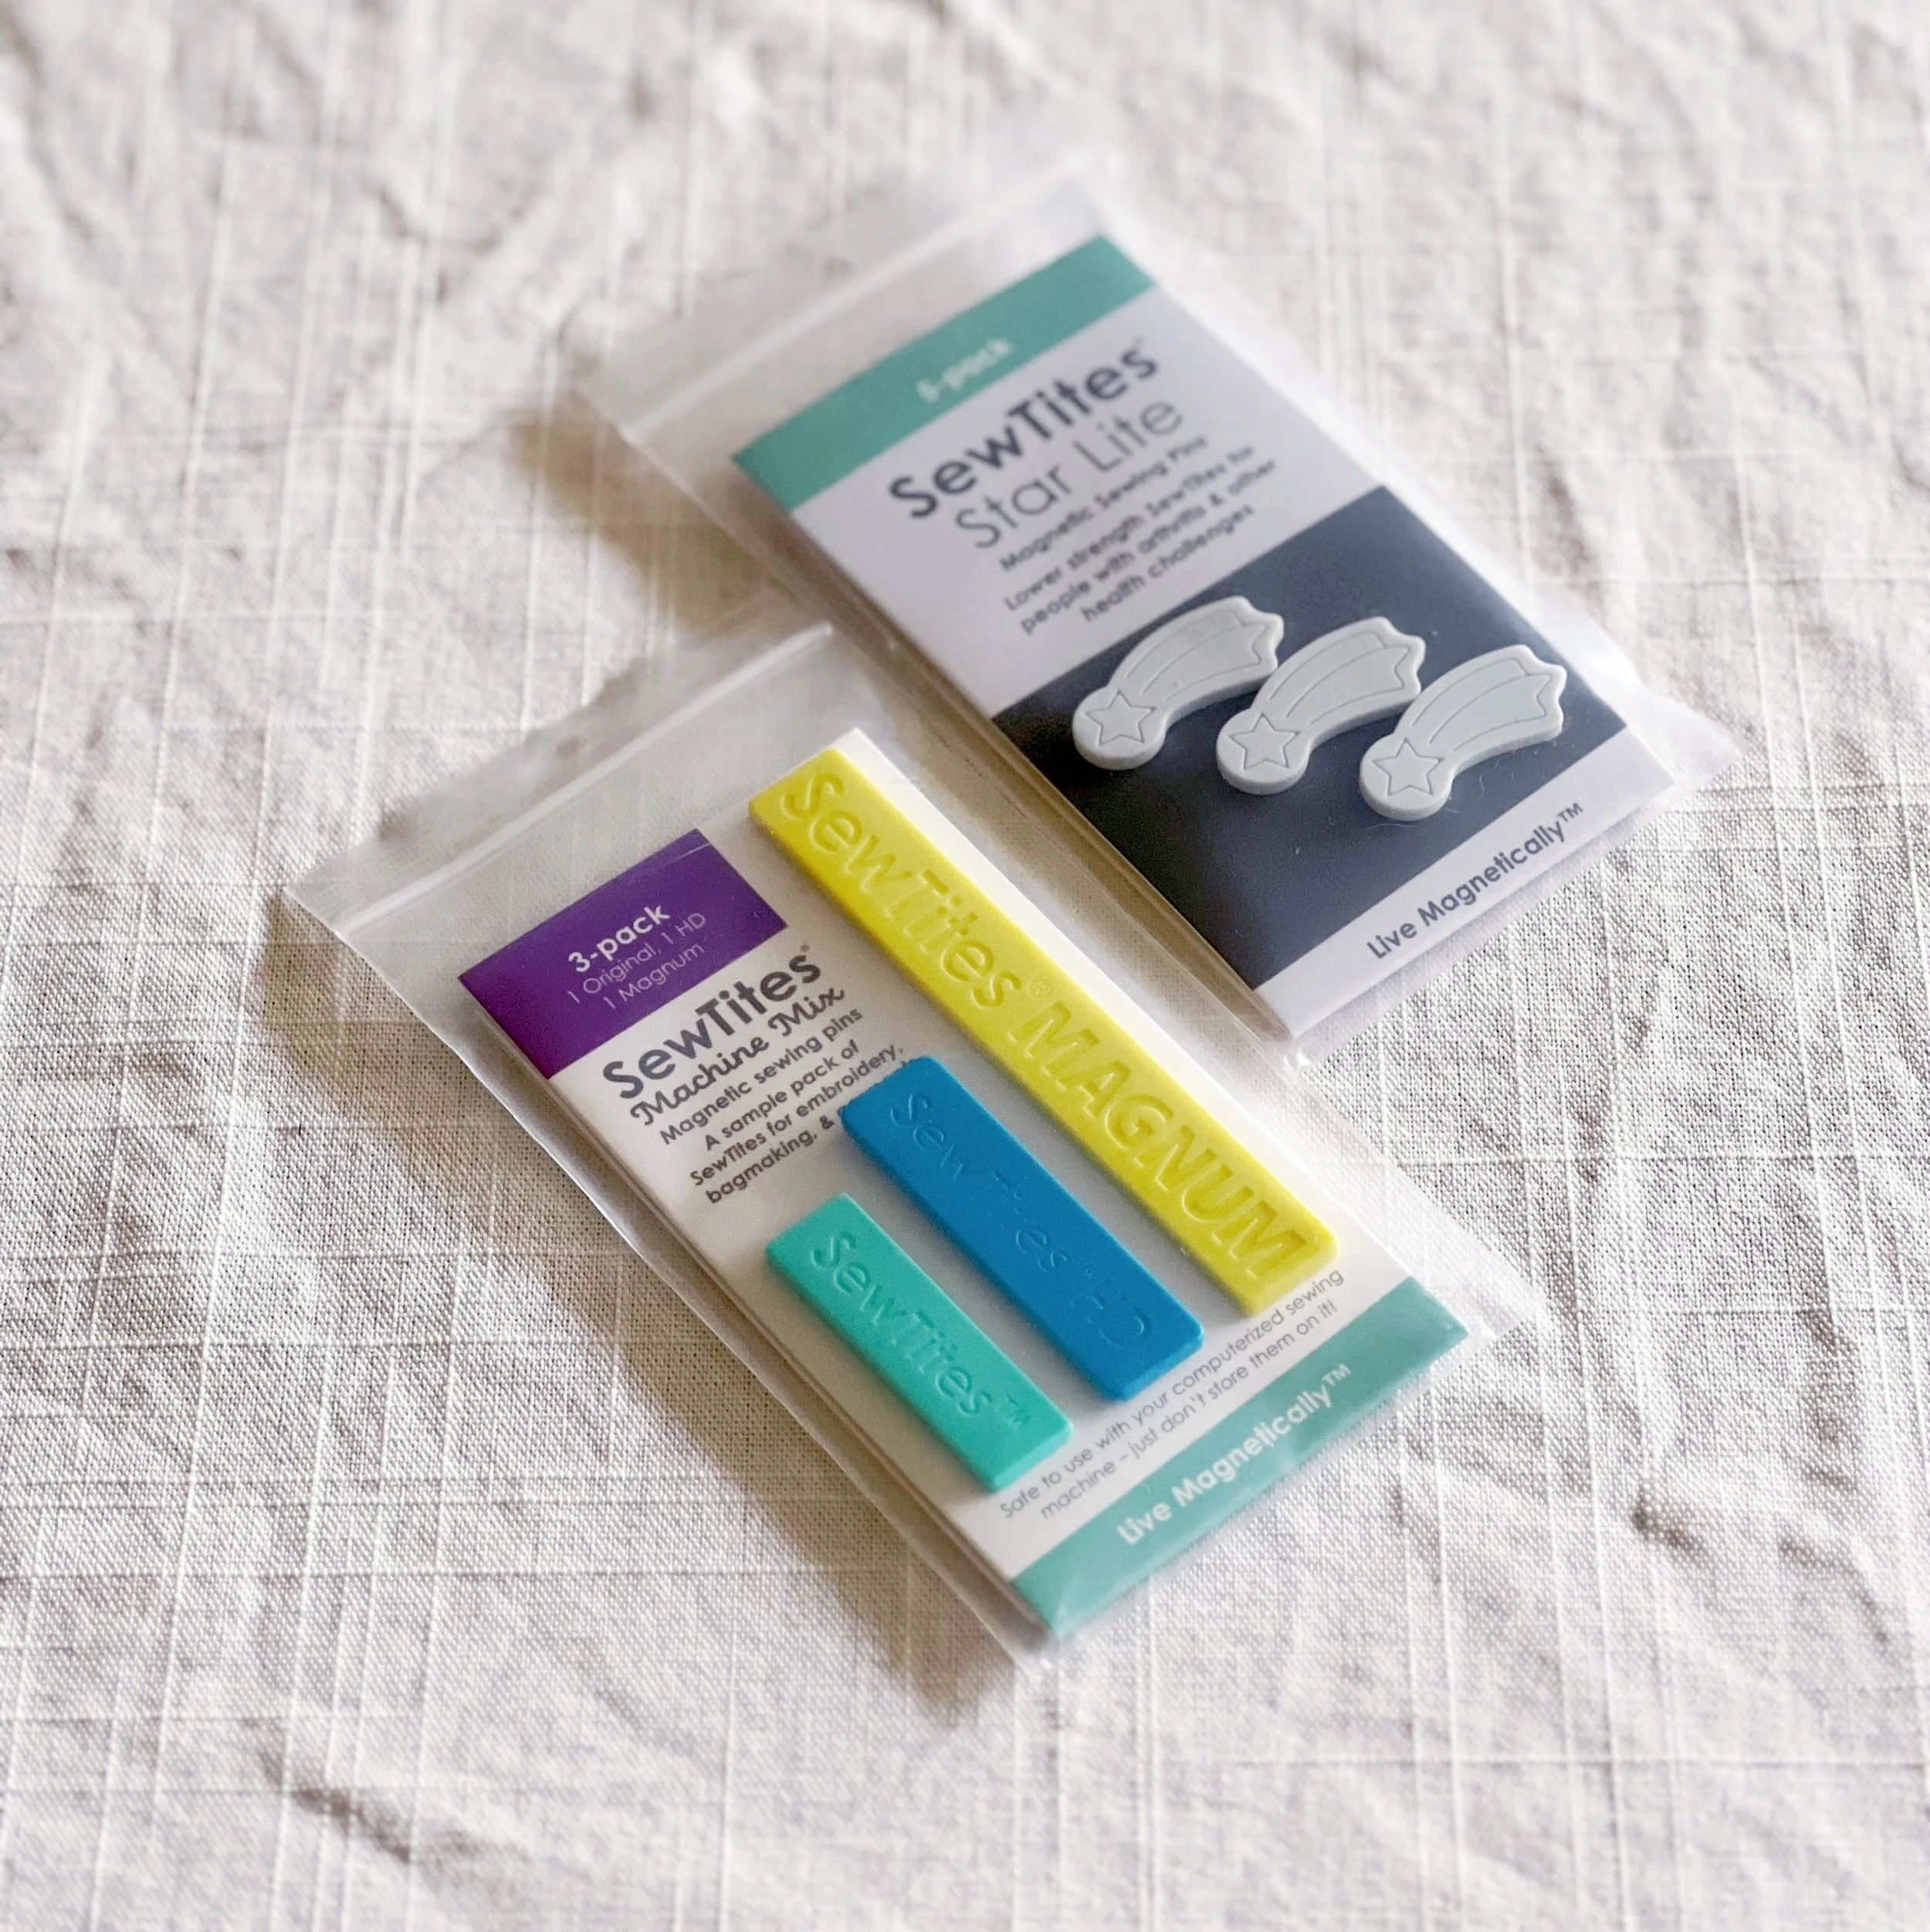
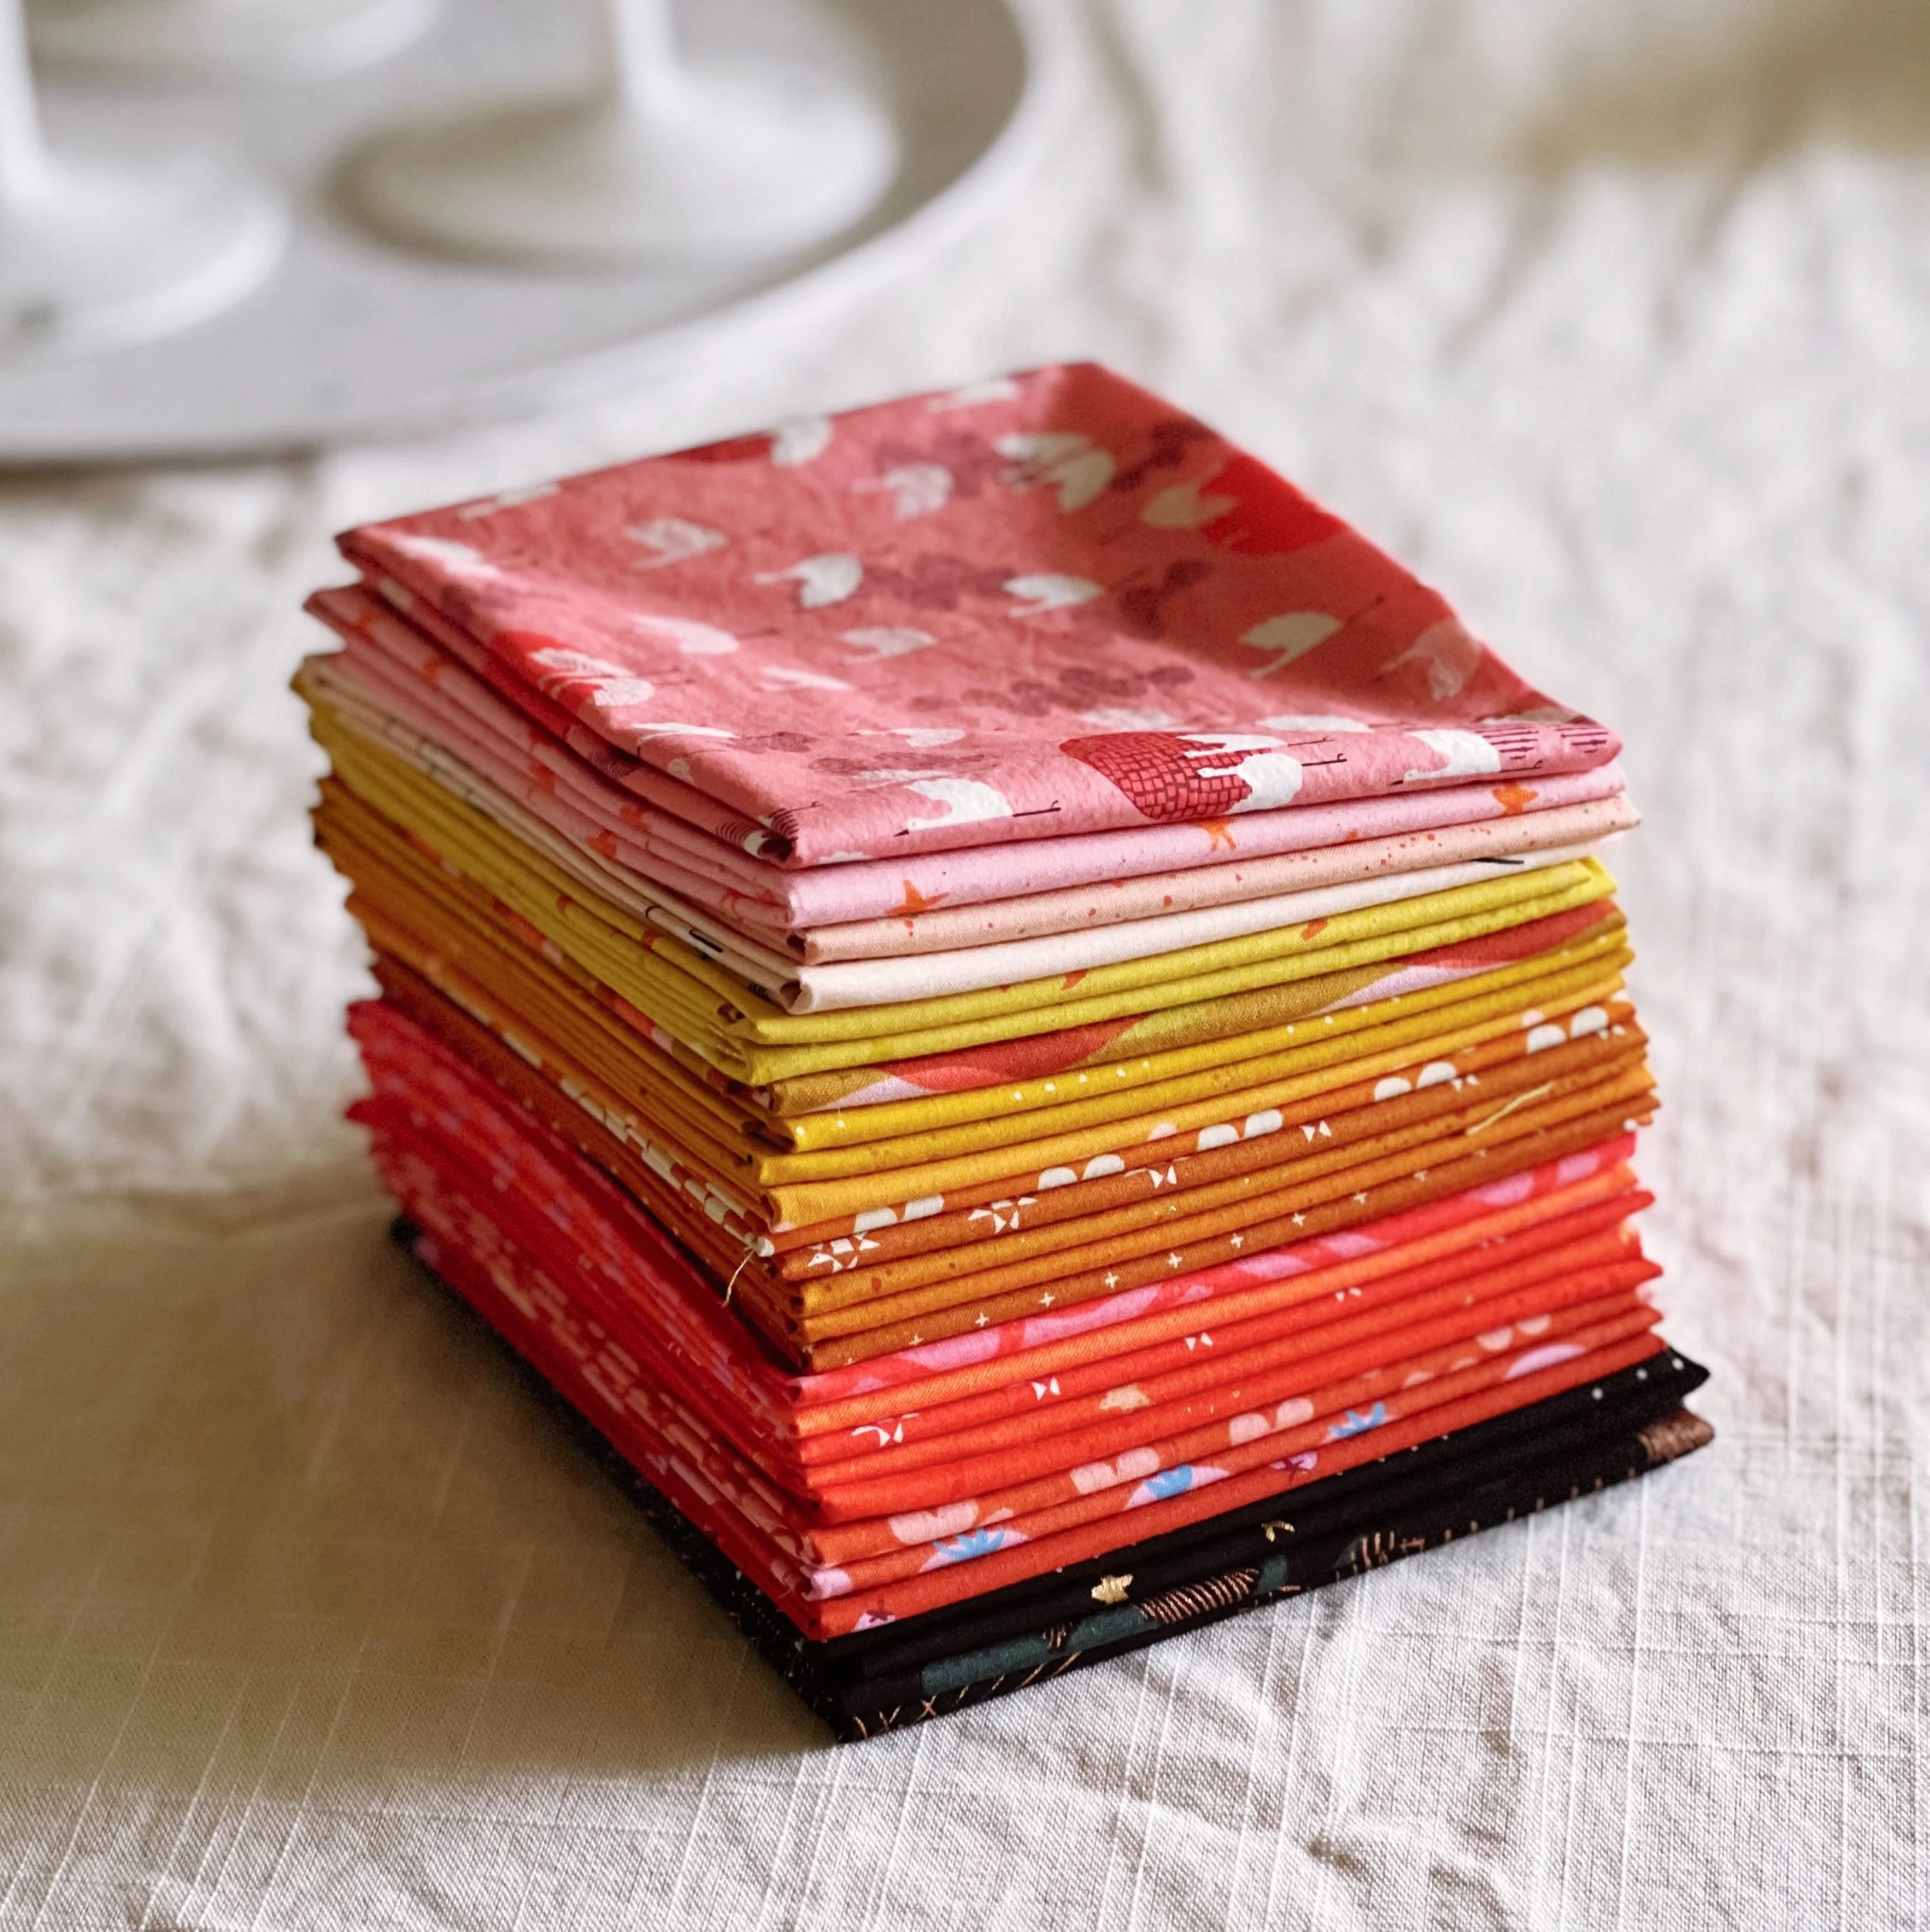
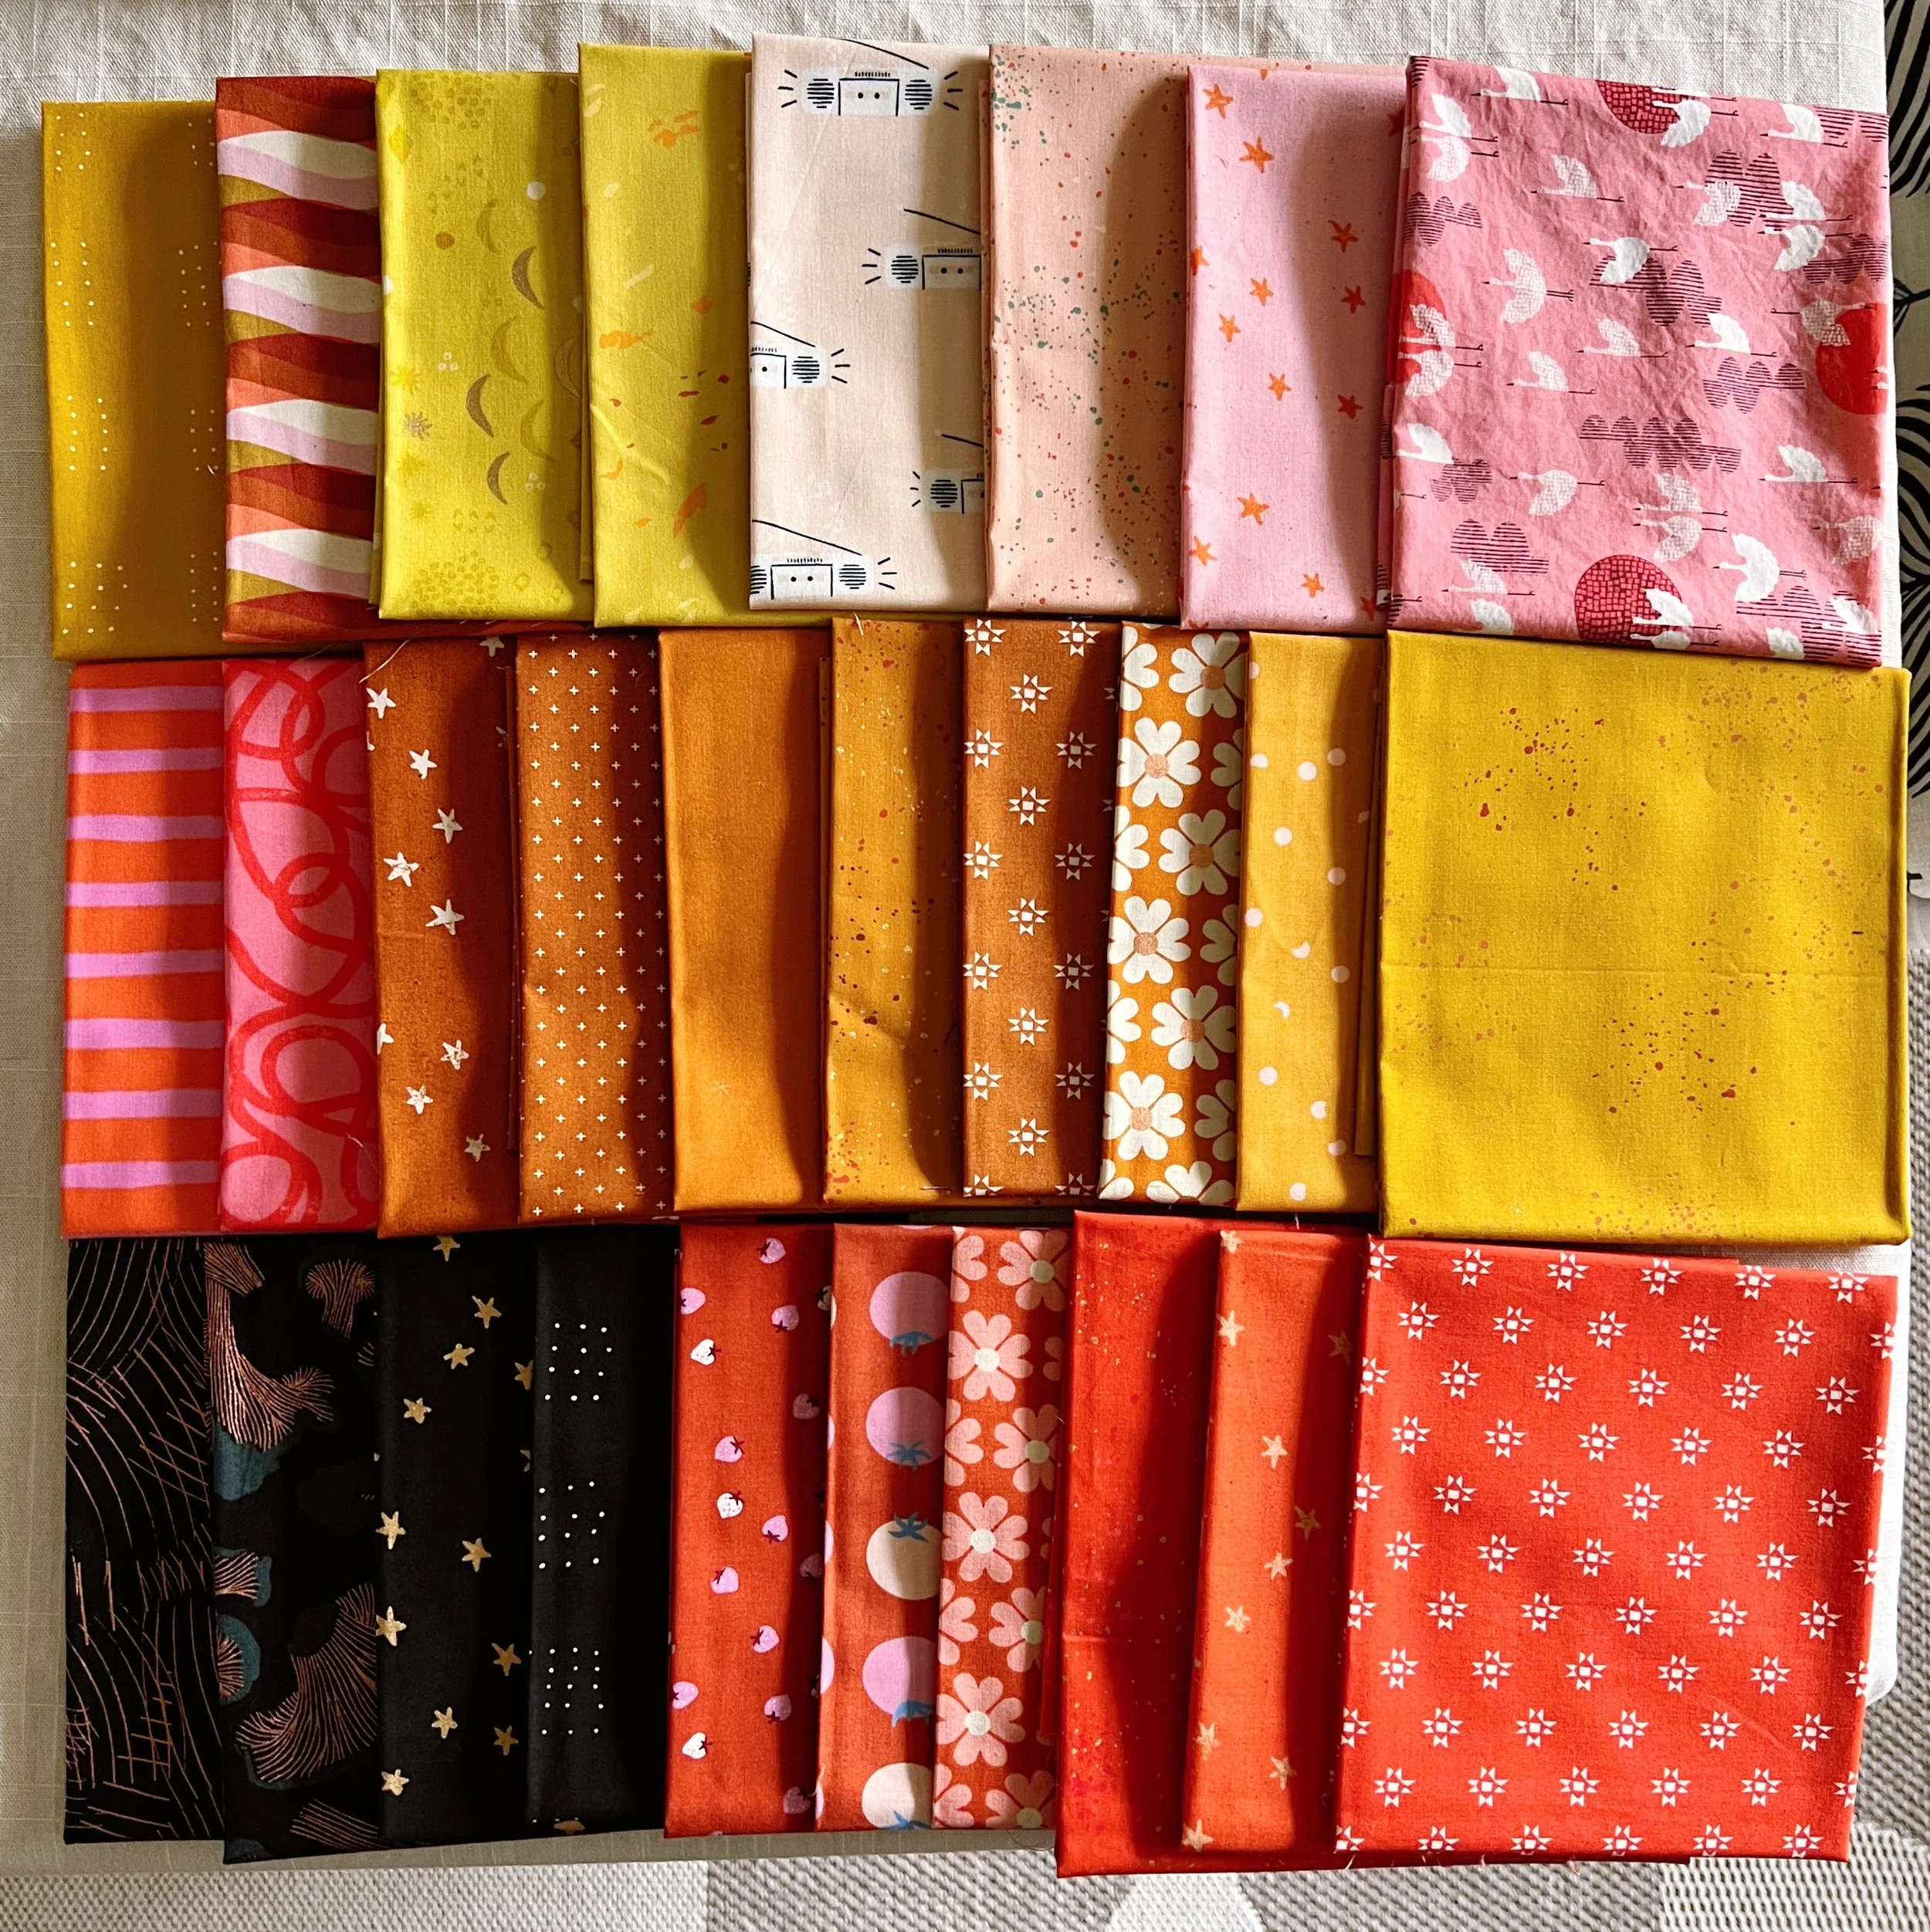
This week, for our super duper final prize pack, one lucky winner will get complimentary edge-to-edge longarm quilting on a finished Omega top (up to Large Throw size) from Wild Phil Quilting, a $50 gift card to Pear Tree Market, an exclusively curated 28 FQ bundle from my stash (shown below), two sets of Sew Tites magnetic “pins” (shown below), and 3 thread glosses from Sew Fine Thread Gloss. I’m also marking all Miss Make patterns 20% off just for QAL participants if you are interested in any of my other patterns!
All participants can also use discount codes generously provided by Pear Tree Market, Sew Fine Thread Gloss, Autumn Moon Quilting, Stitch Lab Quilting, Thai Charm LLC, and Wild Phil Quilting to save some money on supplies/longarm quilting. Full details/discount codes at end of post.
LET’S TAKE STOCK (all versions)
By now, everyone should have made all the blocks for their size and version listed on page 21 (booklet) / 12 (PDF), pressed them, and trimmed them to 12.5” x 12.5”.
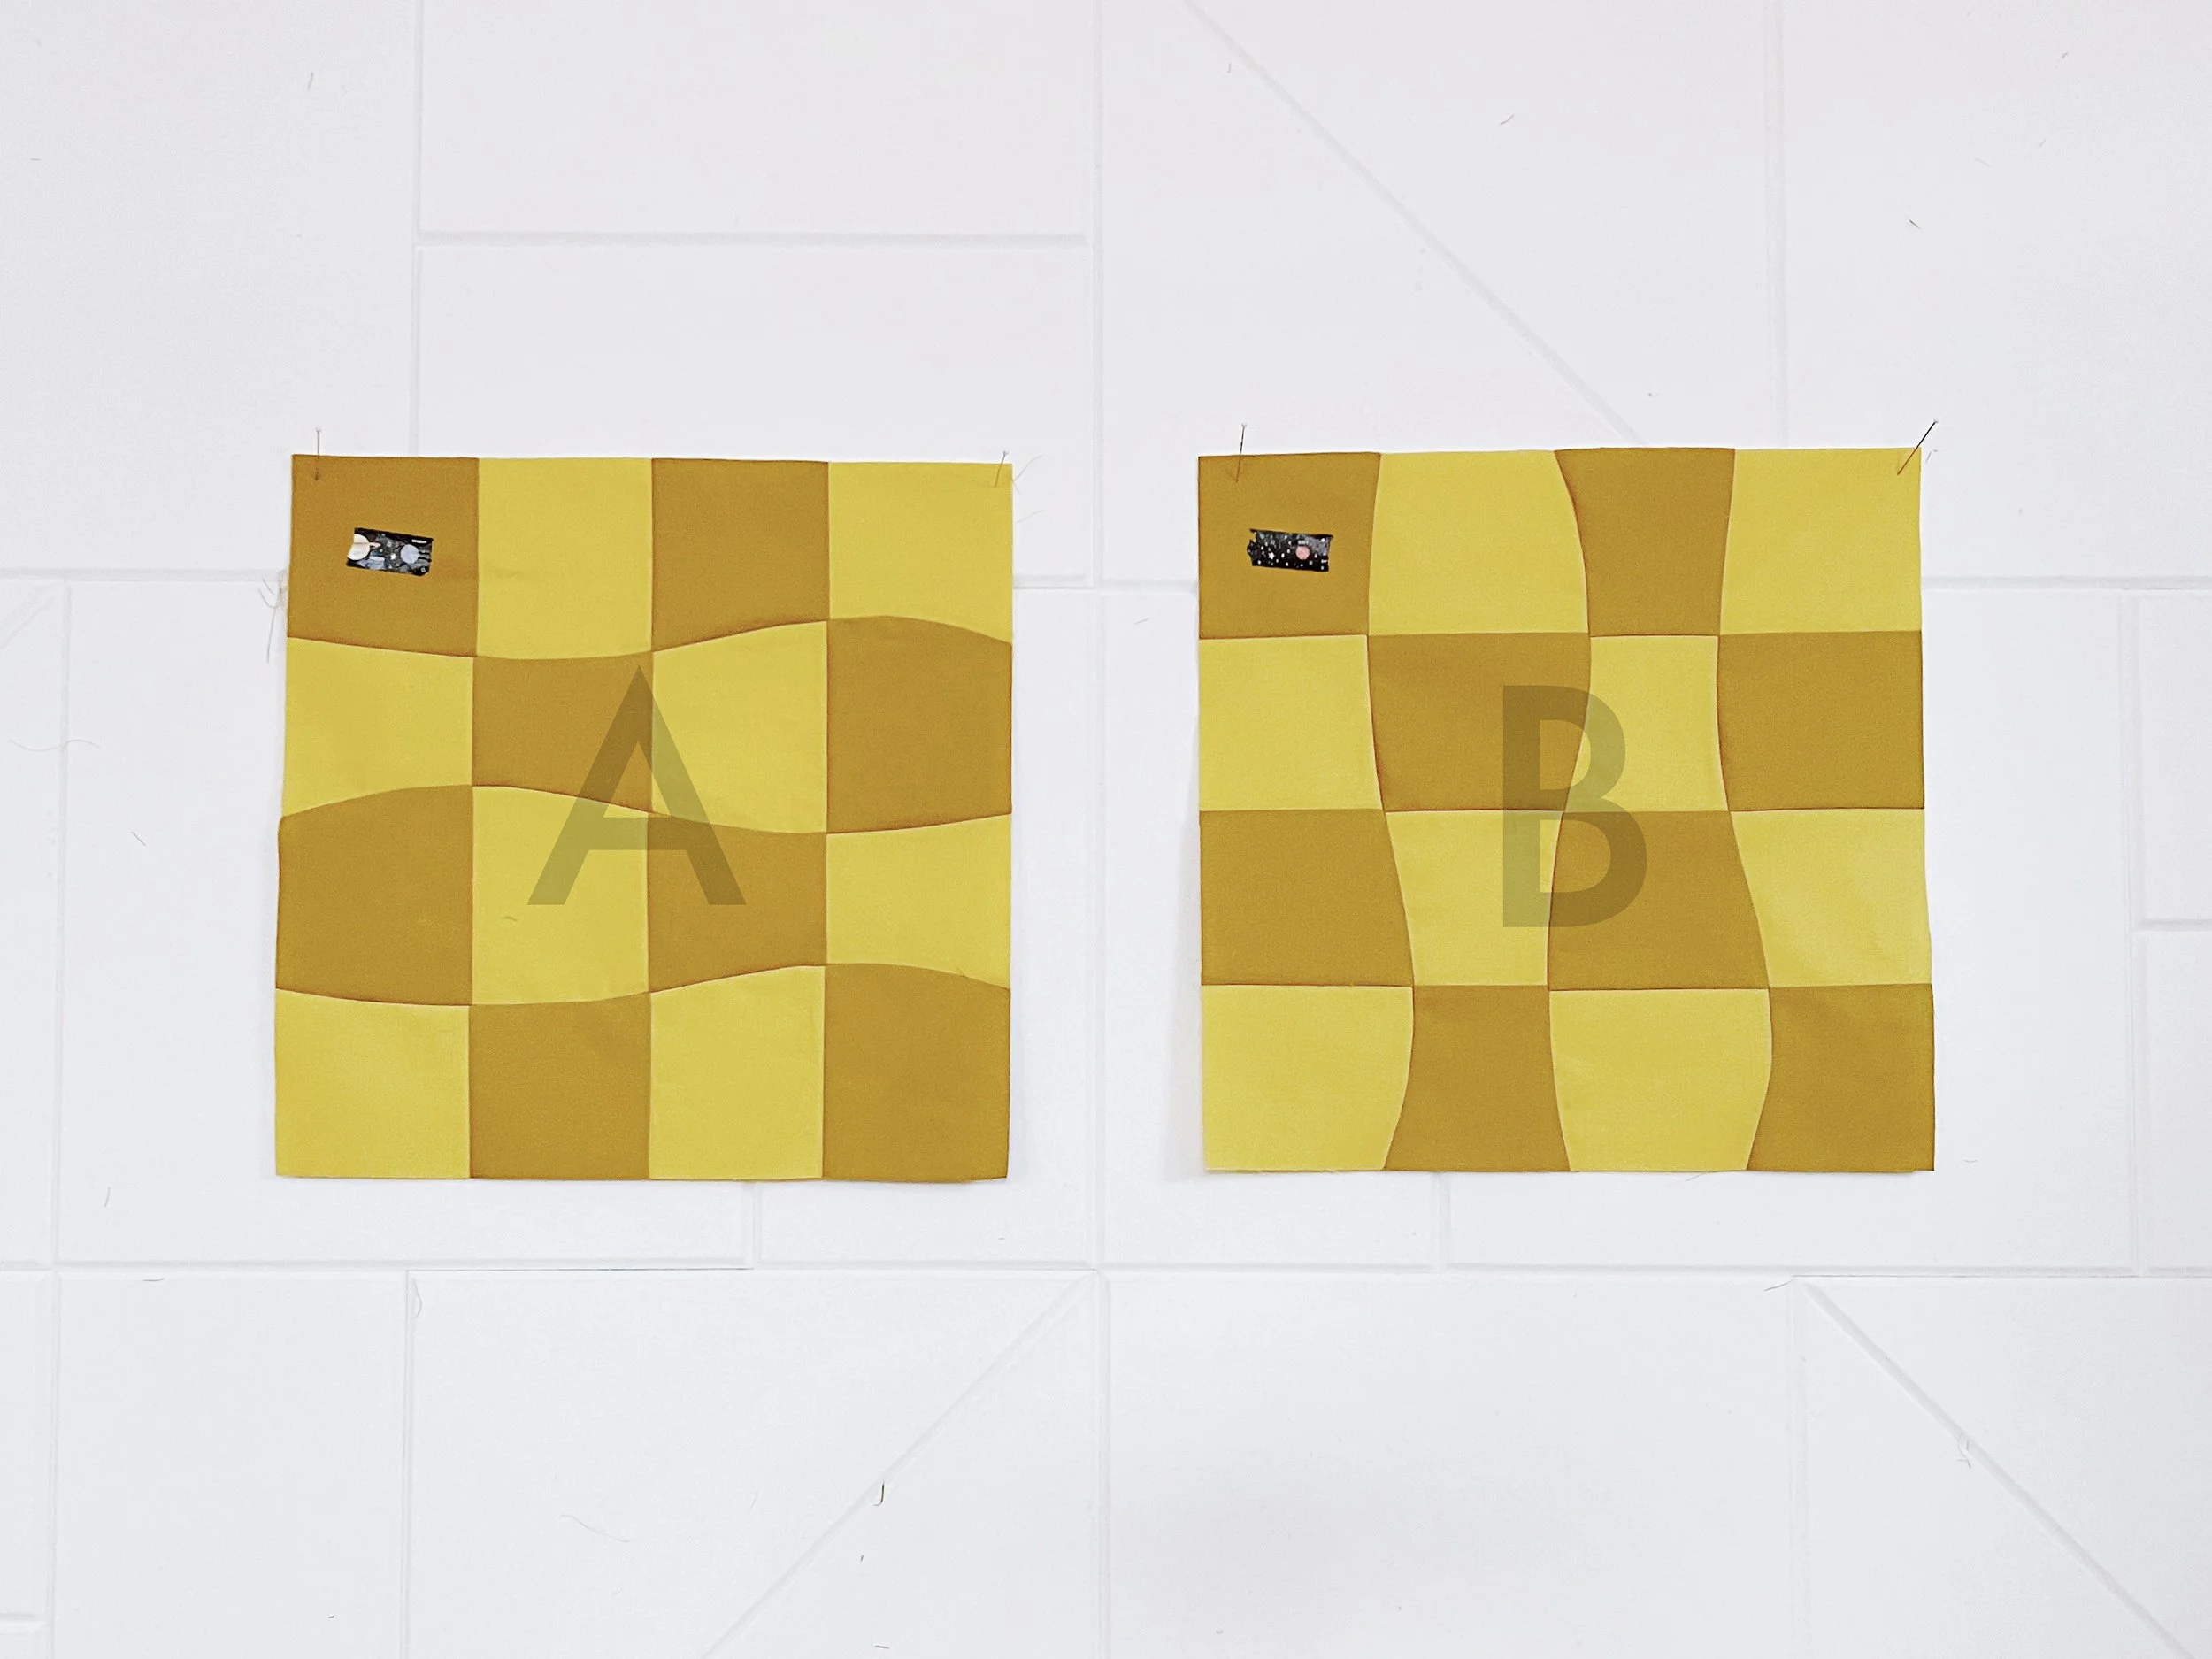
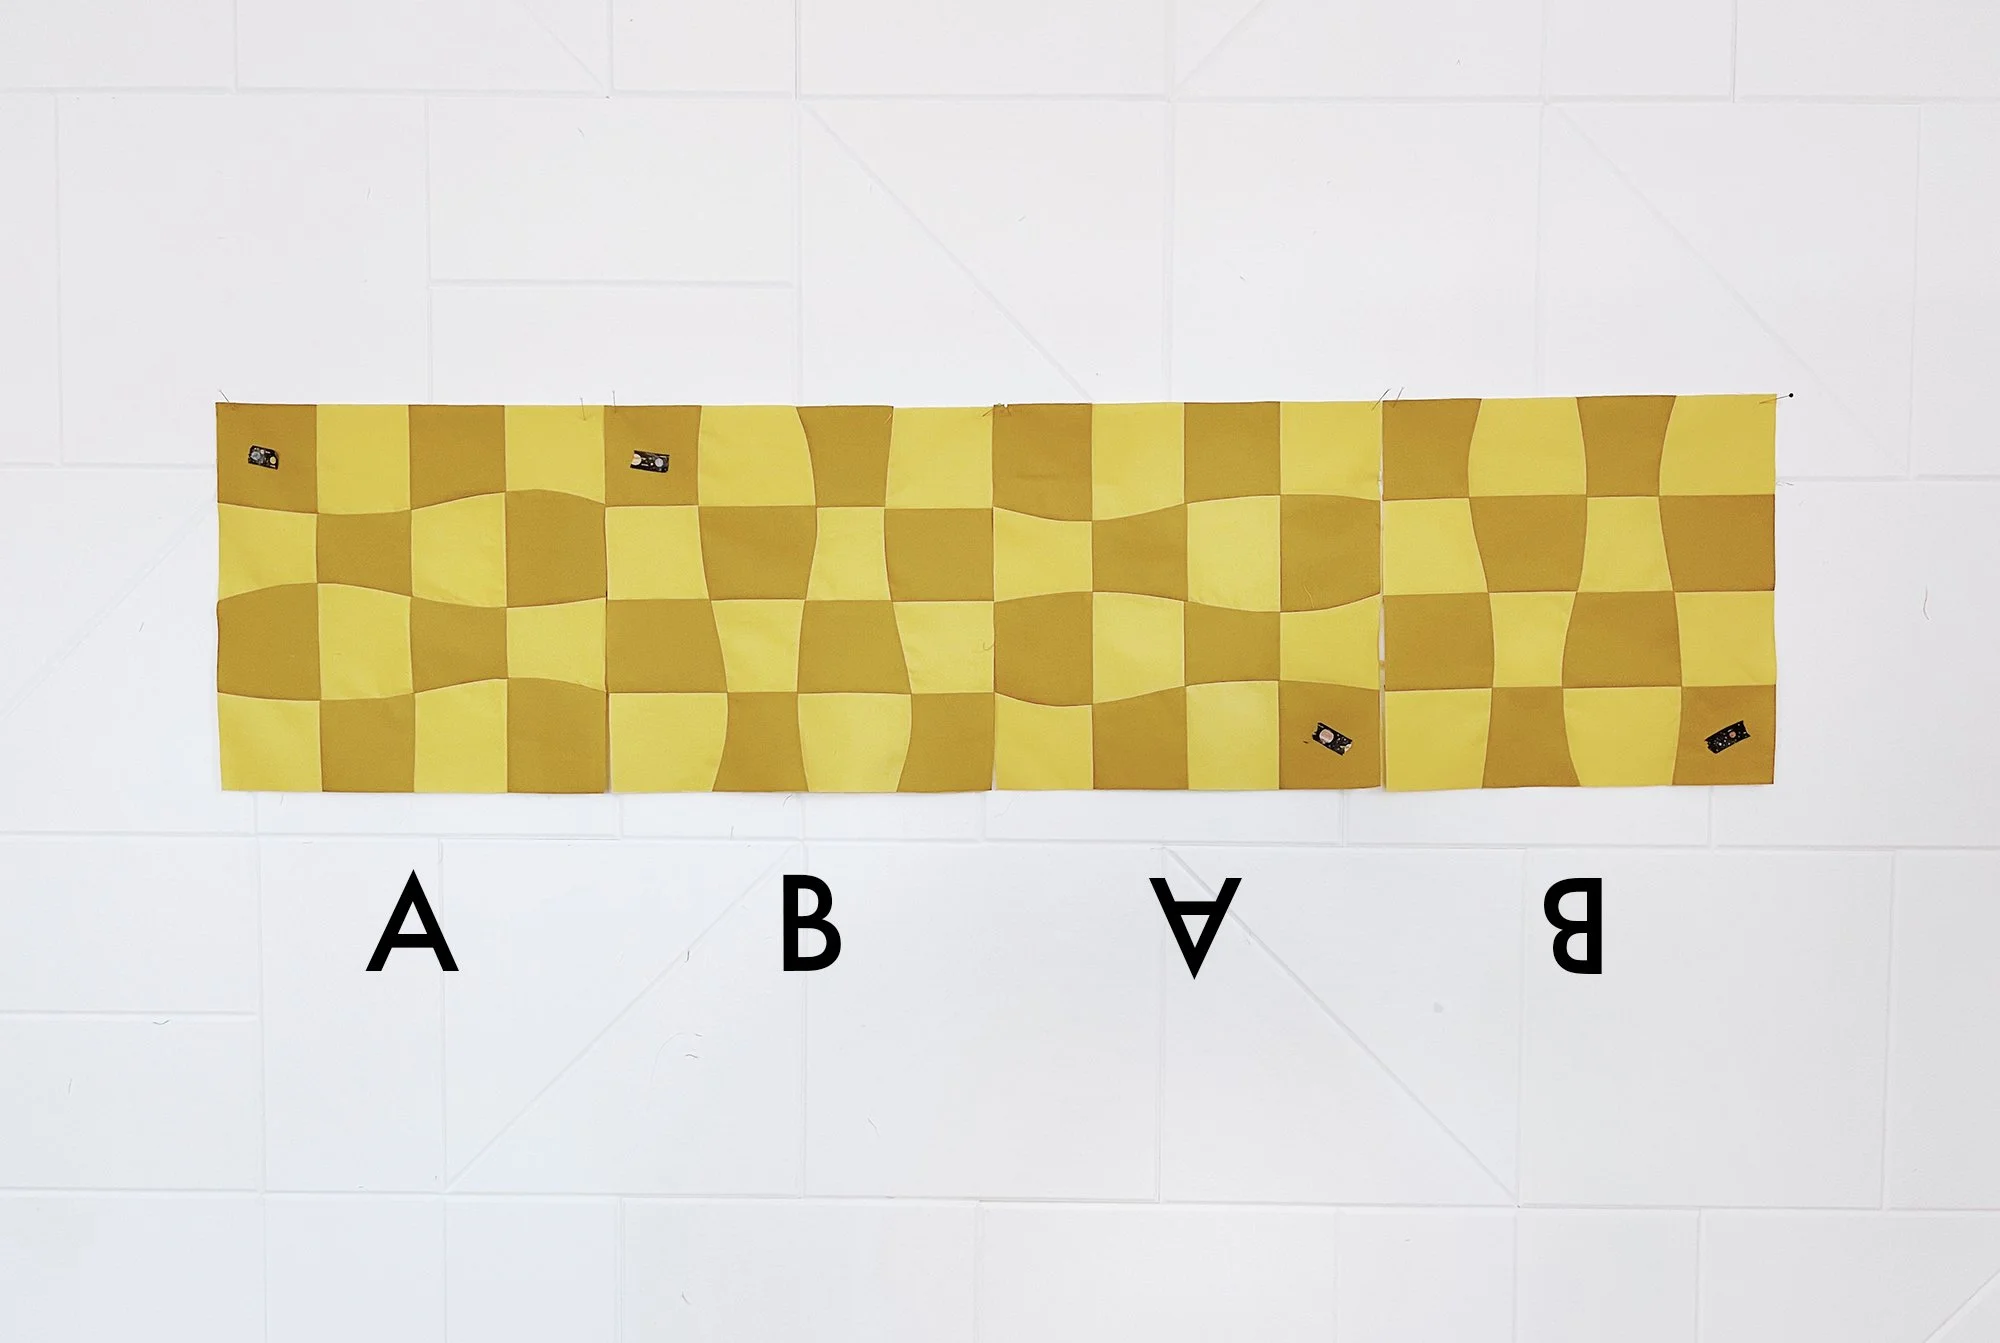
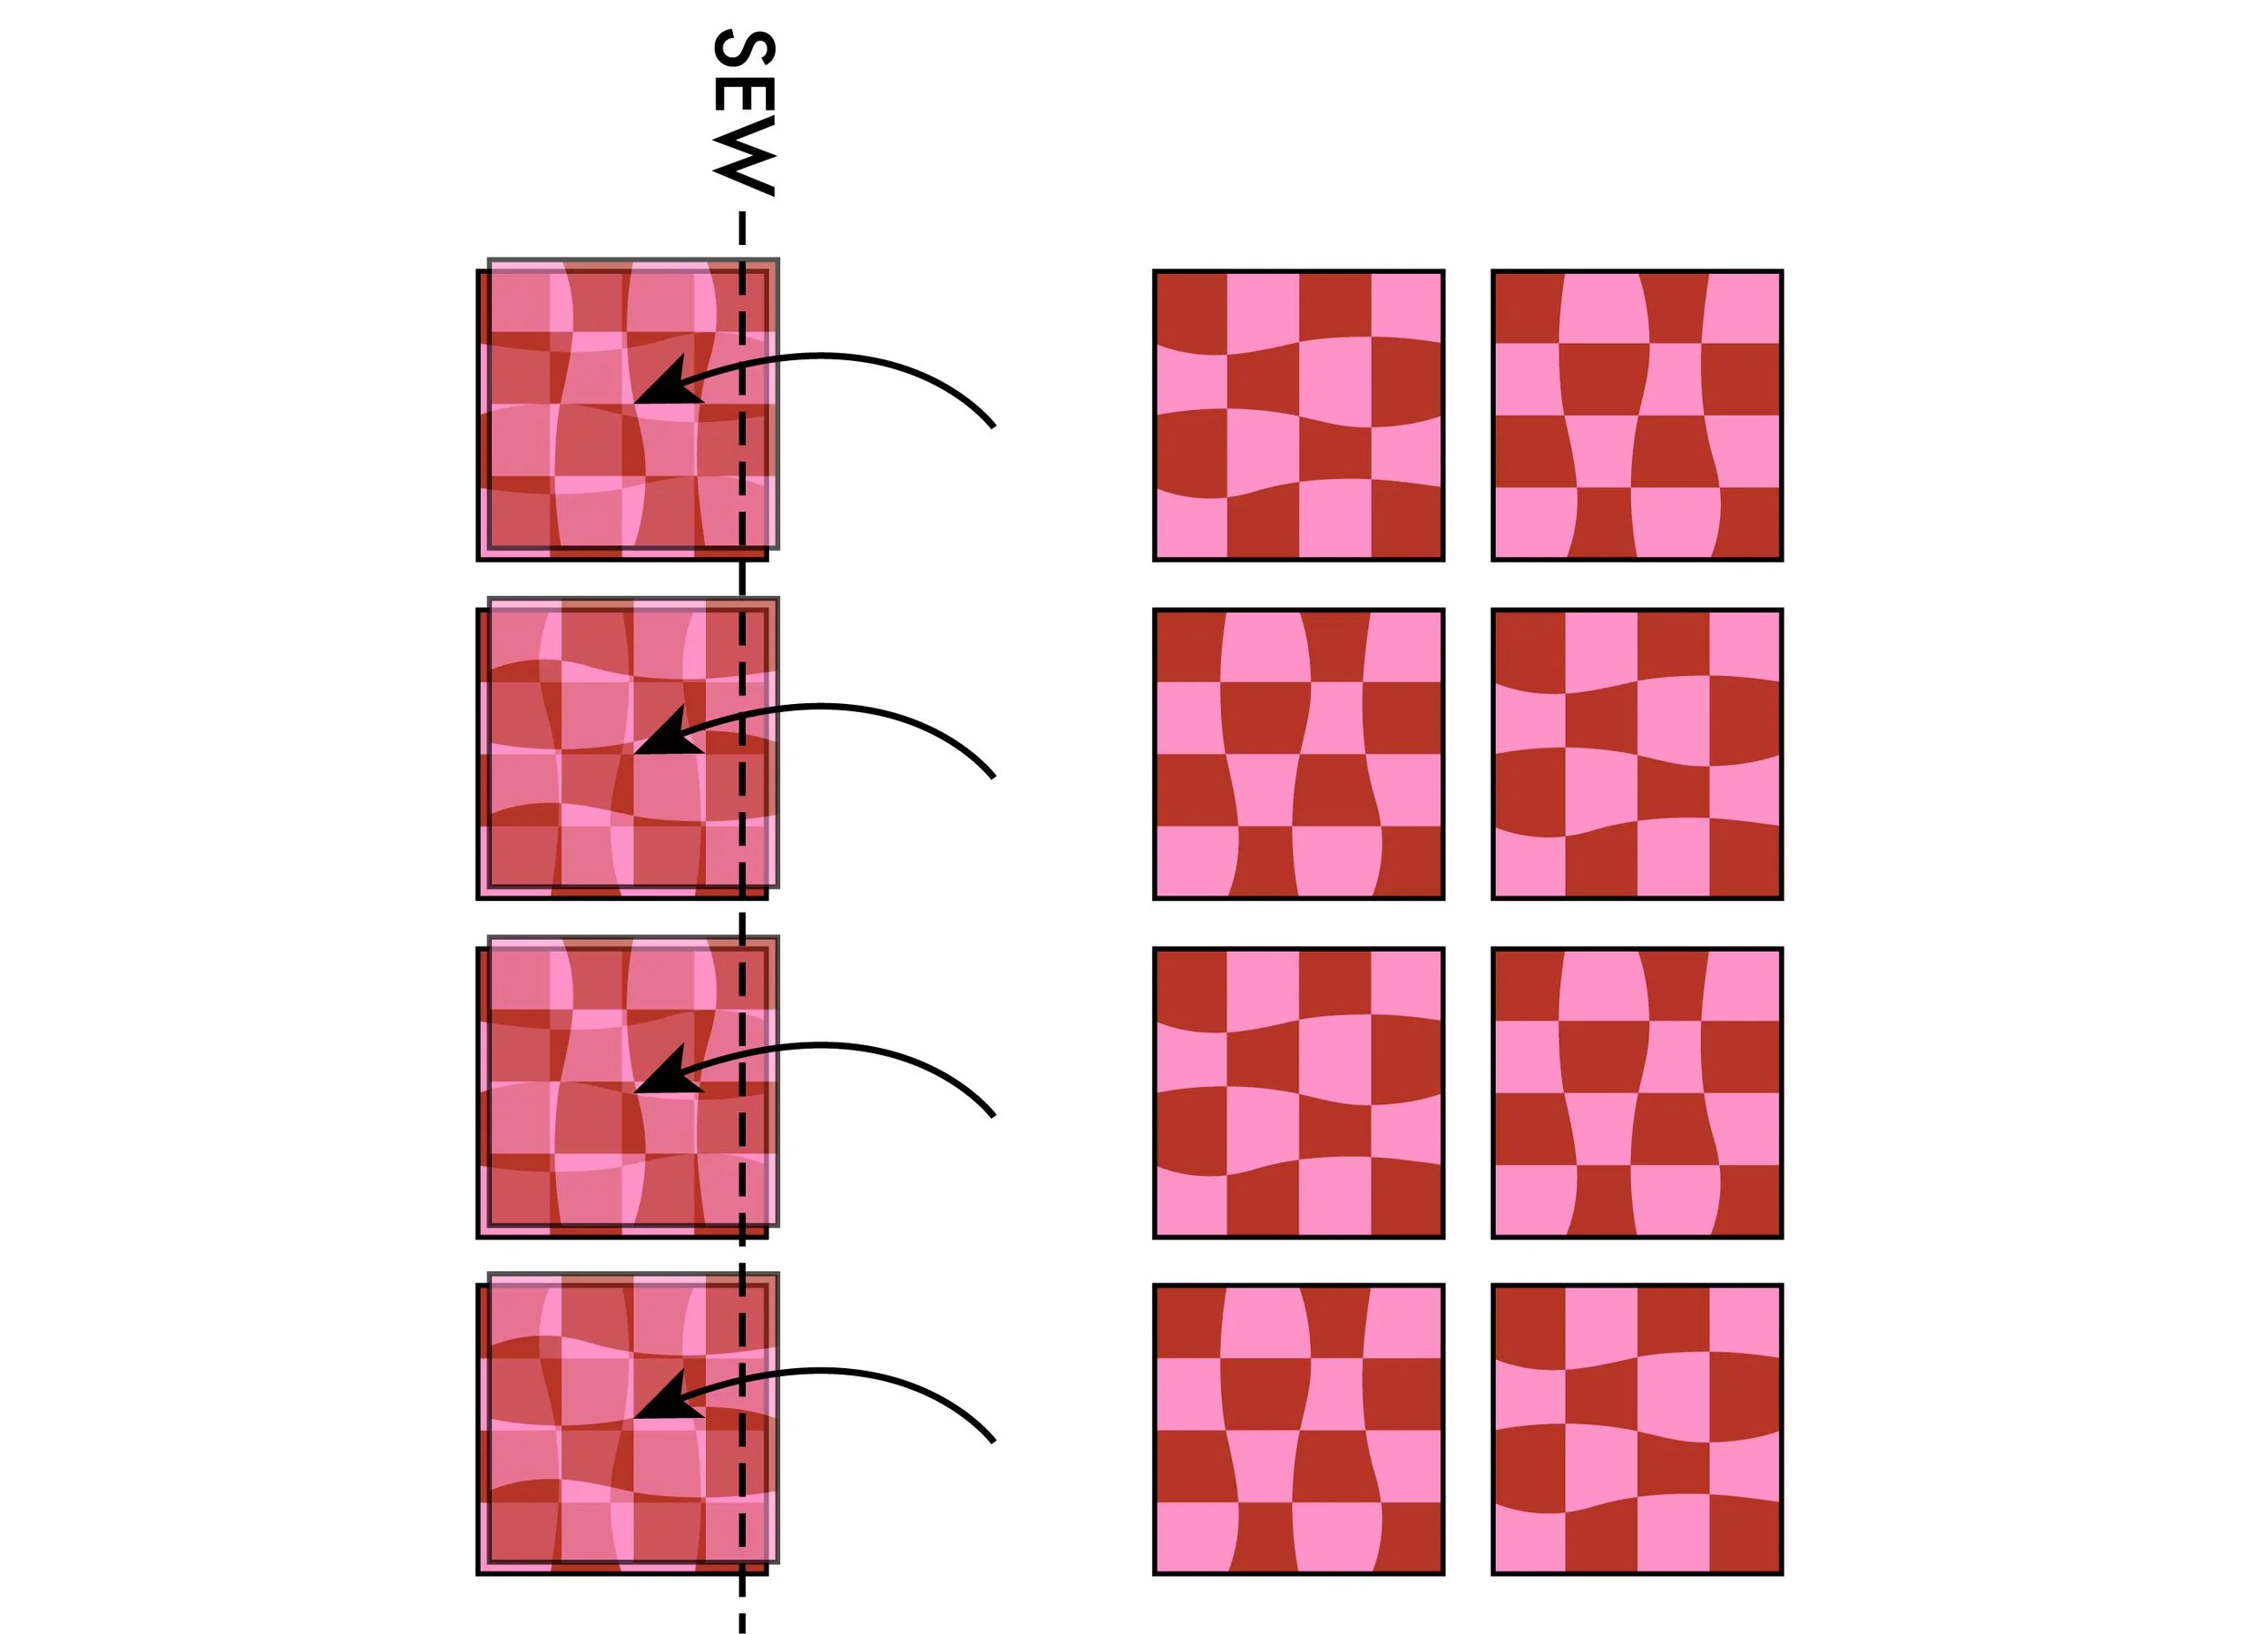
If you’ve lost track of which blocks are which, look to the marks you made on each one. To identify whether a block is A or B, place the marked square at the upper left corner of the block. If the curvy seams are horizontal, it’s a Block A. If the curvy seams are vertical, it’s a Block B. (If you didn’t do marks or they fell off, just put a Fabric 1 square in the upper left to do this appraisal.)
For all blocks, when the mark is in the upper left corner as shown above, it is considered right side up, layout-wise. If you rotate the block 180° so that the mark is in the lower right corner, it’s considered upside down layout-wise.
If you didn’t do the marks, or if you used tape and it fell off, take a look at the center two Fabric 1 pieces (the ones not along an edge). Their different shapes are how I identify the blocks if they get mixed up.
When Block A is right side up, the smaller of the two Fabric 1 pieces is on top. When it’s upside down, the larger one is on top.
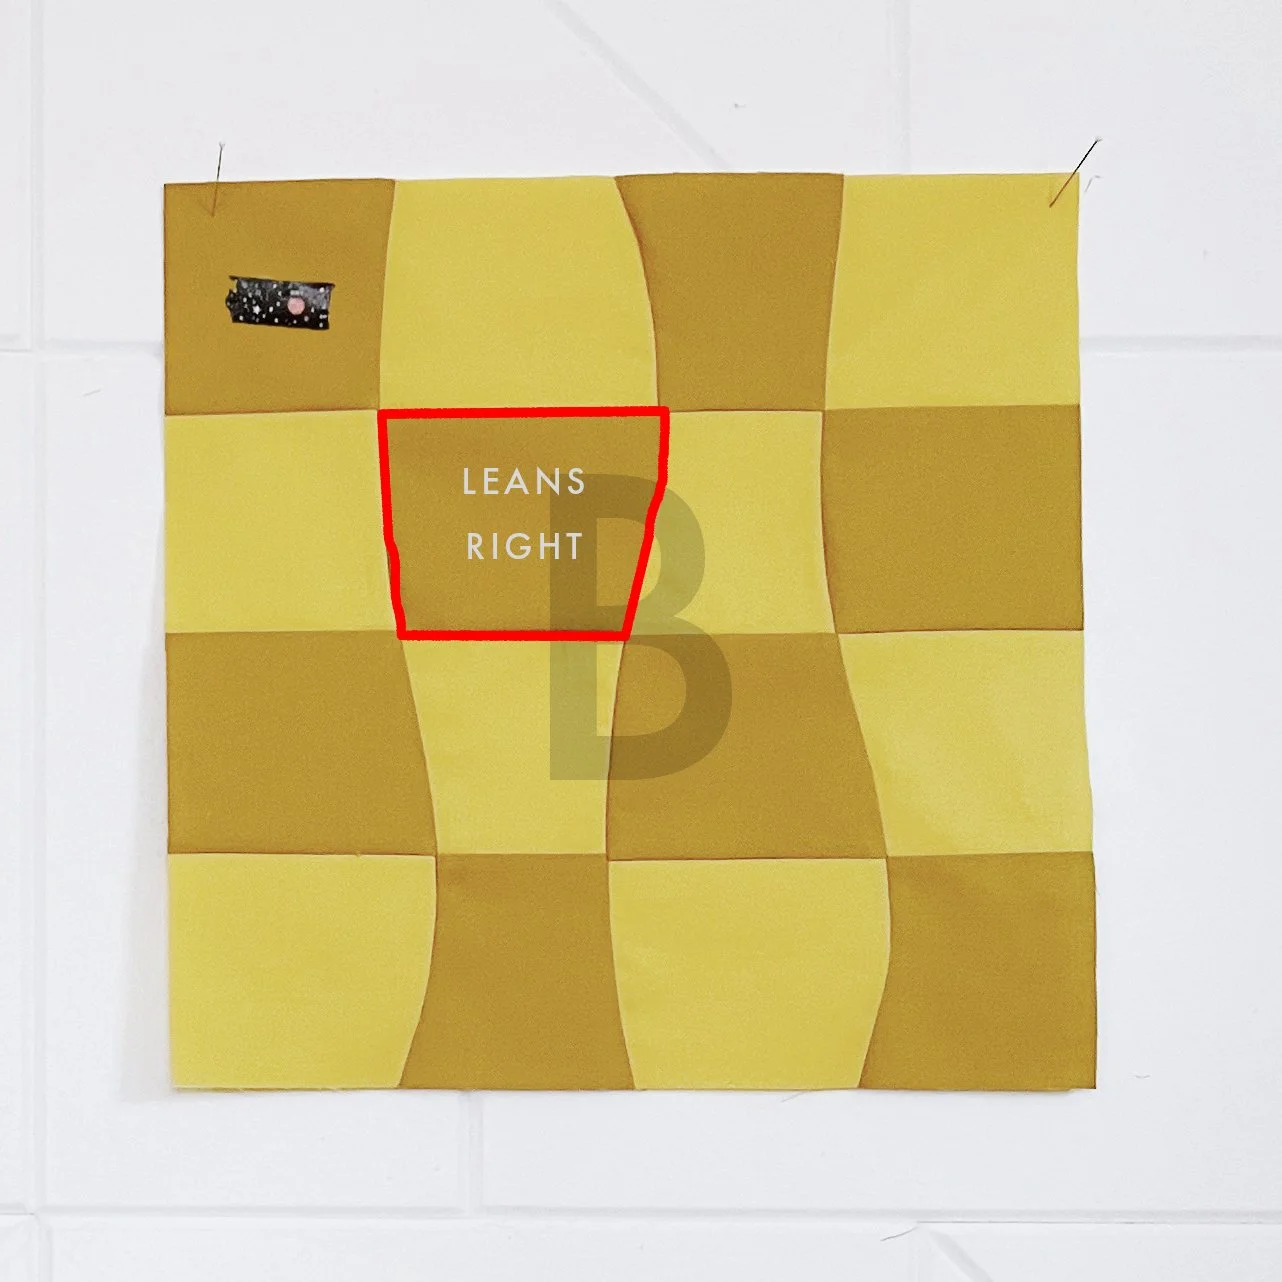
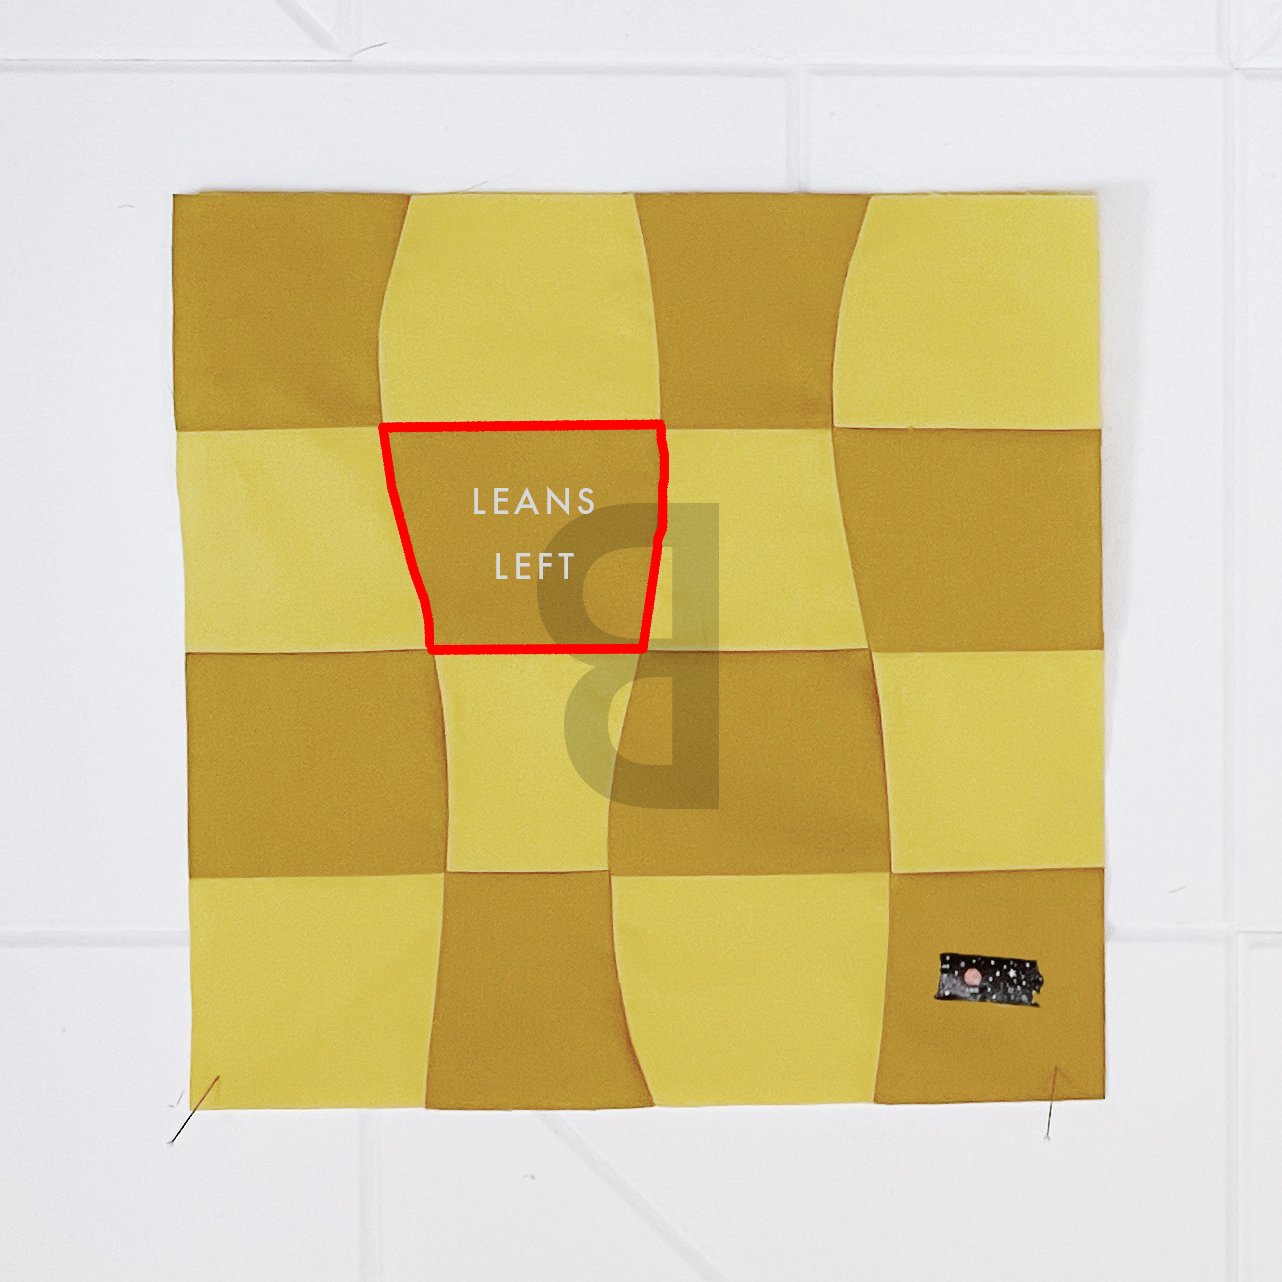
When Block B is right side up, the upper center Fabric 1 piece kind of leans to the right. When it’s upside down, the upper center Fabric 1 piece kind of leans to the left.
A LAYOUT OVERVIEW (all versions)
It will be handy to refer to the assembly overview and your layout diagram as you continue through this section, which starts on page 23/13 of the instructions.
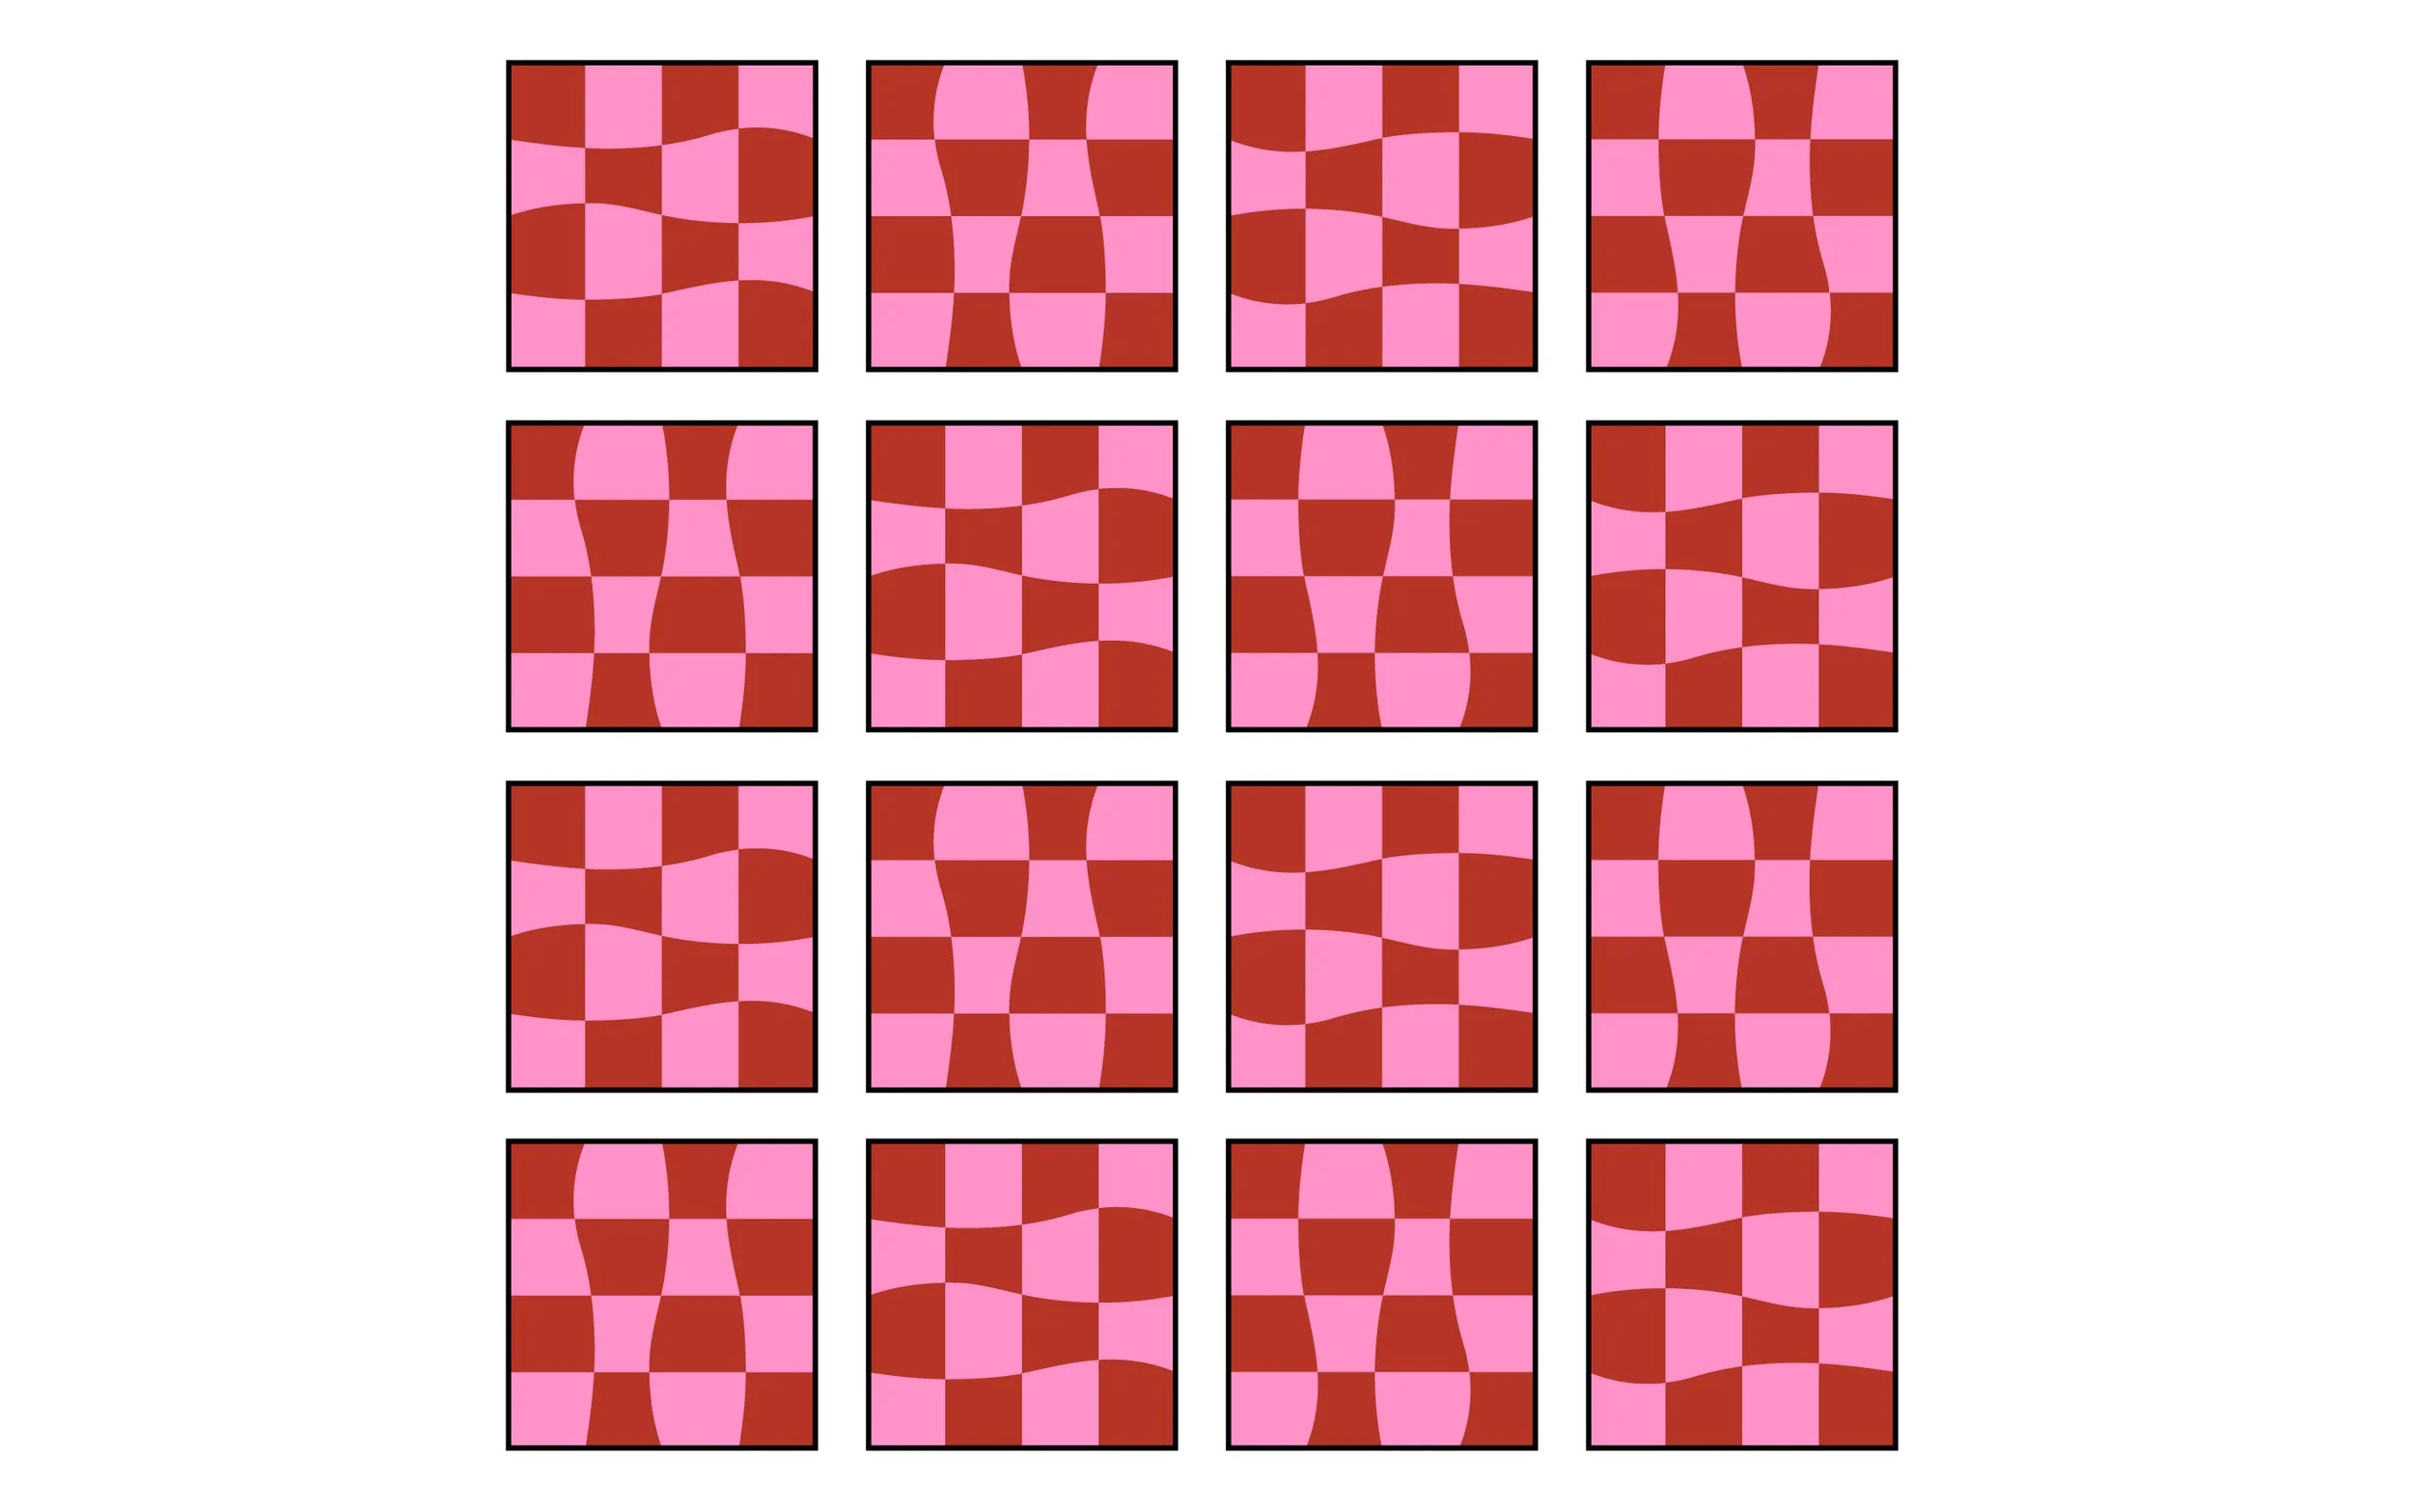
Omega is made up of a checkerboard pattern of Blocks A and B. (So yes, it’s sort of like a checkerboard of smaller wavy checkerboards). The first row is A, B, A, B, etc., the second row is B, A, B, A, etc., the third is A, B, A, B, etc. and so on. This means that the curvy seams alternate both across the rows and down the columns as horizontal, vertical, horizontal, vertical etc. This is what helps create the organic, undulating feel of the wavy lines, instead of your brain immediately seeing the same repeating blocks.
A second way the quilt is kept organic-feeling is that every other Block A and B in a row is upside down. For instance, the first four blocks in the first row of the Basic layout for all sizes are A, B, A, B. In this sequence, the second A and B should be rotated 180° so that they are upside down in relation to the first two. This is why we marked our blocks - it can get a little hard to tell what’s going on in the thick of it, so just use your marks to place your blocks. Mark in upper left means the block is right side up, lower right means the block is upside down. (Whether or not a block is right side up or upside down, all Blocks A and B are placed in the finished quilt with a Fabric 1 piece at the upper left and lower right.)
If you’ve lost your marks or didn’t mark, refer to the section above to help alternate them as you lay out the quilt. It’s ok if you miss a rotation here and there, I wouldn’t call that a seam-rippable offense, just try to get most of them and it will have the same effect.
If you’re doing a scrappy version, you can start by doing the alternating upside down placement as the layout indicates, but then feel free to rotate for best print placement. For instance, if you see that two of the same print are close to each other and it bothers you, rotate the block 180° if that helps, even if it goes against the layout diagram. (You do still want to be sure that all blocks are placed with a Fabric 1 square in the upper left and lower right.)
IMPROV LAYOUT
If you’re making the Improv layout, your Block C’s are going to go into the quilt wherever there is a yellow outlined block in the layout diagram . The curvy seams in each Block C will go in the direction of the arrow shown in the yellow outlined block (upside down/right side up doesn’t really matter, just the direction of the curvy seams). See bottom of page 23/13 for visuals. When doing the layouts, I positioned all the Block C’s in such a way as to look the most random/organic and not accidentally create any repeated shapes with the adjacent blocks that draw your eye, but that’s the only purpose of following the arrows. If you like how a Block C looks rotated a different way, then go for it, it’s your Omega!
You can’t, however, relocate the Block C’s anywhere you want, because you have a certain number of Block A and Block B already. So if you relocate a Block C that goes in a Block A spot, make sure you put it in another Block A spot to keep the block counts the same. (Same goes for a Block B spot.)
Look out for these oopsies (all versions)
When laying out/assembling your quilt, watch out for these layout errors:
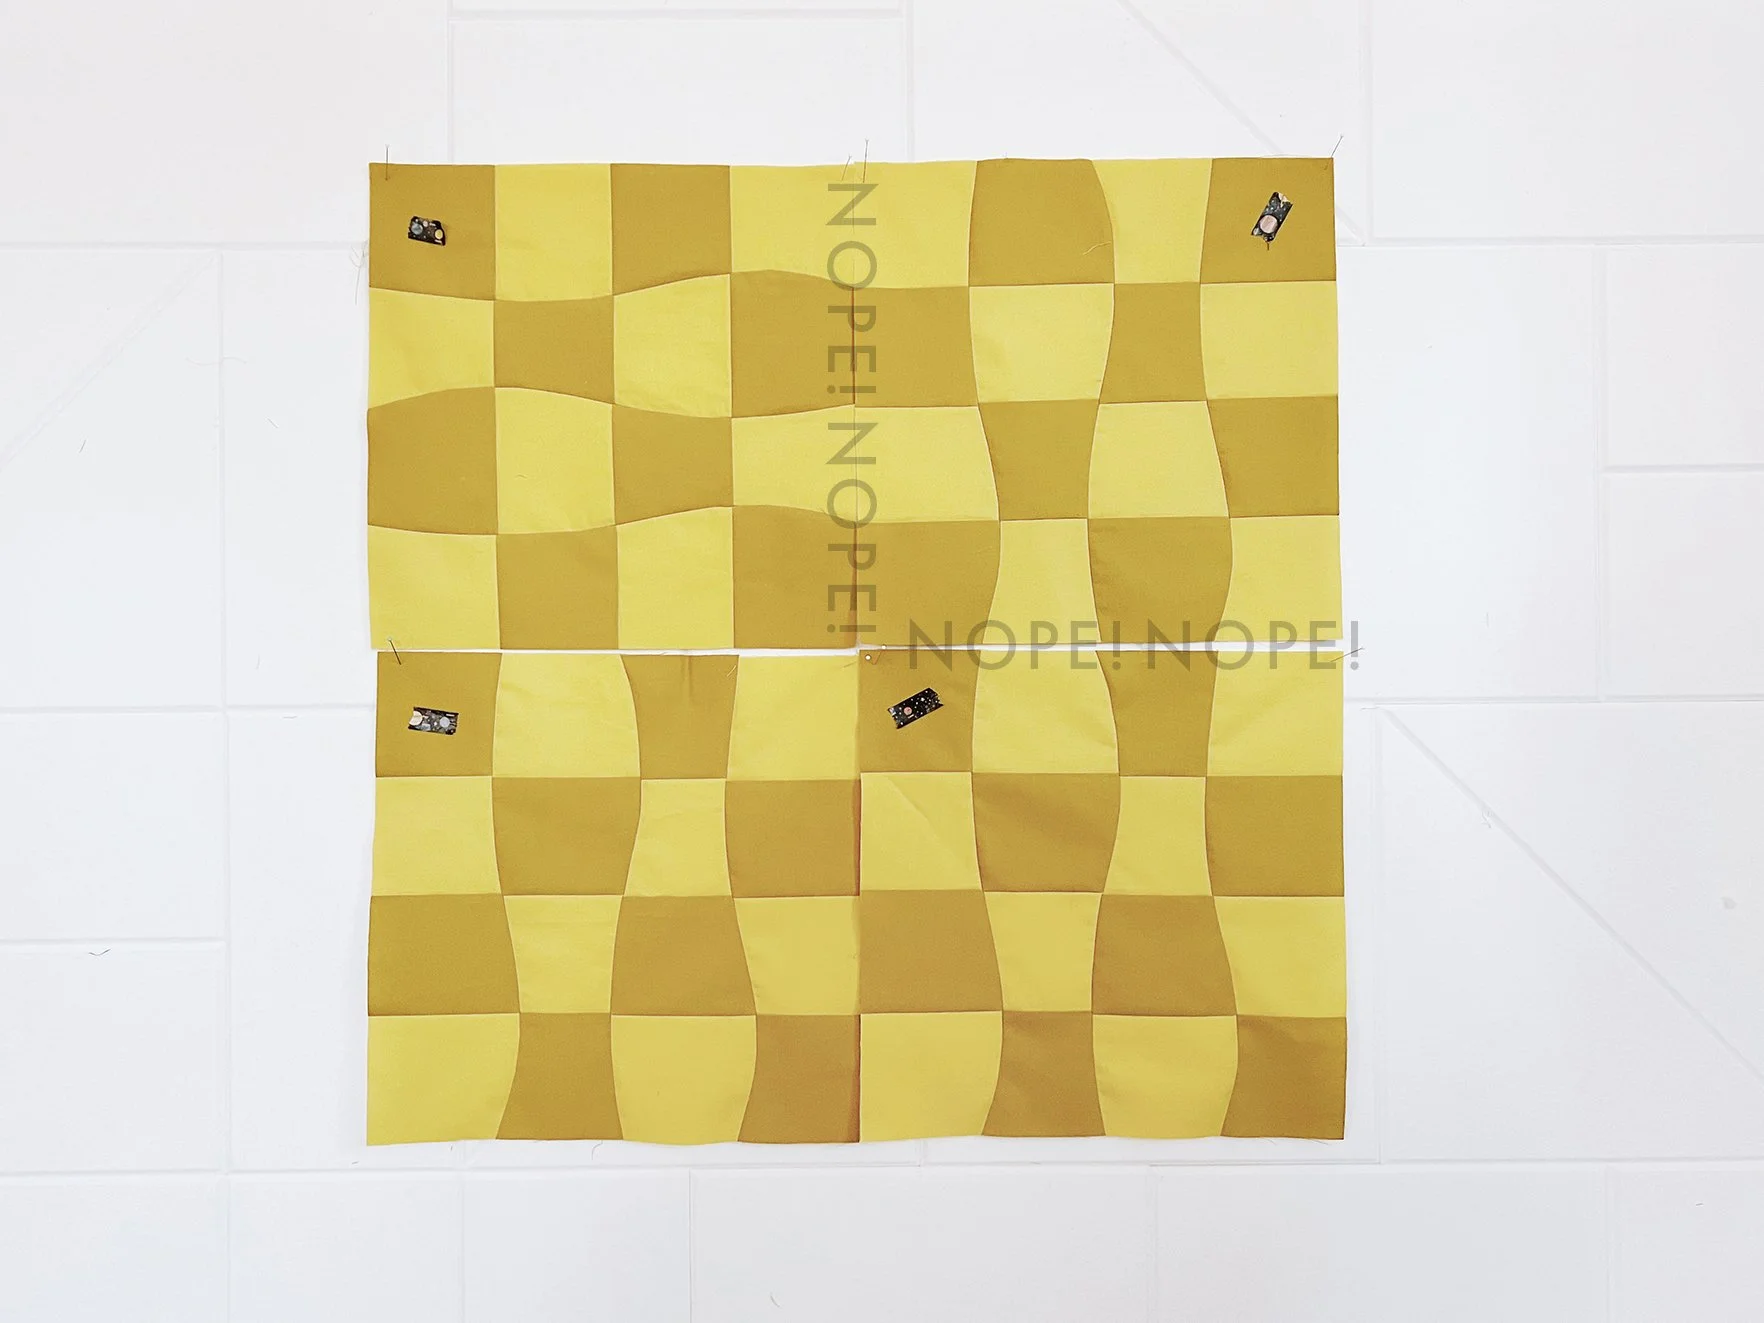
Directly adjacent Fabric 1 and Fabric 2 pieces. If you see a spot where your fabrics are chunking together, something is amiss. Aside from Block C in the Improv layout, there shouldn’t be anywhere in the quilt where two adjacent Fabric 1 or Fabric 2 squares are lining up. So you must have a block rotated the wrong way, and possibly in the wrong place. (Unless you want it this way of course!)
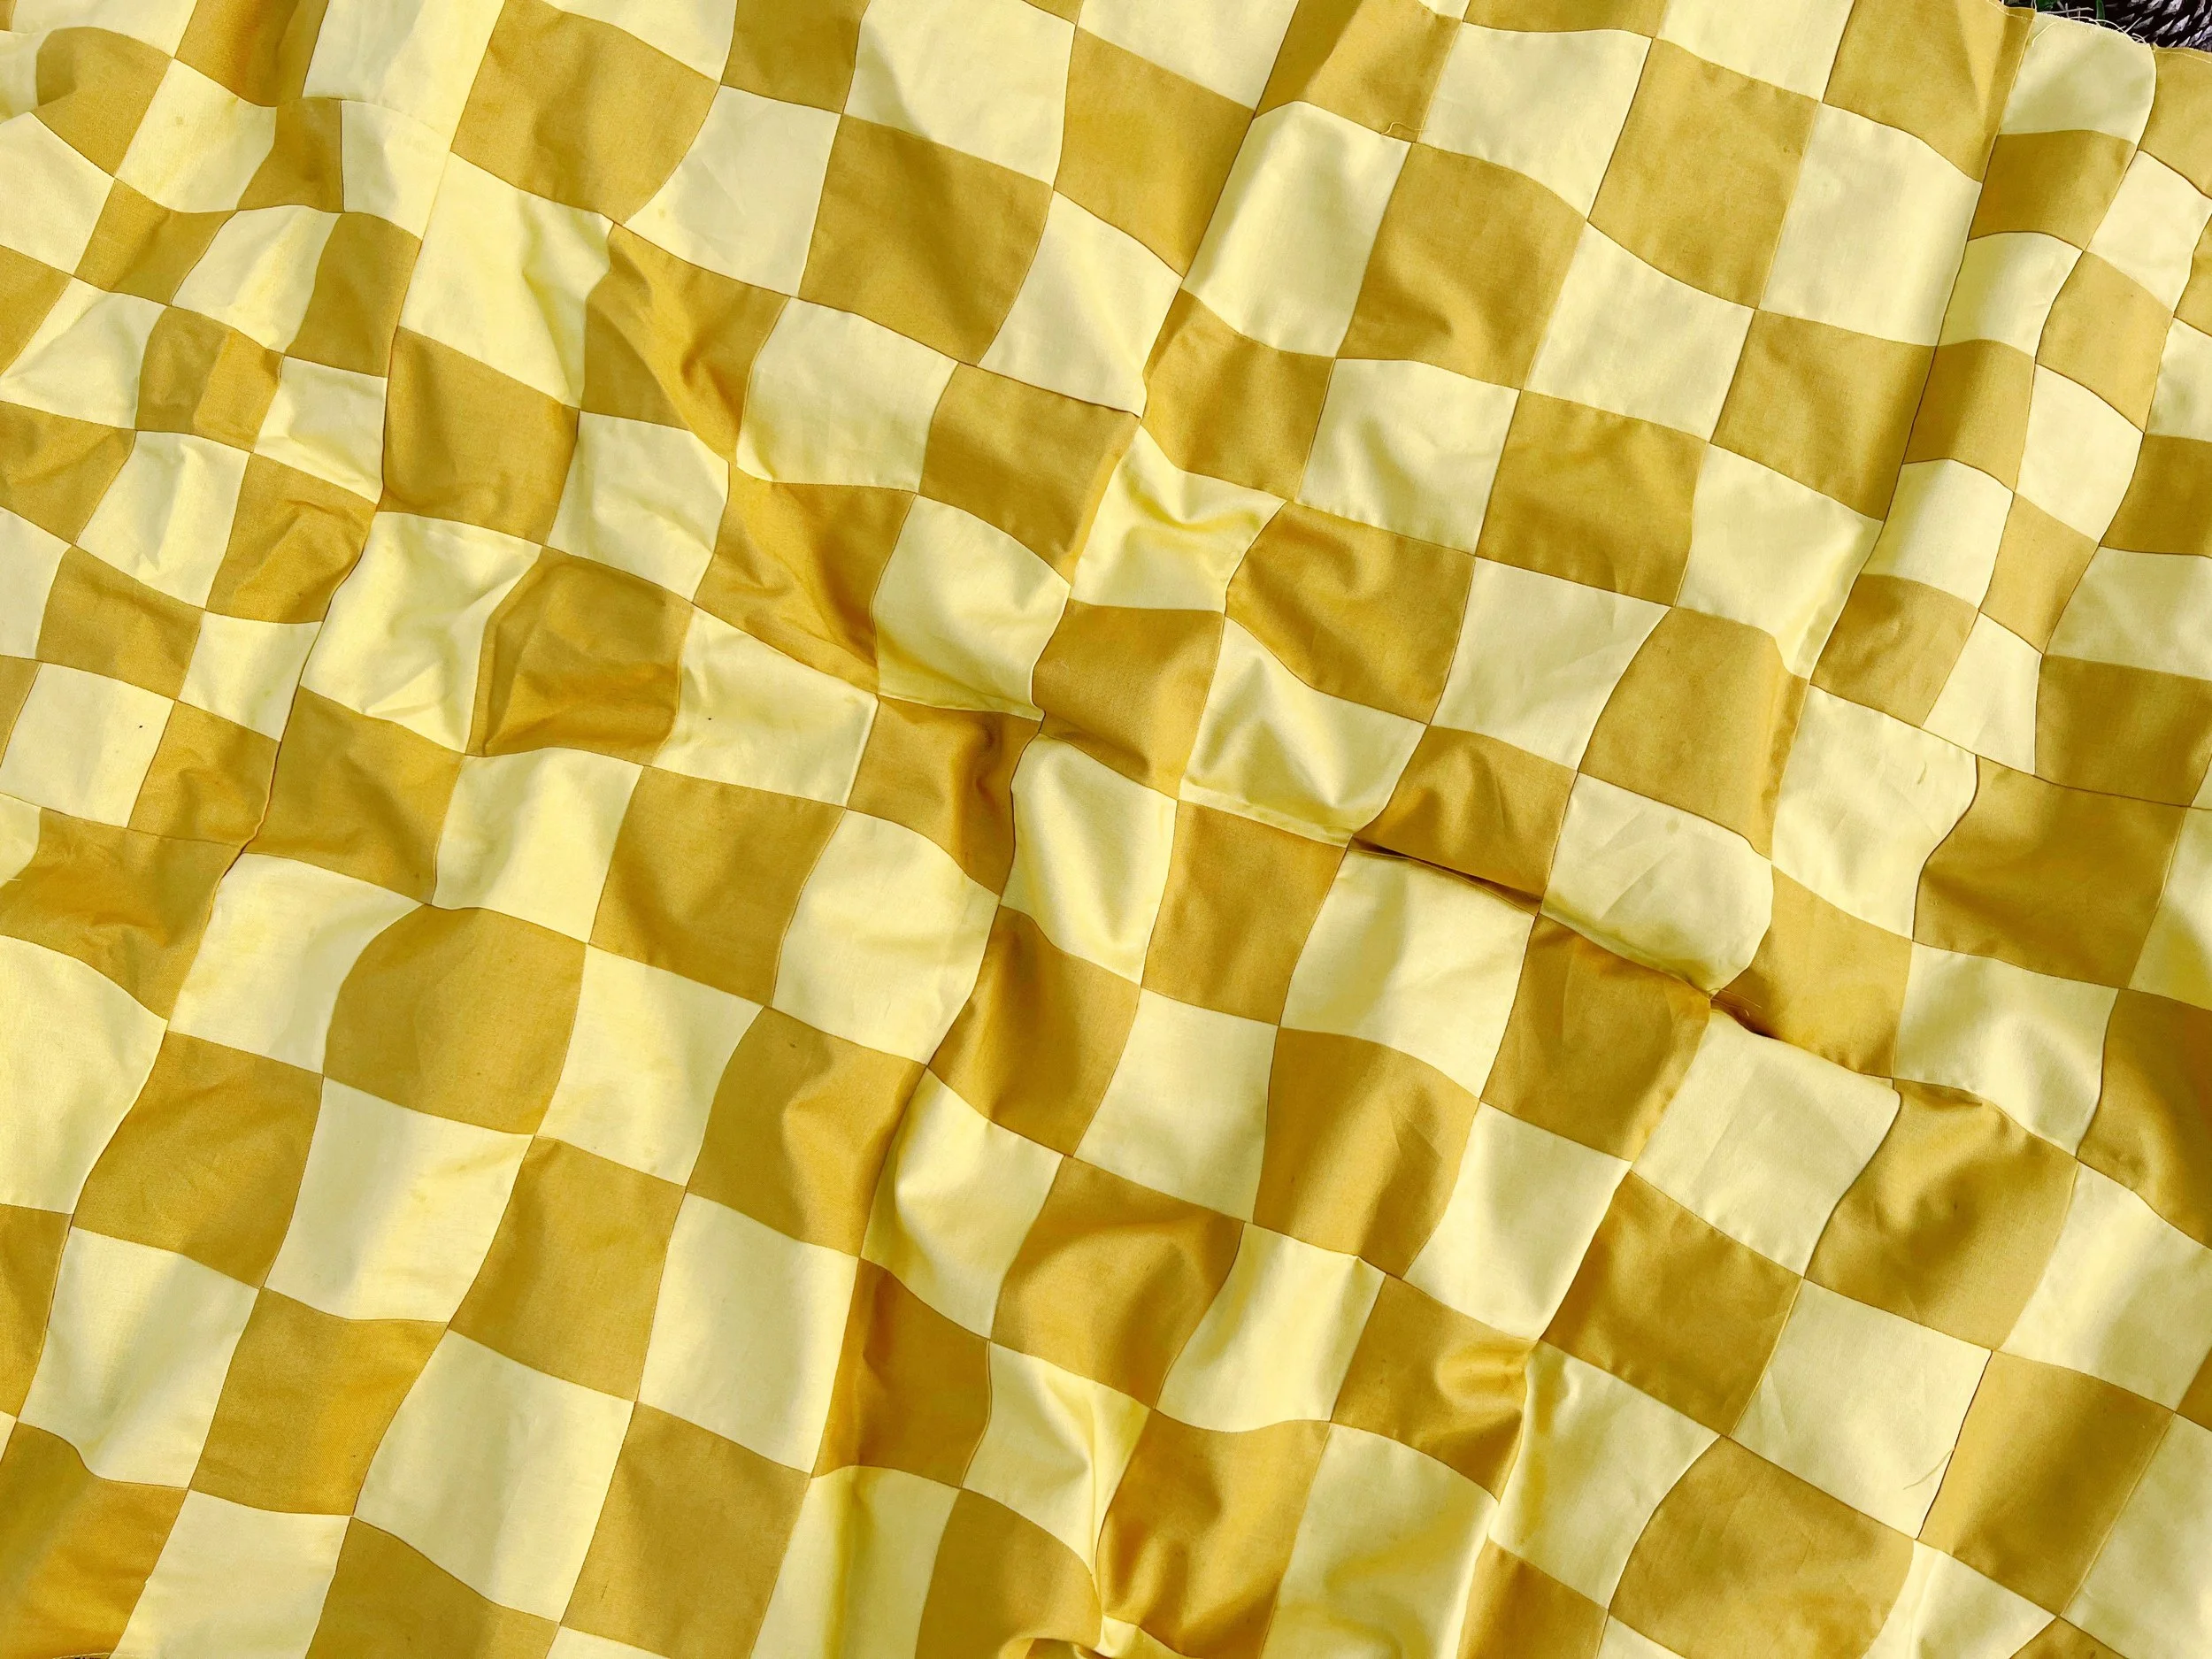
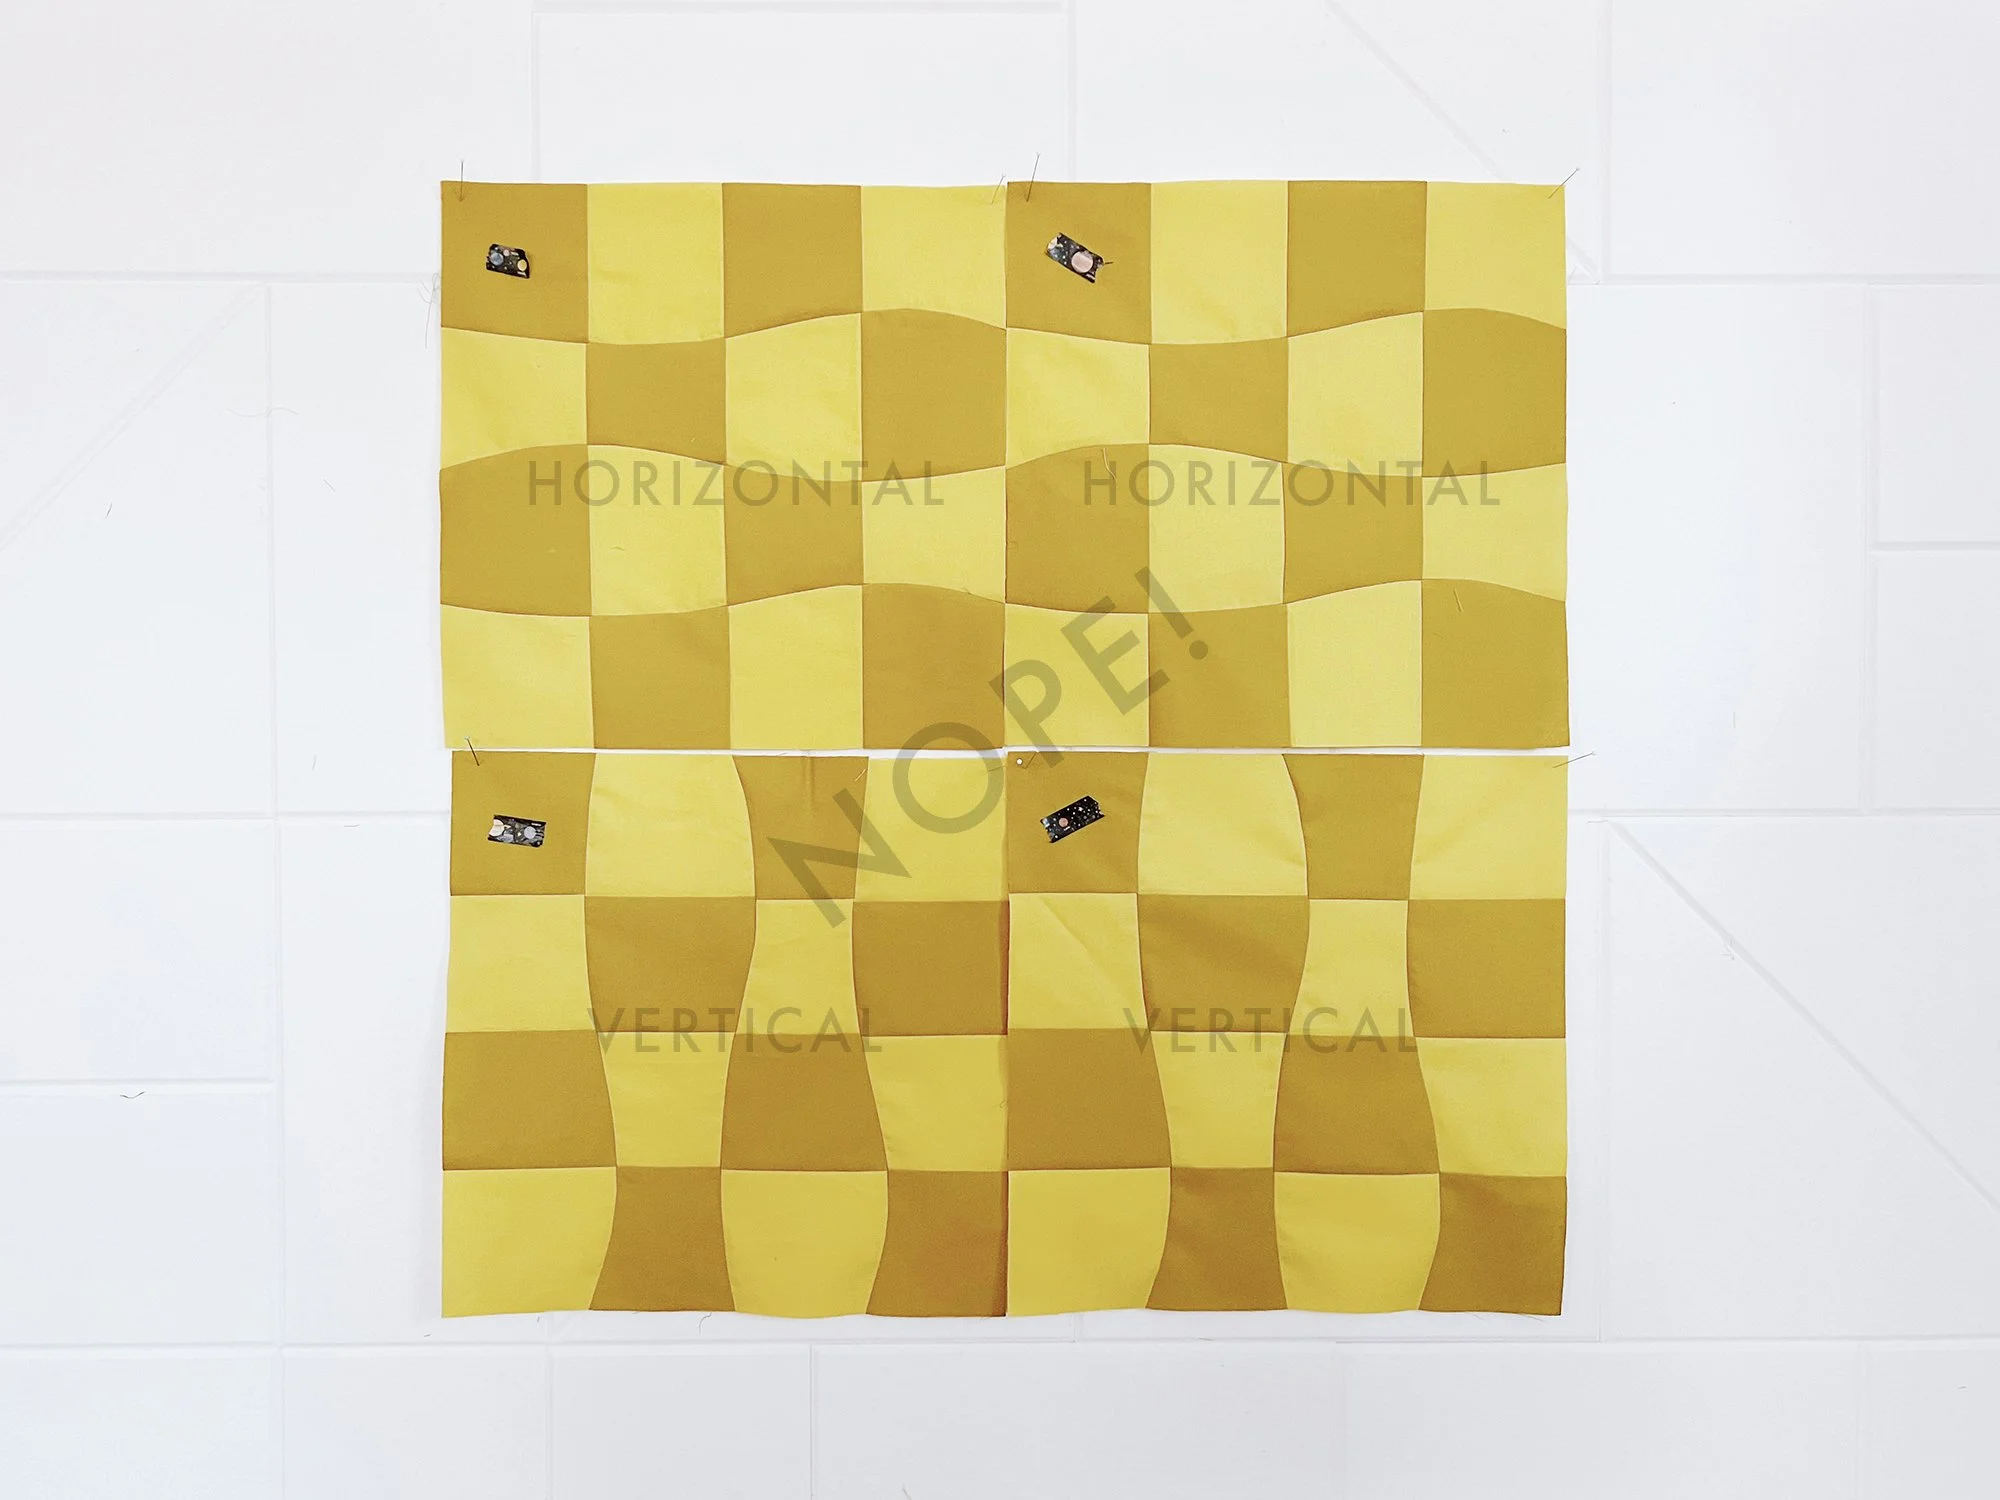
Curvy seams aren’t alternating. Remember that the curvy seams should go horizontal, vertical, horizontal, vertical, etc. If your layout is creating the proper checkerboard of Fabric 1 and 2, but there are adjacent blocks that both have horizontal or vertical curvy seams, something is amiss. In the photo below, the Fabric 1 & 2 checkerboard looks good with no chunking, but you can see that the first row has all horizontal curvy seams, and the second row has all vertical curvy seams. This is because the first row is Block A, Block A, and the second is Block B, Block B. Your brain can easily see that each is the same repeated set of curves because they’re right next to each other. If you had larger areas in the finished quilt like this is would be fairly noticeable. Remember to alternate between Block A and B both across the rows and down the columns. The image below should be A, B in the first row and B, A in the second row.
ASSEMBLY (ALL VERSIONS)
Now that you have all the background info, the assembly is pretty straightforward. You’re going to first sew your blocks together into rows as shown/described for your layout diagram. This means you’re connecting all the blocks in a row together to make one long strip.
With each seam, one block will have the seam allowances pressed open, and the other to one side. Keep the seam allowances as they are as you sew. They won’t nest as strongly as they would if they were pressed in opposite directions, but they’ll nest a little! Do your best to line them up. If there’s a seam here and there that don’t, don’t sweat it. A lot has happened since we started. Remember, this is a wonky checkerboard.
You’ll press the seams of each finished row in alternating directions. An easy way to remember this is to press the seams in the odd rows to the right, and even rows to the left.
Then you’ll sew the rows together to finish the quilt top, nesting row seams as you go. Final long seams can be pressed either way.
Then your Omega is….DONE!!!!
CHAIN PIECE
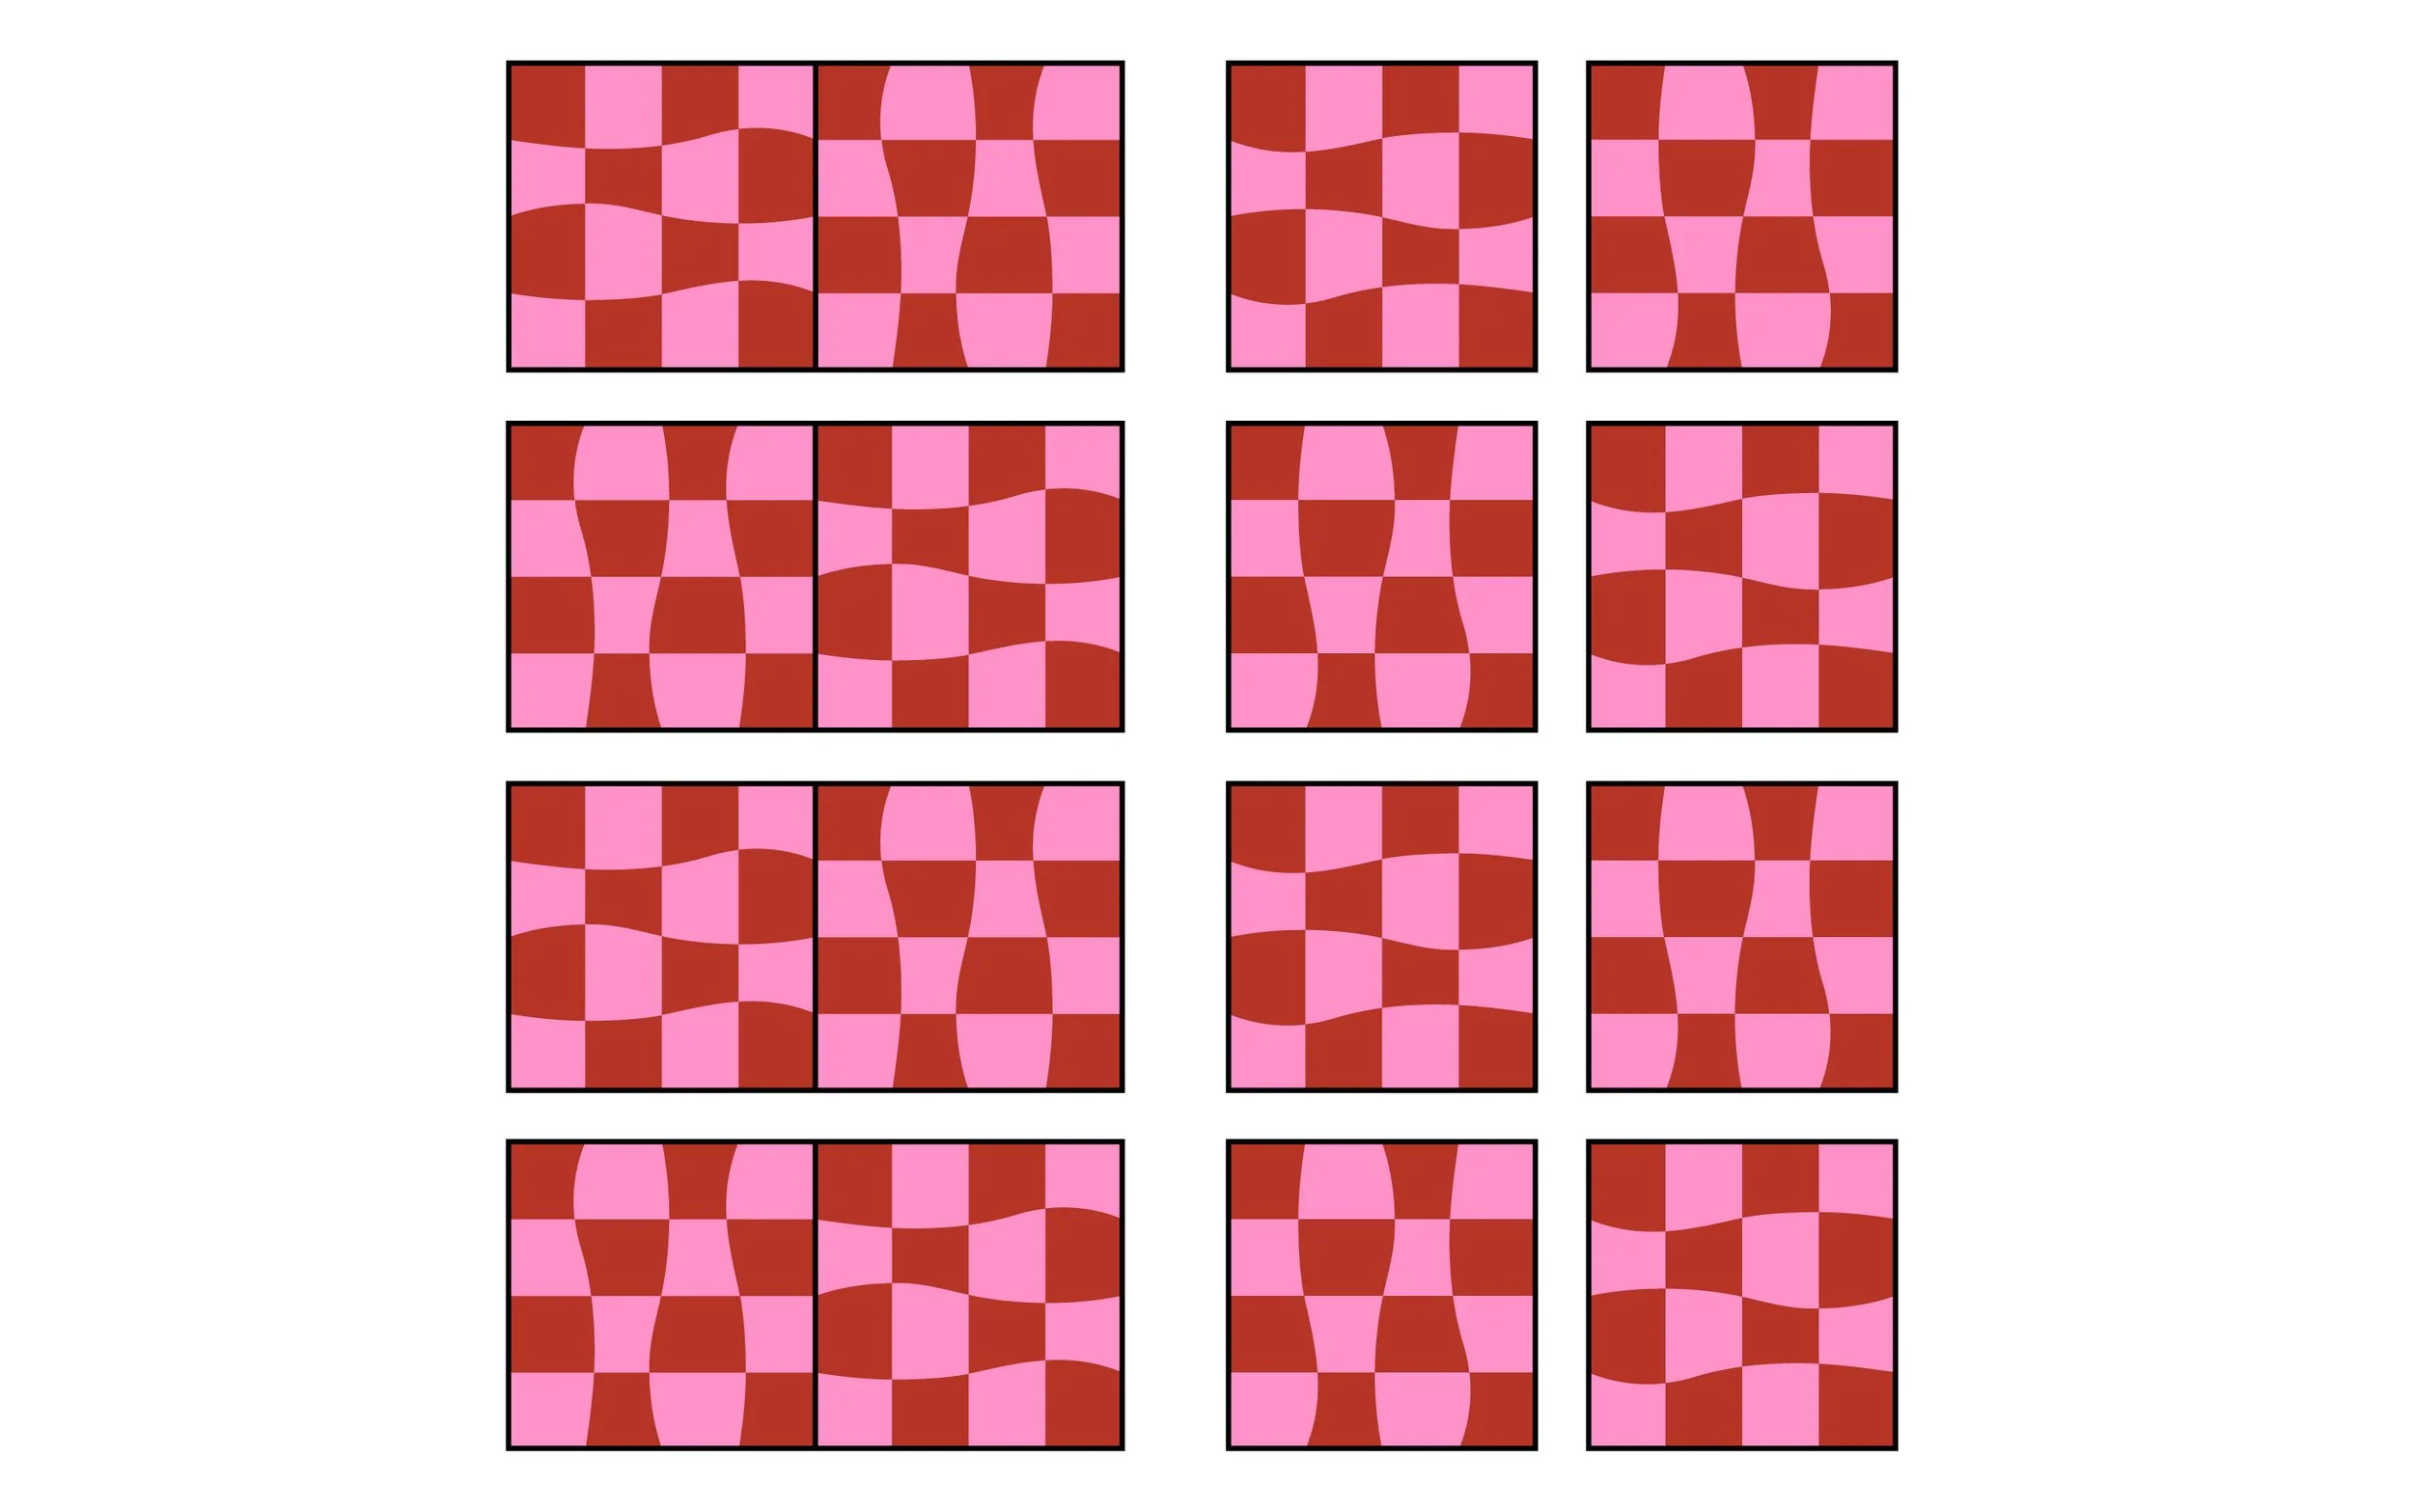
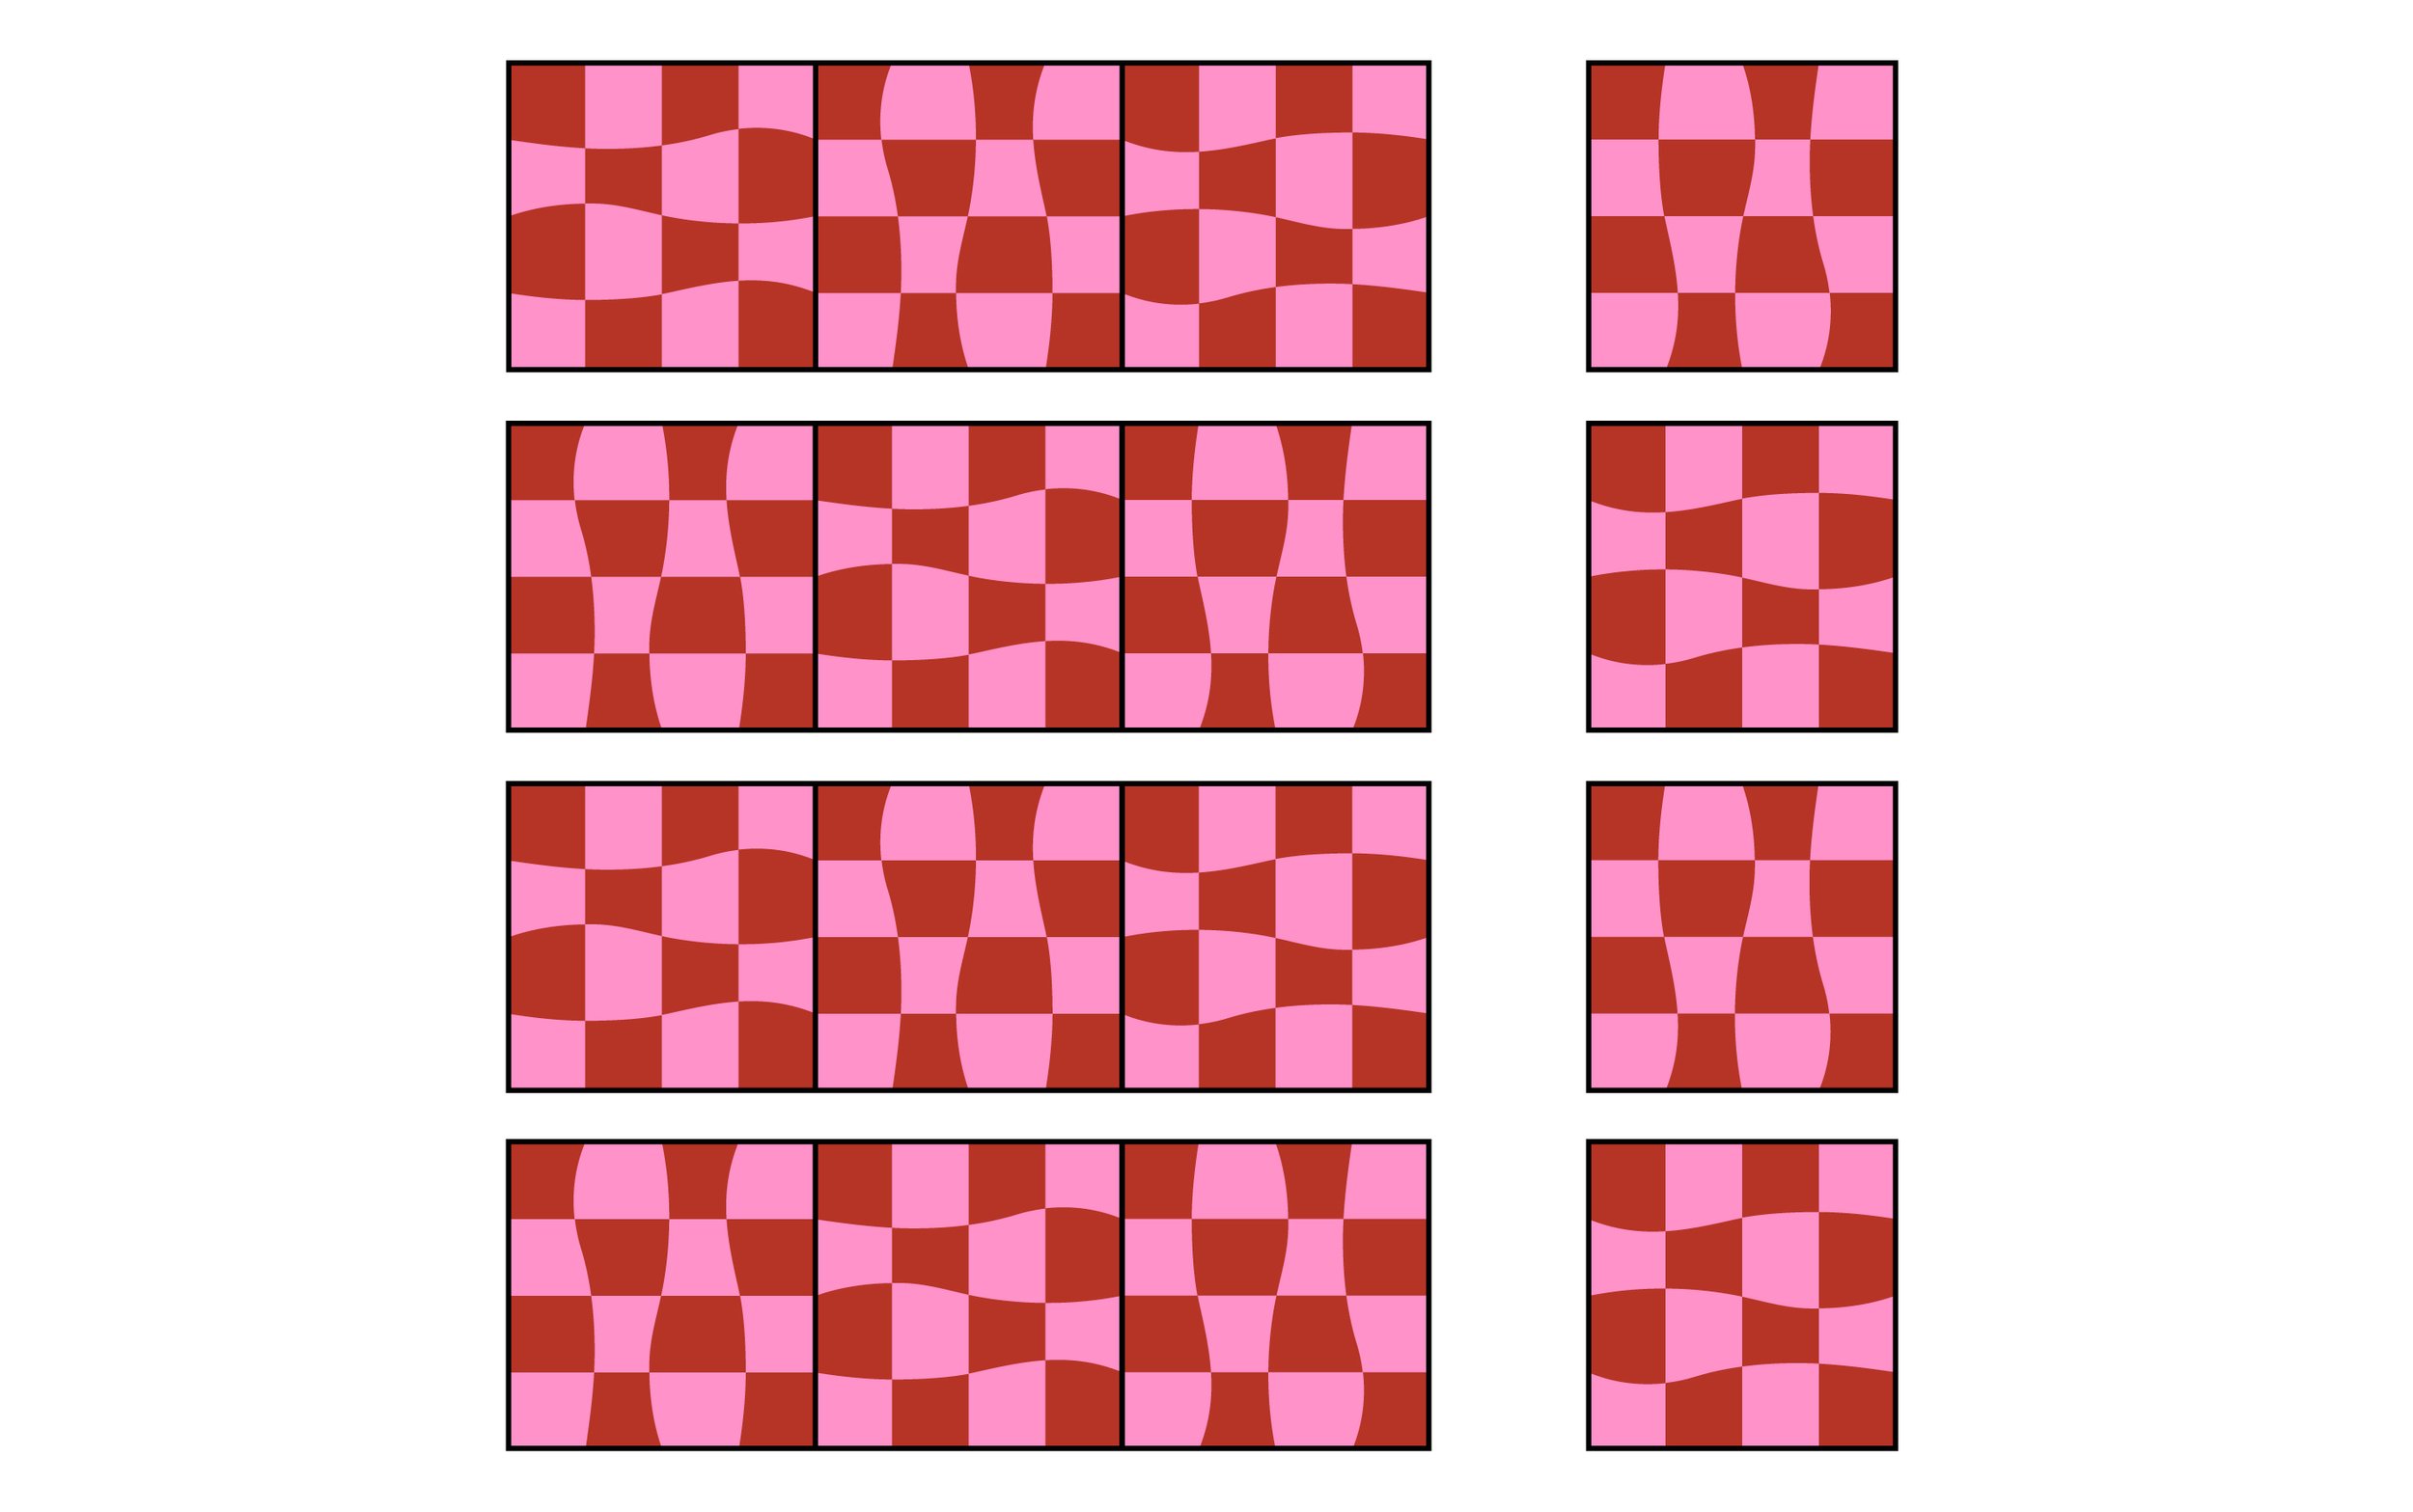
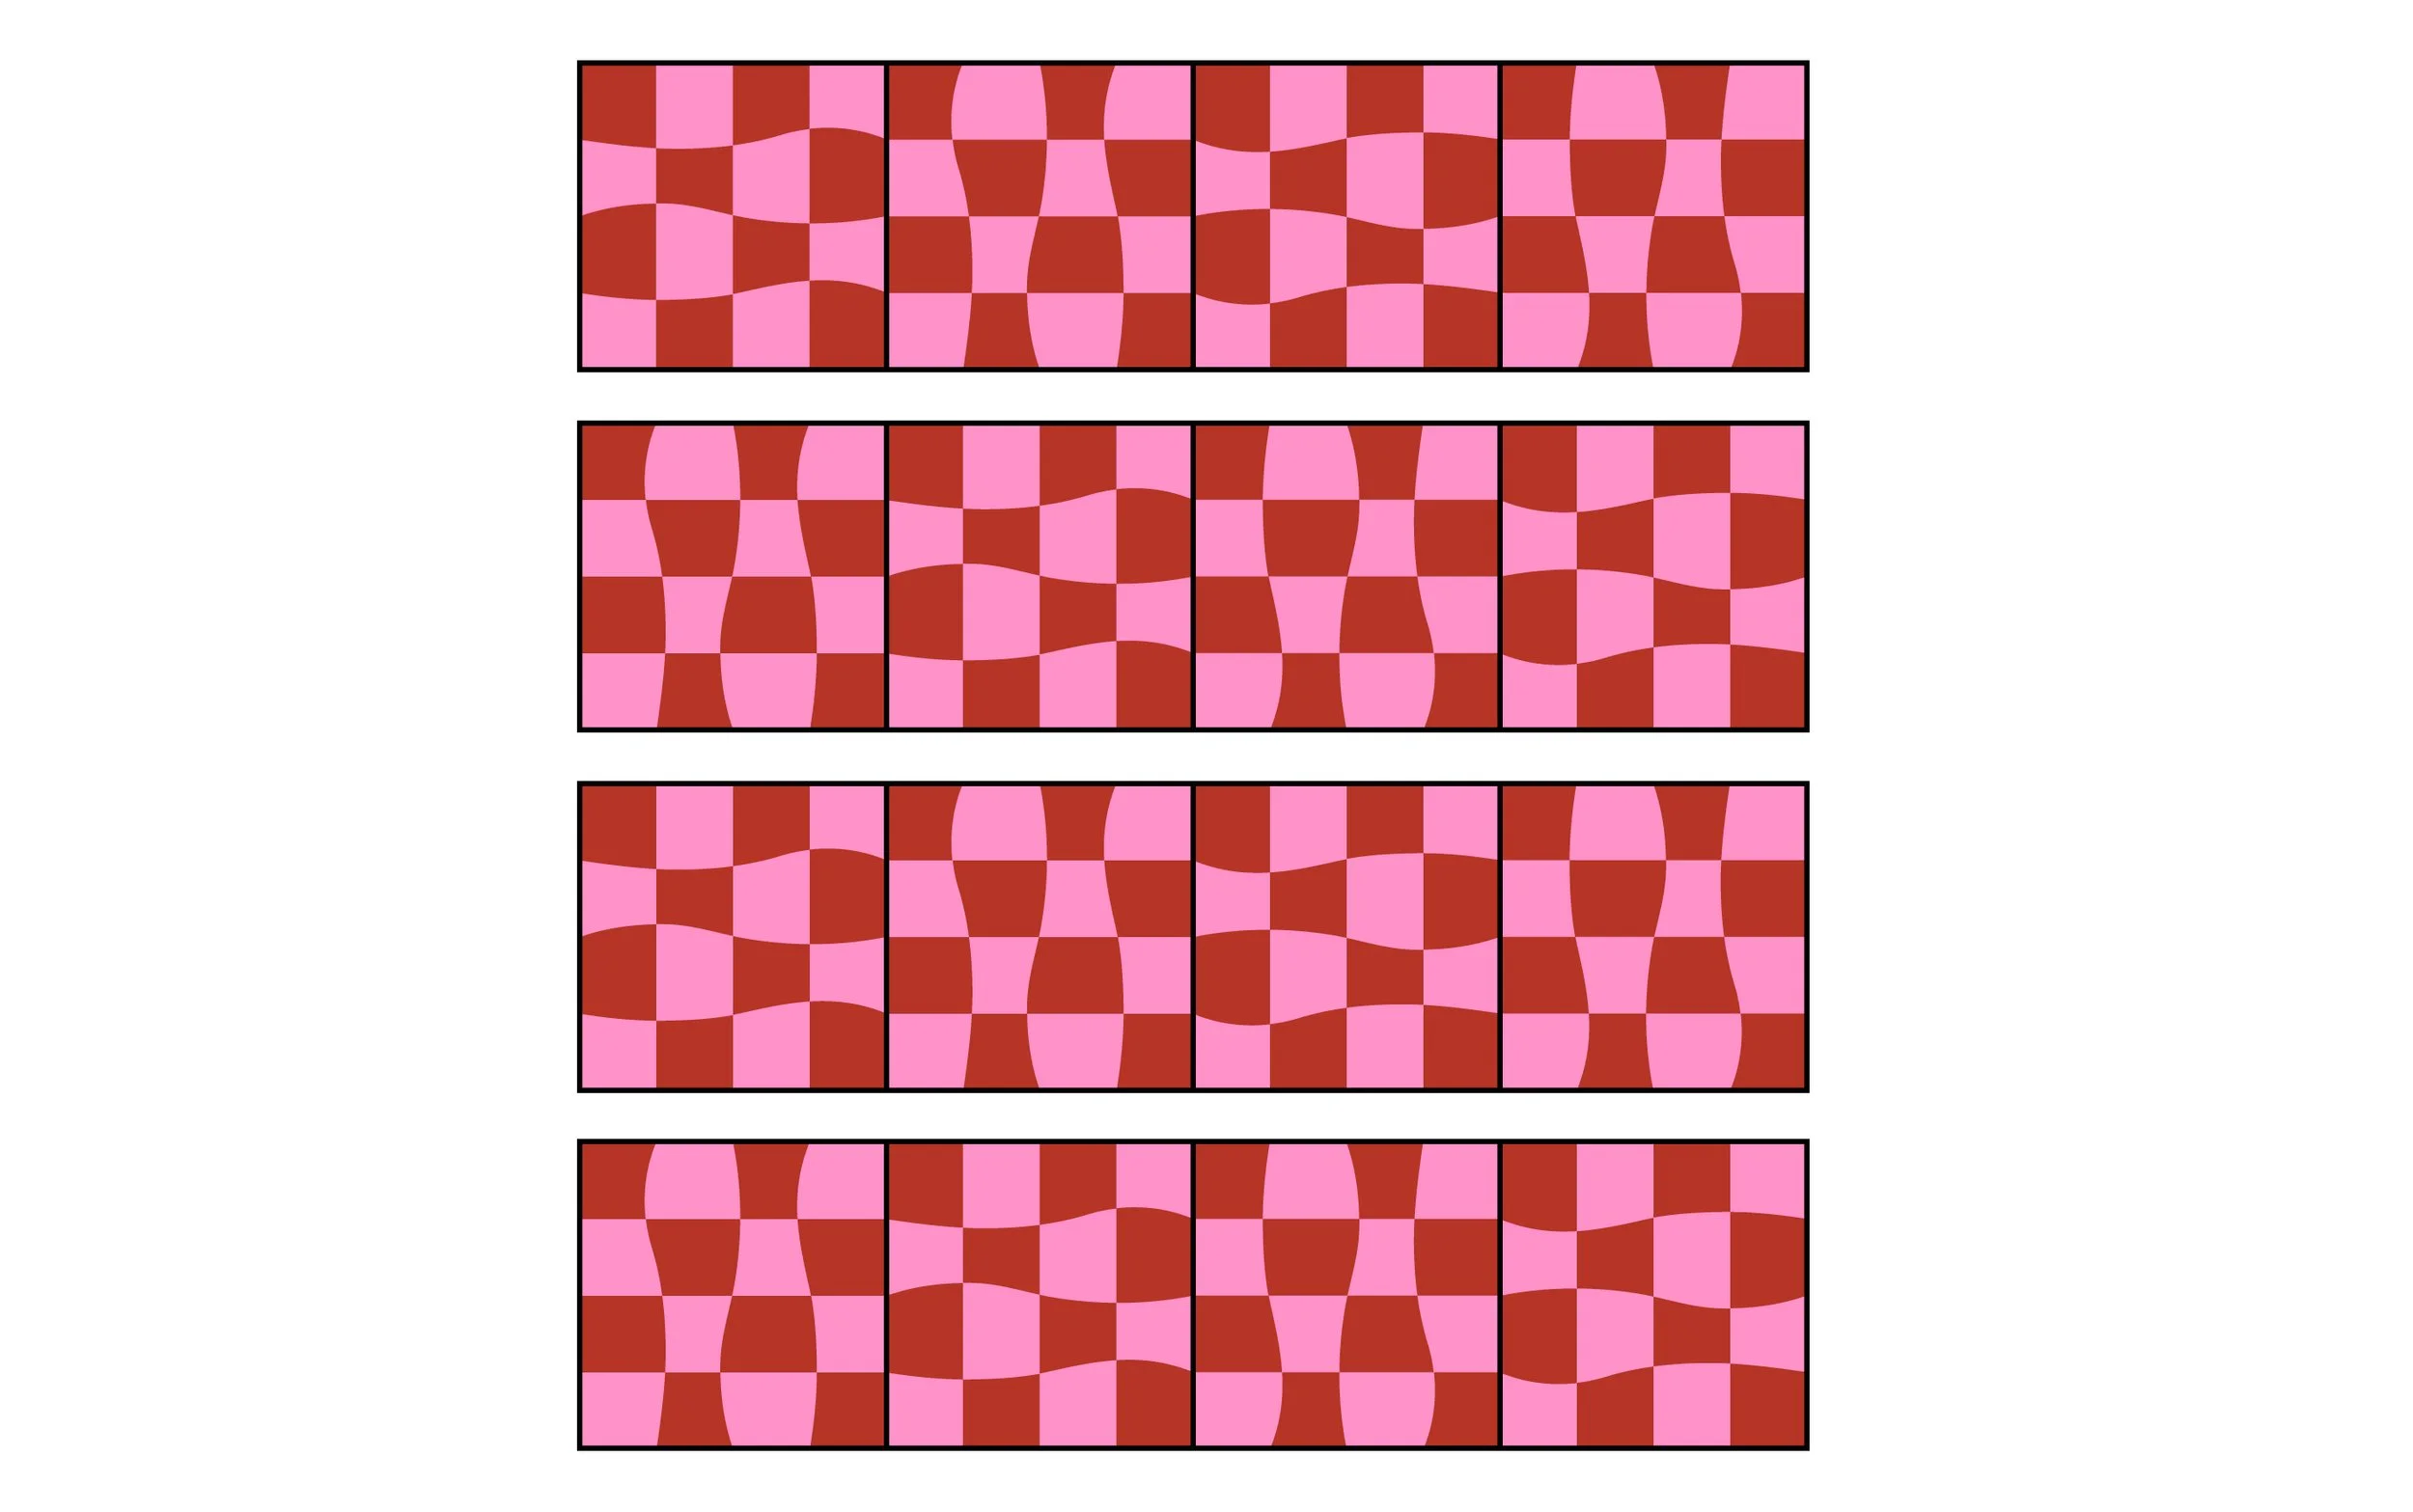
But I’m not done. If you couldn’t tell by now I love chain piecing. It’s another great time saver for assembling the top. Here’s an example of how you would do it for the Baby size (it’s the same idea for all sizes):
Lay out all your blocks. You do need to be sure on A/B/rotation placement before you get started so you put everything in the right spot.
In each row, flip the second block over the first block so that they are right sides together. Sew them together in pairs along the right edge, sewing them all at once in one swoop without cutting the threads in between so that they’re all connected.
Now take the third block in every row and flip it over the second block so they are right sides together. Sew along the right edges of each pair, again without stopping so that they are all connected. It’s easiest to open each Block 1-2 pair as you get to them, and put the third block on top right sides together at your machine. Just make sure you’re adding the new block in the right direction/orientation.
The fourth block in each row gets attached the same way. Flipping not shown this time because I think you get the idea.
Now all your rows are together and you just need to connect them. First, press the row seams as described above. You can leave them all attached for this, it does take a bit of wrangling but your rows won’t get out of order. Or, you can cut the rows apart to press separately, just don’t get them mixed up (not just sequence but which edge gets sewn to which edge). Then connect the rows as described above.
That’s it!
I can’t believe it but we’ve reached the end of the Omega quiltalong! I hope you enjoyed it and that these posts were useful to you. Please share your finished quilt tops on Instagram, whether it’s this week or in four months or in seven years (though share something this week to enter for the last prize), I would love to see them! Thank you so much for joining in!
PRIZE & DISCOUNT INFO
To enter to win the weekly prize, post a photo in your grid on Instagram this week using the hashtag #omegaqal. It can be a photo of your finished top, your current progress, anything Omega related! One winner will be randomly selected from the hashtag to win complimentary edge-to-edge longarm quilting on a finished Omega top (up to Large Throw size or equal credit, does not include backing, batting, binding or shipping) from Wild Phil Quilting, $50 gift card to Pear Tree Market, an exclusively curated 28 FQ bundle from my stash, two sets of Sew Tites magnetic “pins,” and 3 thread glosses from Sew Fine Thread Gloss. Post in your grid, not stories. Your profile must be public for the hashtag picker to see your photo. Open worldwide. You can post to enter multiple times but if you do they must be different photos (no spamming!). Post between 8:00am Mar 6 and 11:55pm Mar 12 (EST) to enter.
FABRIC/SUPPLIES DISCOUNTS
Everyone can get in on these discounts!
Miss Make: Use code LETSMAKEOMEGA for 20% off all Miss Make patterns! Code valid through Mar 13. Aero pattern excluded.
Pear Tree Market: Use code OMEGA10 for 10% off. Valid on website only (not Etsy store).
Sew Fine Thread Gloss: Use code OMEGA25 for 25% off! (Please note checkout shows prices in CAD)
LONGARM QUILTING DISCOUNTS
These discounts are available throughout the whole quiltalong. Dig out those languishing quilt tops and send them away to be finished, and make plans for your future Omega!
Autumn Moon Quilting: Use code OMEGA for 10% off longarm services. Code valid Jan 30 - Mar 5.
Stitch Lab Quilting: 20% off longarm quilting services (batting and binding separate). Use code OmegaQAL23 on booking form. Offer expires June 6, 2023.
Thai Charm LLC: All Omega quilts sent Jan 30 - April 12 will automatically get 25% discount. Participants just need to mention the quiltalong when they fill out the quilting form.
Wild Phil Quilting: 20% off edge to edge longarm quilting services on any Omega top. Use code Omega20 when submitting form. Offer valid through May 5, 2023.

